(!)Due to Microsoft's end of support for Internet Explorer 11 on 15/06/2022, this site does not support the recommended environment.

ideanote
inCAD Library

Please read before use

What is inCAD Library?

  • Helpful application examples for mechanical engineers.

The Concept of inCAD Library

  • Online application library with a range of ideas for all manufacturing industries.
  • Save design time and learn new design applications when you are concepting new machines.

Disclaimer

  • MISUMI may not offer all parts in each application design. Available parts can only be purchased separately not as a unit shown in each application design.
  • MISUMI does not guarantee quality, accuracy, functionality, safety or reliability for the combination of the parts in each application example. Accept these points prior to use.
  • 2014 Copyright MISUMI
  • The data cannot be used for any purposes (including sales promotion) except for designing your machine.
  • All associated CAD is free. Misumi reserves the right at its sole discretion to cancel, terminate or modify this offer.
  • MISUMI may change, add or delete application examples posted without prior notice.
  • MISUMI assumes no responsibilities for any damage incurred resulting from your use of the Service or any change, addition or deletion by MISUMI of the application examples for any reason whatsoever.

inCAD Library Features

  1. Get great new design ideas for these application examples.
  2. Over 300 design application ideas
    collected from dozens of industries!

  3. Find application examples quickly! Search by function, workpiece shape, etc.

  4. Download the CAD models for each application example.
  5. Log in to download free CAD models.
    Download CAD for the entire application example!

Good IDEA! button

Click the Good IDEA! Button when you like an application example!

*Can only be clicked once per application example.

  • Upper right corner on the page of application example details

  • Pop-up dialog for CAD data downloading

Page top

Keyword Search
No. Search
SNS: 

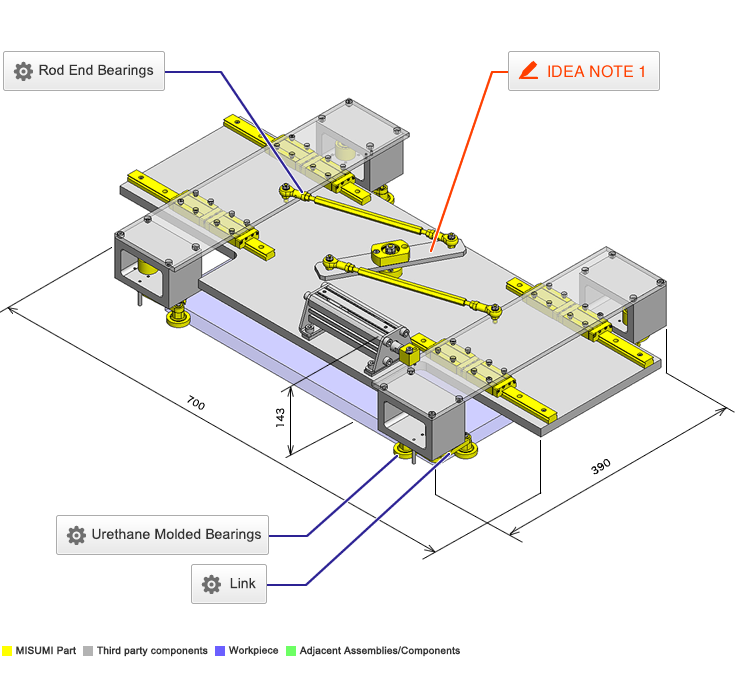
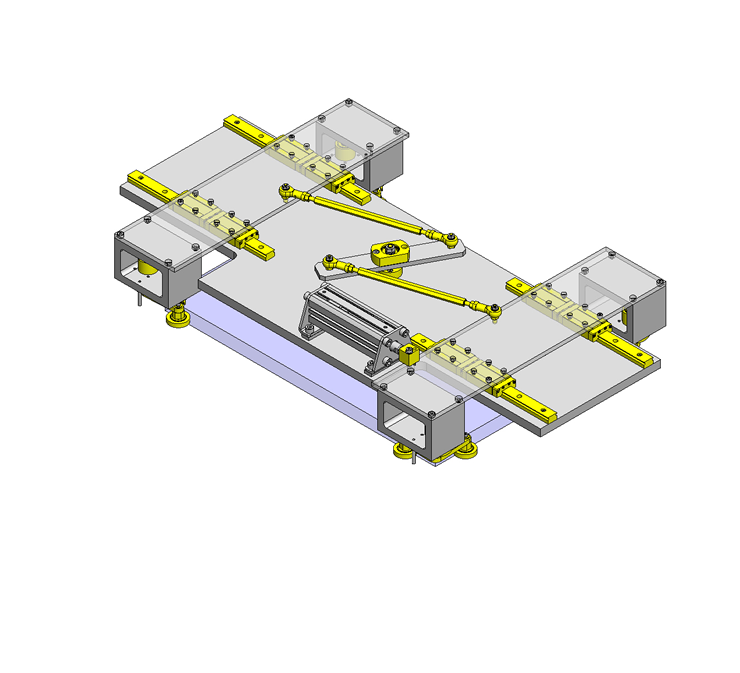
No.000076 Pallet Centering Mechanism

4 direction simultaneous clamping with a cylinder and a linkage mechanism.

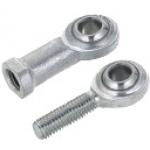
Rod End Bearings

Product name Rod End Bearings - Standard
Part number PHSCM5
* Orange colored cells in the table below indicate the part numbers used in this example.

Selection criteria

Suitable for applying to swinging link mechanism parts.

Back to page top

Available sizes

■Rod End Coupling Rods - Both Ends Threaded

Material Surface Treatment Accessory (Hex Nut)
Material Surface Treatment
1045 Carbon Steel Black Oxide 1045 Carbon Steel Trivalent Chromate
Electroless Nickel Plating
304 Stainless Steel 304 Stainless Steel

■Sizes and Dimensions

Screw Dia.
(Coarse)
Hex Size Overall Length
(1mm Increments)
Thread Length
M3 6 25〜39 8
40〜300 15
M4 7 35〜49 12
50〜400 20
M5 8 40〜59 13
60〜600 25
M6 10 50〜69 17
70〜600 30
M8 13 60〜89 23
90〜1000 40
M10 17 70〜109 28
110〜1000 50
M12 19 80〜129 33
130〜1000 60
M14 21 130〜1000 60
M16 24 170〜1000 80
M18 27 170〜1000 80

Back to page top

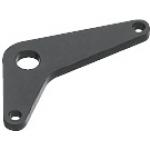
Link

Product name Links - Angled, 3 Hole
Part number LKBM6-L50-S50-Q90-H6-HA6-T6
Features Angled links are available.
* Orange colored cells in the table below indicate the part numbers used in this example.

Selection criteria

Suitable for limiting 2-axis direction with bearings.

Back to page top

Available sizes

■Links - Angled

Material Surface Treatment
1018 Carbon Steel Black Oxide
Electroless Nickel Plating

■Sizes and Dimensions

Main Shaft Bore Dia. Bend Angle Plate Thickness Arm 1 Arm 2
1° Increments Hole Type Hole Dia. (Selectable) Distance
between Fulcrum and Main Shaft
Hole Type Hole Dia. (Selectable) Distance
between Fulcrum and Main Shaft
φ4 90〜180 5

6
Precision Hole

Tapped Hole
φ3
φ4
φ5
φ6
φ8
φ10
φ12
φ16
M3
M4
M5
M6
M8
M10
M12
M16
40〜100
(1mm Increments)
Precision Hole

Tapped Hole
φ3
φ4
φ5
φ6
φ8
φ10
φ12
φ16
M3
M4
M5
M6
M8
M10
M12
M16
30〜100
(1mm Increments)
φ5
φ6
φ8
φ10
φ12
φ14
φ15

* Please see the product pages for detailed dimensions.

Back to page top

Accuracy Info

■Accuracy of Links

Main Shaft Bore Dia. Tolerance: H7

Precision Hole Dia. Tolerance: H7

Back to page top

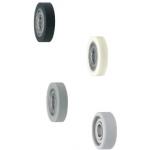
Urethane Molded Bearings

Product name Silicon Rubber / Urethane Molded Bearings - Flat
Part number UMBB6-28
* Orange colored cells in the table below indicate the part numbers used in this example.

Selection criteria

Urethane/Rubber will prevent damage to fixture.

Back to page top

Available sizes

■Urethane Molded Bearings - Flat, Shape A

Tire Section Bearing Material
Material Hardness Color Steel Stainless Steel
(52100 Bearing Steel) (440C Stainless Steel)
Urethane Shore A95 Black
White
Shore A90 Black
White
Shore A70 Black
White
Shore A50 Black
White
Antistatic Urethane Shore A90 Gray

■Sizes and Dimensions

I.D. O.D. Width Bearing Used
φ3 φ10 3 W683ZZA
φ12
φ4 φ13 4 W684AX50ZZ
φ16 5 624ZZ
φ5 φ16 WBC5−13ZZ
φ20 625ZZ
φ6 φ20 696ZZ
φ28 6 626ZZ
φ8 φ28 7 608ZZ
φ30 608ZZ
φ10 φ30 8 6000ZZ
φ40 9 6200ZZ
φ15 φ40 6002ZZ
φ45 11 6202ZZ
φ20 φ45 9 6904ZZ
φ55 14 6204ZZ
φ25 φ65 15 6205ZZ

Back to page top

Performance info.

■Load Capacity of Urethane Molded Bearing - Flat

I.D. O.D. Allowable Load N
Shore A95 Shore A90 Shore A70 Shore A50
φ3 φ10 38 28 9 4
φ12 53 34 10 6
φ4 φ13 66 44 13 7
φ16 79 59 16 6
φ5 φ16 79 16
φ20 102 78 20 9
φ6 φ20 114 23 15
φ28 218 157 44 39
φ8 φ28 208 42 35
φ30 176 81 65
φ10 φ30 94 51
φ40 274 136 93
φ15 φ40 122 96
φ45 343 109 102
φ20 φ45 130 98
φ55 490 225 176
φ25 φ65 750 333 250

Back to page top

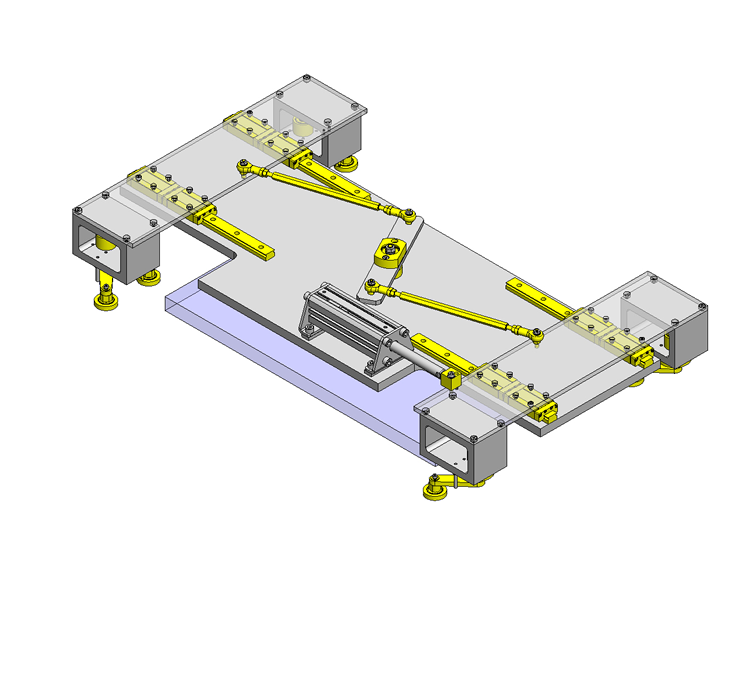
IDEA NOTE Have one cylinder center, locate and evacuate.

Two plates connected together with a linkage mechanism are operated by one cylinder. The plates are moved to the outside and returned to the center. The work piece is centered by the roller of the bell crank type linkage.

  • TERMS AND CONDITIONS FOR USE OF CAD DATA
    Your access to the CAD data that MISUMI Corporation (hereinafter referred to as the Company) posts on this site (including 3D CAD data, intermediate 3D CAD data and 2D CAD data; hereinafter referred to as the Data) are of products manufactured and/or sold by the Company (hereinafter referred to as the Products) assumes that you have read and accepted these terms and conditions which govern your use of the Data. If you do not agree to these terms and conditions, you must stop using this website and the Data. You must not use the Data for any unlawful purpose or in any manner inconsistent with these terms and conditions.
    1. CAD Data
    The Data is prepared for assisting the Company's users in the CAD design process by providing dimensions and other Product information. In order to provide the best speed and stability working within this site, the Product drawings were simplified to reduce the size of the Data. For instance, some of the Products are shown without the oil groove shape, screws or spring shape. Also, please be aware that the tolerance, surface roughness and/or chamfer of the Data may vary from the actual Products.
    2. Disclaimer on Data
    While the Company has carefully prepared the Data, accuracy of the Data is not guaranteed and is subject to the variances as described above. The Company may also modify, add or delete the Data at any time without prior notice. The Company assumes no liability for any direct, indirect, consequential or special damages that you may claim resulted from your use of the Data or any changes to or deletions of the Data regardless of the reason. The Company provides no warranty as to the quality, accuracy, functionality, safety or reliability of the combination of Products and parts. Example applications and combinations of the Products are provided for illustrative purposes only.
    3. Copyright
    Copyrights to the content and the Data belong to the Company or the manufacturers of the Products. The said copyright is protected by the Copyright Act and international treaties. The use (including duplication, modification, uploading, posting, transmission, distribution, licensing, sales and publishing) of the Data except for the purpose to use the Data described above without prior approval of the Company is not allowed. The Data cannot be used for any purposes (including sales promotion) except for designing your machine. If you violate this provision or the laws or regulations, the Company may prohibit you from the use of the Data, the Company’s site and/or take legal action. So long as you comply with these terms and conditions, the Company grants to you a non-exclusive, non-transferable, revocable license to access and use the Data for the sole purpose of assisting you in designing machines that incorporate products.
    In case that the CAD data is found to have been to be used for any purpose other than mentioned above or against the related laws, MISUMI may take legal actions, including the one for blocking the involved user from using CAD data and from accessing to the MISUMI site.
    4. Disclaimer of Warranty
    ANY AND ALL CONTENT APPEARING ON THIS WEB SITE IS PROVIDED FOR INFORMATIONAL PURPOSES ONLY. THIS WEB SITE, ITS CONTENT AND ITS LINKS ARE PROVIDED ON AN "AS IS" AND "AS AVAILABLE" BASIS AND ARE USED ONLY AT YOUR SOLE RISK, TO THE FULLEST EXTENT PERMISSIBLE BY LAW. THE COMPANY DISCLAIMS ALL WARRANTIES, EXPRESS OR IMPLIED, OF ANY KIND, REGARDING THIS WEB SITE (INCLUDING ITS CONTENT, HARDWARE, SOFTWARE AND LINKS), INCLUDING AS TO FITNESS FOR A PARTICULAR PURPOSE, MERCHANTABILITY, TITLE, NON INFRINGEMENT, RESULTS, ACCURACY, COMPLETENESS, ACCESSIBILITY, COMPATIBILITY, SECURITY AND FREEDOM FROM COMPUTER VIRUS. THE COMPANY WILL NOT BE LIABLE FOR ANY DAMAGES OR LOSSES, INCLUDING DIRECT, INDIRECT, CONSEQUENTIAL, SPECIAL, INCIDENTAL OR PUNITIVE DAMAGES AND/OR LOST PROFITS, IN CONNECTION WITH USE OF THE INTERNET, THIS WEB SITE, ITS CONTENT OR ITS LINKS
    Further, the Company will not be liable to you for any failure or delay by the Company to provide access to the Data or any of its obligations under these terms and conditions where such failure or delay is the direct or indirect result of any circumstances beyond the Company's reasonable control (and the Company's obligations will be suspended for the duration of such circumstances).
    5. Policy of Third Parties
    You may be required to separately agree to third party's policies if you use third party software to create or browse the Data or use a third party’s CAD data. In this case, the Company does not assume any responsibility for defects of such CAD data or the software of the third party or violation of their rights. Understand them before use.

    CAD Download (Unit Assembly)

    CAD Download: File Format
    生成

    Thank you for downloading the data.

    Click the Good IDEA! button when you find interesting design tips.


    This data is utilized in order to list more useful application examples in the future.

    CAD Data Limitations

    1. Assembly data shows the assembly drawings in the concept design phase. The sole purpose of the data is to explain the structure and functionality of the assembly and is not considered nor to be used as a final design.
      You will need to edit the Data so that it meets your specific design conditions.
    2. Unit assembly Data consists of some sub-assemblies.
      It is configured so that each sub-assembly unit can be used as it is or edited.
    3. * The part in the frame is a sub-assembly unit.

    4. The Data for fabricated parts is based on easy-to-edit dimensions and shapes in sketches and histories.
    5. The Data including the third-part components are made by the Company.

    Page top

  • * Unit assembly Data consists of some sub-assemblies.
       It is configured so that each sub-assembly unit can be used as it is or edited.

Application Overview

Purpose

  • (Objective) One cylinder clamps in four directions.
  • (Operation) Pallets transferred on a roller conveyor are centered at working position.

Points for use

  • Production line where the pallets are detected by photomicrosensor and stopped on the conveyor.
  • Pallet evacuation mechanism is not needed.

Target workpiece

  • Shape: Pallet
    Size: W450×D300×H20mm
    Weight:5kg

Design Specifications

Operating Conditions or Design Requirements

  • Cylinder stroke: 75mm
  • Clamp stroke: 5mm

Required Performance

  • Conveyor stopping accuracy; ±45/300mm

Selection Criteria for Main Components

  • Set the required linkage operation length (75mm) to be at 60 degrees to the center linkage connecting two sliders.
  • Select a cylinder size according to friction coefficient and weight of the pallet.

Design Evaluation

Verification of main components

  • Compare the process resistance force to the friction between the pallet and the roller conveyor.
    • Here, the friction coefficient between the pallet and the roller conveyor to be 0.2.
    • Required force for motion: Fp=5×0.2×9.8=9.8N of force can slide.
    • From cylinder force chart,
      Thrust of φ25 cylinder pull thrust when operation pressure 0.5 MPa Fs = 189 N
    • Process force withstandable: F = Fs - Fp, so F = 198 - 9.8 = 179.2 N
      Therefore, the externally applied process force must be set to less than 179 N

Other Design Consideration

  • During evacuation, the workpiece needs to stop on the conveyor within the center of four outside rollers.
  • Determine the positions of 8 rollers according to pallet external dimensions.
  • Determine the stroke based on roller evacuation position.
  • Determine clamping force based on pallet weight and process force.

Explore Similar Application Examples

Page - / -

Part List

No. Part Name Sample Picture MISUMI Part Number
For Price and Days to ship click on Part No.
Quantity
1 Linear Guides SSELB16-230 4
2 Rotary Shaft PFXFC8-24-F6-M6 1
3 Bearing W/ Housing BGCA608ZZ 1
4 Rod End Bearings PHSCM5 2
5 Rod End Bearings PHSCLM5 2
6 Rod End Coupling Rods LBRFN5-190 2
7 Rotary Shaft PFXAC5-5-F7-MA4 4
8 Bearing W/Housing BARC626ZZ-35 4
9 Cantilever Pin PFXMB6-10-F35-T1-MA3 4
10 Collars NCLM6-10-23 4
11 Metal Washers WSSM10-3-1 24
12 Links LKBM6-L50-S50-Q90-H6-HA6-T6 4
13 Cantilever Pin PFXMB6-12-F5-T1-MA3 8
14 Urethane Mold Bearings UMBB6-28 8
15 Floating Joints FJMXL6-1.0 1
16 Tension Springs AWS5-40 4
17 Post AIPO3-15 8
  • The part list above only contains MISUMI parts.
    Part list download (CSV) includes MISUMI and third party components used in this example.
  • TERMS AND CONDITIONS FOR USE OF CAD DATA
    Your access to the CAD data that MISUMI Corporation (hereinafter referred to as the Company) posts on this site (including 3D CAD data, intermediate 3D CAD data and 2D CAD data; hereinafter referred to as the Data) are of products manufactured and/or sold by the Company (hereinafter referred to as the Products) assumes that you have read and accepted these terms and conditions which govern your use of the Data. If you do not agree to these terms and conditions, you must stop using this website and the Data. You must not use the Data for any unlawful purpose or in any manner inconsistent with these terms and conditions.
    1. CAD Data
    The Data is prepared for assisting the Company's users in the CAD design process by providing dimensions and other Product information. In order to provide the best speed and stability working within this site, the Product drawings were simplified to reduce the size of the Data. For instance, some of the Products are shown without the oil groove shape, screws or spring shape. Also, please be aware that the tolerance, surface roughness and/or chamfer of the Data may vary from the actual Products.
    2. Disclaimer on Data
    While the Company has carefully prepared the Data, accuracy of the Data is not guaranteed and is subject to the variances as described above. The Company may also modify, add or delete the Data at any time without prior notice. The Company assumes no liability for any direct, indirect, consequential or special damages that you may claim resulted from your use of the Data or any changes to or deletions of the Data regardless of the reason. The Company provides no warranty as to the quality, accuracy, functionality, safety or reliability of the combination of Products and parts. Example applications and combinations of the Products are provided for illustrative purposes only.
    3. Copyright
    Copyrights to the content and the Data belong to the Company or the manufacturers of the Products. The said copyright is protected by the Copyright Act and international treaties. The use (including duplication, modification, uploading, posting, transmission, distribution, licensing, sales and publishing) of the Data except for the purpose to use the Data described above without prior approval of the Company is not allowed. The Data cannot be used for any purposes (including sales promotion) except for designing your machine. If you violate this provision or the laws or regulations, the Company may prohibit you from the use of the Data, the Company’s site and/or take legal action. So long as you comply with these terms and conditions, the Company grants to you a non-exclusive, non-transferable, revocable license to access and use the Data for the sole purpose of assisting you in designing machines that incorporate products.
    In case that the CAD data is found to have been to be used for any purpose other than mentioned above or against the related laws, MISUMI may take legal actions, including the one for blocking the involved user from using CAD data and from accessing to the MISUMI site.
    4. Disclaimer of Warranty
    ANY AND ALL CONTENT APPEARING ON THIS WEB SITE IS PROVIDED FOR INFORMATIONAL PURPOSES ONLY. THIS WEB SITE, ITS CONTENT AND ITS LINKS ARE PROVIDED ON AN "AS IS" AND "AS AVAILABLE" BASIS AND ARE USED ONLY AT YOUR SOLE RISK, TO THE FULLEST EXTENT PERMISSIBLE BY LAW. THE COMPANY DISCLAIMS ALL WARRANTIES, EXPRESS OR IMPLIED, OF ANY KIND, REGARDING THIS WEB SITE (INCLUDING ITS CONTENT, HARDWARE, SOFTWARE AND LINKS), INCLUDING AS TO FITNESS FOR A PARTICULAR PURPOSE, MERCHANTABILITY, TITLE, NON INFRINGEMENT, RESULTS, ACCURACY, COMPLETENESS, ACCESSIBILITY, COMPATIBILITY, SECURITY AND FREEDOM FROM COMPUTER VIRUS. THE COMPANY WILL NOT BE LIABLE FOR ANY DAMAGES OR LOSSES, INCLUDING DIRECT, INDIRECT, CONSEQUENTIAL, SPECIAL, INCIDENTAL OR PUNITIVE DAMAGES AND/OR LOST PROFITS, IN CONNECTION WITH USE OF THE INTERNET, THIS WEB SITE, ITS CONTENT OR ITS LINKS
    Further, the Company will not be liable to you for any failure or delay by the Company to provide access to the Data or any of its obligations under these terms and conditions where such failure or delay is the direct or indirect result of any circumstances beyond the Company's reasonable control (and the Company's obligations will be suspended for the duration of such circumstances).
    5. Policy of Third Parties
    You may be required to separately agree to third party's policies if you use third party software to create or browse the Data or use a third party’s CAD data. In this case, the Company does not assume any responsibility for defects of such CAD data or the software of the third party or violation of their rights. Understand them before use.

    CAD Download (Unit Assembly)

    CAD Download: File Format
    生成

    Thank you for downloading the data.

    Click the Good IDEA! button when you find interesting design tips.


    This data is utilized in order to list more useful application examples in the future.

    CAD Data Limitations

    1. Assembly data shows the assembly drawings in the concept design phase. The sole purpose of the data is to explain the structure and functionality of the assembly and is not considered nor to be used as a final design.
      You will need to edit the Data so that it meets your specific design conditions.
    2. Unit assembly Data consists of some sub-assemblies.
      It is configured so that each sub-assembly unit can be used as it is or edited.
    3. * The part in the frame is a sub-assembly unit.

    4. The Data for fabricated parts is based on easy-to-edit dimensions and shapes in sketches and histories.
    5. The Data including the third-part components are made by the Company.

    Page top

Page top