(!)Due to Microsoft's end of support for Internet Explorer 11 on 15/06/2022, this site does not support the recommended environment.

ideanote
inCAD Library

Please read before use

What is inCAD Library?

  • Helpful application examples for mechanical engineers.

The Concept of inCAD Library

  • Online application library with a range of ideas for all manufacturing industries.
  • Save design time and learn new design applications when you are concepting new machines.

Disclaimer

  • MISUMI may not offer all parts in each application design. Available parts can only be purchased separately not as a unit shown in each application design.
  • MISUMI does not guarantee quality, accuracy, functionality, safety or reliability for the combination of the parts in each application example. Accept these points prior to use.
  • 2014 Copyright MISUMI
  • The data cannot be used for any purposes (including sales promotion) except for designing your machine.
  • All associated CAD is free. Misumi reserves the right at its sole discretion to cancel, terminate or modify this offer.
  • MISUMI may change, add or delete application examples posted without prior notice.
  • MISUMI assumes no responsibilities for any damage incurred resulting from your use of the Service or any change, addition or deletion by MISUMI of the application examples for any reason whatsoever.

inCAD Library Features

  1. Get great new design ideas for these application examples.
  2. Over 300 design application ideas
    collected from dozens of industries!

  3. Find application examples quickly! Search by function, workpiece shape, etc.

  4. Download the CAD models for each application example.
  5. Log in to download free CAD models.
    Download CAD for the entire application example!

Good IDEA! button

Click the Good IDEA! Button when you like an application example!

*Can only be clicked once per application example.

  • Upper right corner on the page of application example details

  • Pop-up dialog for CAD data downloading

Page top

Keyword Search
No. Search
SNS: 

No.000165 Intermittent Rotary Drive by Air Cylinder

Single-direction 90-degree-increment rotary feed with a ratchet mechanism.

Relevant category

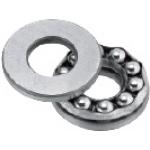
Thrust Ball Bearings

Product name Thrust Ball Bearings
Part number B51105
* Orange colored cells in the table below indicate the part numbers used in this example.

Available sizes

■Thrust Ball Bearings

Name No. Shaft Bore Dia. O.D. Overall thickness
Material:
52100 Bearing Steel
Material:
440C Stainless Steel
Tolerance Tolerance Tolerance
B51100 SB51100 φ10 0/-0.008 φ24 0/-0.013 9 0/-0.075
B51200 - φ26 11
B51101 SB51101 φ12 9
B51201 - φ28 11
B51102 SB51102 φ15 9
B51202 - φ32 0/-0.016 12
B51103 SB51103 φ17 φ30 9
B51203 - φ35 12
B51104 SB51104 φ20 0/-0.010 10
B51204 - φ40 14
B51105 SB51105 φ25 φ42 11
B51205 - φ47 15
B51106 SB51106 φ30 11
B51206 - φ52 0/-0.019 16

* Please see the product pages for recommended dimensions of the mating shaft.

Back to page top

Performance info.

■Load information of the thrust ball bearings

Shaft Bore Dia. O.D. Basic Load Rating (kN) Allowable Rotational Speed
(Reference)
(rpm)
Material: 52100 Bearing Steel Material: 440C Stainless Steel
Ca(Dynamic) Coa((Static) Ca(Dynamic) Coa((Static)
φ10 φ24 10.1 14 5 6.96 6700
φ26 12.8 17.1 - - 6000
φ12 10.4 15.4 5.15 7.7 6700
φ28 13.3 19 - - 5600
φ15 10.6 16.8 5.25 8.38 6300
φ32 16.7 24.8 - - 5000
φ17 φ30 11.4 19.5 5.39 9.07 6000
φ35 17.3 27.3 - - 4800
φ20 15.1 26.6 7.11 12.36 5300
φ40 22.5 37.5 - - 4300
φ25 φ42 19.7 37 9.76 18.63 4800
φ47 28 50.5 - - 3800
φ30 20.6 42 10.2 21.08 4300
φ52 29.5 58 - - 3400

Back to page top

Bearing Nuts / Tooth Lock Washers

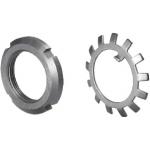
Product name Bearing Lock Nuts - With Tooth Lock Washer
Part number JLNK17
Features Nut and Tooth Lock Washer for Bearing.
* Orange colored cells in the table below indicate the part numbers used in this example.

Available sizes

■Bearing Lock Nuts - With Tooth Lock Washer

Material
Nut Tooth Lock Washers
1018 Carbon Steel Low Carbon Steel
No.10-20, 303 Stainless Steel 304 Stainless Steel
No.25-50, 304 Stainless Steel

■Sizes and Dimensions

Nut Tooth Lock Washers
Screw Dia. X Pitch
(Fine thread)
O.D. Mounting side
O.D.
Thickness O.D. Plate Thickness Number of Teeth
M10×0.75 φ18 φ13 4 φ21 1 9
M12×1.0 φ22 φ17 φ25
M15×1.0 φ25 φ21 5 φ28 13
M17×1.0 φ28 φ24 φ32
M20×1.0 φ32 φ26 6 φ36
M25×1.5 φ38 φ32 7 φ42 1.2
M30×1.5 φ45 φ38 φ49
M35×1.5 φ52 φ44 8 φ57 15
M40×1.5 φ58 φ50 9 φ62
M45×1.5 φ65 φ56 10 φ69 17
M50×1.5 φ70 φ61 11 φ74

Back to page top

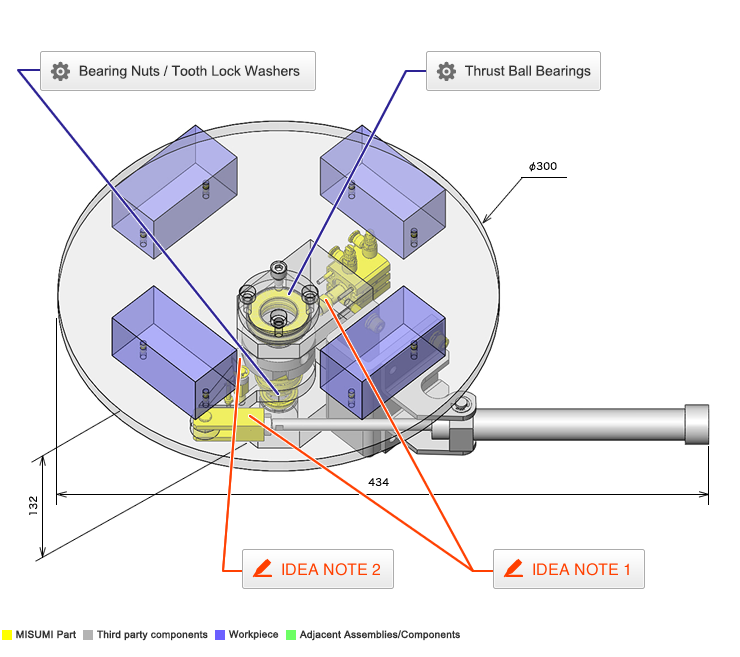
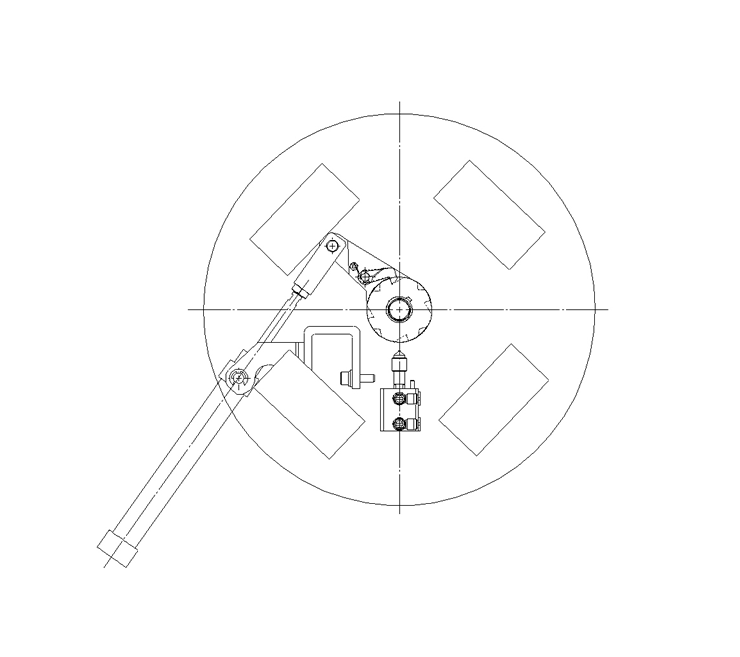
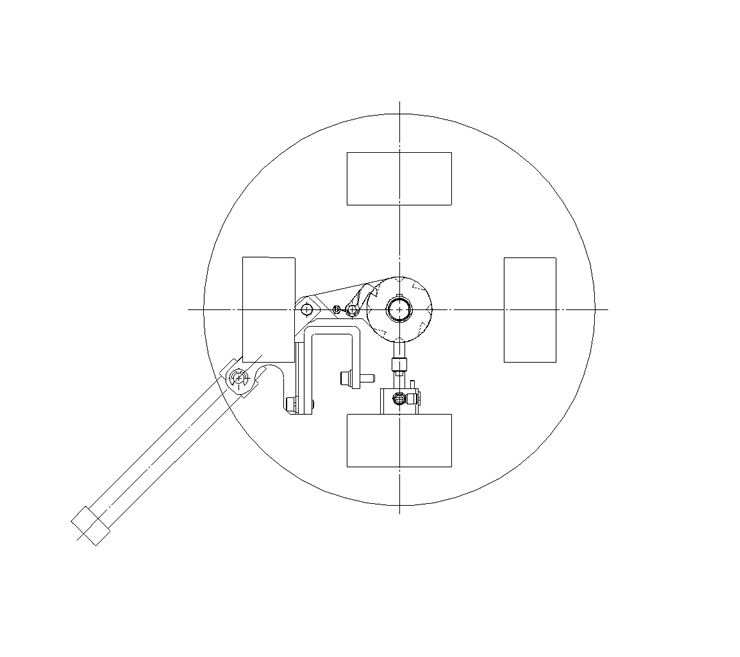
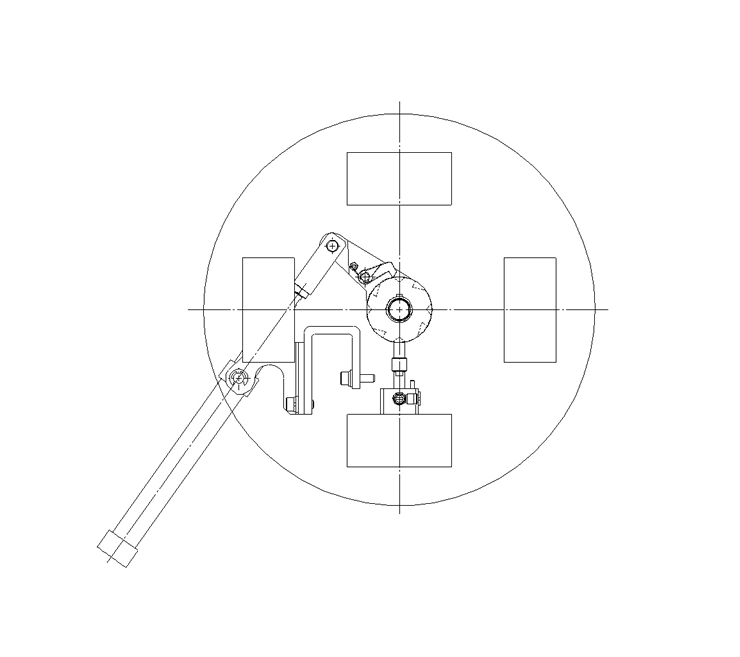
IDEA NOTE Intermittently rotated by air cylinder.

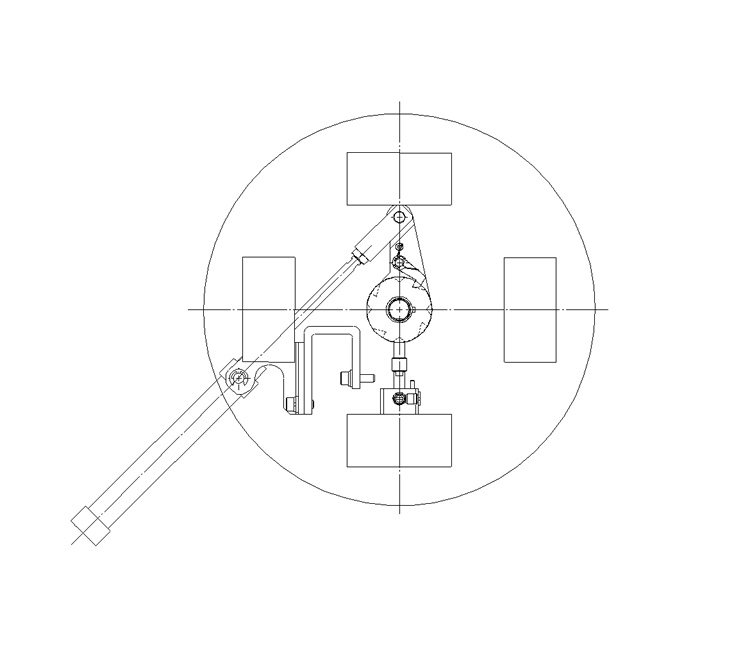
The drive cylinder moves the ratchet which rotates the table the indexed amount. The positioning cylinder also moves to suppress the rotation. Before the next rotation is started the driving cylinder advances and the position cylinder retracts.

IDEA NOTE Rotary table stopping method

A spring engages a claw in the ratchet and presses the claw against the rotating part.

  • TERMS AND CONDITIONS FOR USE OF CAD DATA
    Your access to the CAD data that MISUMI Corporation (hereinafter referred to as the Company) posts on this site (including 3D CAD data, intermediate 3D CAD data and 2D CAD data; hereinafter referred to as the Data) are of products manufactured and/or sold by the Company (hereinafter referred to as the Products) assumes that you have read and accepted these terms and conditions which govern your use of the Data. If you do not agree to these terms and conditions, you must stop using this website and the Data. You must not use the Data for any unlawful purpose or in any manner inconsistent with these terms and conditions.
    1. CAD Data
    The Data is prepared for assisting the Company's users in the CAD design process by providing dimensions and other Product information. In order to provide the best speed and stability working within this site, the Product drawings were simplified to reduce the size of the Data. For instance, some of the Products are shown without the oil groove shape, screws or spring shape. Also, please be aware that the tolerance, surface roughness and/or chamfer of the Data may vary from the actual Products.
    2. Disclaimer on Data
    While the Company has carefully prepared the Data, accuracy of the Data is not guaranteed and is subject to the variances as described above. The Company may also modify, add or delete the Data at any time without prior notice. The Company assumes no liability for any direct, indirect, consequential or special damages that you may claim resulted from your use of the Data or any changes to or deletions of the Data regardless of the reason. The Company provides no warranty as to the quality, accuracy, functionality, safety or reliability of the combination of Products and parts. Example applications and combinations of the Products are provided for illustrative purposes only.
    3. Copyright
    Copyrights to the content and the Data belong to the Company or the manufacturers of the Products. The said copyright is protected by the Copyright Act and international treaties. The use (including duplication, modification, uploading, posting, transmission, distribution, licensing, sales and publishing) of the Data except for the purpose to use the Data described above without prior approval of the Company is not allowed. The Data cannot be used for any purposes (including sales promotion) except for designing your machine. If you violate this provision or the laws or regulations, the Company may prohibit you from the use of the Data, the Company’s site and/or take legal action. So long as you comply with these terms and conditions, the Company grants to you a non-exclusive, non-transferable, revocable license to access and use the Data for the sole purpose of assisting you in designing machines that incorporate products.
    In case that the CAD data is found to have been to be used for any purpose other than mentioned above or against the related laws, MISUMI may take legal actions, including the one for blocking the involved user from using CAD data and from accessing to the MISUMI site.
    4. Disclaimer of Warranty
    ANY AND ALL CONTENT APPEARING ON THIS WEB SITE IS PROVIDED FOR INFORMATIONAL PURPOSES ONLY. THIS WEB SITE, ITS CONTENT AND ITS LINKS ARE PROVIDED ON AN "AS IS" AND "AS AVAILABLE" BASIS AND ARE USED ONLY AT YOUR SOLE RISK, TO THE FULLEST EXTENT PERMISSIBLE BY LAW. THE COMPANY DISCLAIMS ALL WARRANTIES, EXPRESS OR IMPLIED, OF ANY KIND, REGARDING THIS WEB SITE (INCLUDING ITS CONTENT, HARDWARE, SOFTWARE AND LINKS), INCLUDING AS TO FITNESS FOR A PARTICULAR PURPOSE, MERCHANTABILITY, TITLE, NON INFRINGEMENT, RESULTS, ACCURACY, COMPLETENESS, ACCESSIBILITY, COMPATIBILITY, SECURITY AND FREEDOM FROM COMPUTER VIRUS. THE COMPANY WILL NOT BE LIABLE FOR ANY DAMAGES OR LOSSES, INCLUDING DIRECT, INDIRECT, CONSEQUENTIAL, SPECIAL, INCIDENTAL OR PUNITIVE DAMAGES AND/OR LOST PROFITS, IN CONNECTION WITH USE OF THE INTERNET, THIS WEB SITE, ITS CONTENT OR ITS LINKS
    Further, the Company will not be liable to you for any failure or delay by the Company to provide access to the Data or any of its obligations under these terms and conditions where such failure or delay is the direct or indirect result of any circumstances beyond the Company's reasonable control (and the Company's obligations will be suspended for the duration of such circumstances).
    5. Policy of Third Parties
    You may be required to separately agree to third party's policies if you use third party software to create or browse the Data or use a third party’s CAD data. In this case, the Company does not assume any responsibility for defects of such CAD data or the software of the third party or violation of their rights. Understand them before use.

    CAD Download (Unit Assembly)

    CAD Download: File Format
    生成

    Thank you for downloading the data.

    Click the Good IDEA! button when you find interesting design tips.


    This data is utilized in order to list more useful application examples in the future.

    CAD Data Limitations

    1. Assembly data shows the assembly drawings in the concept design phase. The sole purpose of the data is to explain the structure and functionality of the assembly and is not considered nor to be used as a final design.
      You will need to edit the Data so that it meets your specific design conditions.
    2. Unit assembly Data consists of some sub-assemblies.
      It is configured so that each sub-assembly unit can be used as it is or edited.
    3. * The part in the frame is a sub-assembly unit.

    4. The Data for fabricated parts is based on easy-to-edit dimensions and shapes in sketches and histories.
    5. The Data including the third-part components are made by the Company.

    Page top

  • * Unit assembly Data consists of some sub-assemblies.
       It is configured so that each sub-assembly unit can be used as it is or edited.

Application Overview

Purpose

  • Purpose
    • To feed workpieces intermittently by rotating them 90 degrees at a time.
  • Operation
    • After the rotary table is rotated 90 degrees, the thin cylinder advances the stopper pin. When the driving cylinder advances, the rotary table is kept stationary by the ratchet

      A mechanism used to allow movement in only one direction.

      mechanism.

Target workpiece

  • Shape: rectangular electronic part
  • Size: W15 x D40 x H30mm
  • Weight: 0.019kg

Design Specifications

Operating Conditions or Design Requirements

  • Driving cylinder stroke: 100mm
  • Positioning cylinder stroke: 10mm
  • Rotary table rotation angle per cycle:90°
  • Outer dimensions: width: W434 at maximum x height: H132mm
                   Table outer diameter: φ300mm

Required Performance

  • Load: product + pallet = 15N

Selection Criteria for Main Components

  • To rotate a load of 0.024 (0.008 x 3) [N], a cylinder with an inner tube diameter of φ20mm is selected.

Design Evaluation

Verification of main components

  • Must verify the cylinder thrust to ensure the necessary rotation force can be obtained.
  • Selection of driving cylinder
    • Conditional value: workpiece mass: W = 0.55kg, gravitational acceleration g = 9.8m/, friction coefficient μ = 0.0015, instroke pressure area A1 = 264m
      , operating pressure P1 = 0.4MPa
    • The force F1 required for rotation is obtained by F1 = W x g x μ, therefore, F1 = 0.55 x 9.8 x 0.0015 ≈ 0.008N.
      The cylinder thrust (instroke) F2 is, F2 = A1 x P1 = 264 x 0.4  105N > F1.
      ⇒There is no problem.

Explore Similar Application Examples

Page - / -

Part List

No. Part Name Sample Picture MISUMI Part Number
For Price and Days to ship click on Part No.
Quantity
1 Air Cylinders MSCCN16-10 1
2 Ball Bearing B51105 1
3 Ball Bearing FL6903ZZ 2
4 Ball Bearing FL6802ZZ 1
5 Bearing Nut JLNK17 1
6 Shaft Collars SCSJ20-8 1
7 Oil Free Bushings Multi-Layer LF BFLB8-10 1
8 Oil Free Bushings MDZB6-8 1
9 Precision Pivot Pins SHCCG6-16 1
10 Rotary Shaft FXAA6-12-F8 1
11 Torsion Spring UA90R6-2-0.6-LC15-RC20-RBC90-RZ15 1
12 Post BSPO3-25 1
13 Knuckle Joint FNTB8-1.0-D6-B8-U20 1
14 Retaining Rings-External NETW5 2
15 Sensors for Air Cylinders MD13L3 2
16 Flow Rate Control Valves MNSPS4-M5 2
17 Socket Head Cap Screws-with Washer SCBS6-15 4
18 Socket Head Cap Screws-with Washer SCBS6-20 2
19 Dowel Pins MSC3-8 2
  • The part list above only contains MISUMI parts.
    Part list download (CSV) includes MISUMI and third party components used in this example.
  • TERMS AND CONDITIONS FOR USE OF CAD DATA
    Your access to the CAD data that MISUMI Corporation (hereinafter referred to as the Company) posts on this site (including 3D CAD data, intermediate 3D CAD data and 2D CAD data; hereinafter referred to as the Data) are of products manufactured and/or sold by the Company (hereinafter referred to as the Products) assumes that you have read and accepted these terms and conditions which govern your use of the Data. If you do not agree to these terms and conditions, you must stop using this website and the Data. You must not use the Data for any unlawful purpose or in any manner inconsistent with these terms and conditions.
    1. CAD Data
    The Data is prepared for assisting the Company's users in the CAD design process by providing dimensions and other Product information. In order to provide the best speed and stability working within this site, the Product drawings were simplified to reduce the size of the Data. For instance, some of the Products are shown without the oil groove shape, screws or spring shape. Also, please be aware that the tolerance, surface roughness and/or chamfer of the Data may vary from the actual Products.
    2. Disclaimer on Data
    While the Company has carefully prepared the Data, accuracy of the Data is not guaranteed and is subject to the variances as described above. The Company may also modify, add or delete the Data at any time without prior notice. The Company assumes no liability for any direct, indirect, consequential or special damages that you may claim resulted from your use of the Data or any changes to or deletions of the Data regardless of the reason. The Company provides no warranty as to the quality, accuracy, functionality, safety or reliability of the combination of Products and parts. Example applications and combinations of the Products are provided for illustrative purposes only.
    3. Copyright
    Copyrights to the content and the Data belong to the Company or the manufacturers of the Products. The said copyright is protected by the Copyright Act and international treaties. The use (including duplication, modification, uploading, posting, transmission, distribution, licensing, sales and publishing) of the Data except for the purpose to use the Data described above without prior approval of the Company is not allowed. The Data cannot be used for any purposes (including sales promotion) except for designing your machine. If you violate this provision or the laws or regulations, the Company may prohibit you from the use of the Data, the Company’s site and/or take legal action. So long as you comply with these terms and conditions, the Company grants to you a non-exclusive, non-transferable, revocable license to access and use the Data for the sole purpose of assisting you in designing machines that incorporate products.
    In case that the CAD data is found to have been to be used for any purpose other than mentioned above or against the related laws, MISUMI may take legal actions, including the one for blocking the involved user from using CAD data and from accessing to the MISUMI site.
    4. Disclaimer of Warranty
    ANY AND ALL CONTENT APPEARING ON THIS WEB SITE IS PROVIDED FOR INFORMATIONAL PURPOSES ONLY. THIS WEB SITE, ITS CONTENT AND ITS LINKS ARE PROVIDED ON AN "AS IS" AND "AS AVAILABLE" BASIS AND ARE USED ONLY AT YOUR SOLE RISK, TO THE FULLEST EXTENT PERMISSIBLE BY LAW. THE COMPANY DISCLAIMS ALL WARRANTIES, EXPRESS OR IMPLIED, OF ANY KIND, REGARDING THIS WEB SITE (INCLUDING ITS CONTENT, HARDWARE, SOFTWARE AND LINKS), INCLUDING AS TO FITNESS FOR A PARTICULAR PURPOSE, MERCHANTABILITY, TITLE, NON INFRINGEMENT, RESULTS, ACCURACY, COMPLETENESS, ACCESSIBILITY, COMPATIBILITY, SECURITY AND FREEDOM FROM COMPUTER VIRUS. THE COMPANY WILL NOT BE LIABLE FOR ANY DAMAGES OR LOSSES, INCLUDING DIRECT, INDIRECT, CONSEQUENTIAL, SPECIAL, INCIDENTAL OR PUNITIVE DAMAGES AND/OR LOST PROFITS, IN CONNECTION WITH USE OF THE INTERNET, THIS WEB SITE, ITS CONTENT OR ITS LINKS
    Further, the Company will not be liable to you for any failure or delay by the Company to provide access to the Data or any of its obligations under these terms and conditions where such failure or delay is the direct or indirect result of any circumstances beyond the Company's reasonable control (and the Company's obligations will be suspended for the duration of such circumstances).
    5. Policy of Third Parties
    You may be required to separately agree to third party's policies if you use third party software to create or browse the Data or use a third party’s CAD data. In this case, the Company does not assume any responsibility for defects of such CAD data or the software of the third party or violation of their rights. Understand them before use.

    CAD Download (Unit Assembly)

    CAD Download: File Format
    生成

    Thank you for downloading the data.

    Click the Good IDEA! button when you find interesting design tips.


    This data is utilized in order to list more useful application examples in the future.

    CAD Data Limitations

    1. Assembly data shows the assembly drawings in the concept design phase. The sole purpose of the data is to explain the structure and functionality of the assembly and is not considered nor to be used as a final design.
      You will need to edit the Data so that it meets your specific design conditions.
    2. Unit assembly Data consists of some sub-assemblies.
      It is configured so that each sub-assembly unit can be used as it is or edited.
    3. * The part in the frame is a sub-assembly unit.

    4. The Data for fabricated parts is based on easy-to-edit dimensions and shapes in sketches and histories.
    5. The Data including the third-part components are made by the Company.

    Page top

Page top