(!)Due to Microsoft's end of support for Internet Explorer 11 on 15/06/2022, this site does not support the recommended environment.

ideanote
inCAD Library

Please read before use

What is inCAD Library?

  • Helpful application examples for mechanical engineers.

The Concept of inCAD Library

  • Online application library with a range of ideas for all manufacturing industries.
  • Save design time and learn new design applications when you are concepting new machines.

Disclaimer

  • MISUMI may not offer all parts in each application design. Available parts can only be purchased separately not as a unit shown in each application design.
  • MISUMI does not guarantee quality, accuracy, functionality, safety or reliability for the combination of the parts in each application example. Accept these points prior to use.
  • 2014 Copyright MISUMI
  • The data cannot be used for any purposes (including sales promotion) except for designing your machine.
  • All associated CAD is free. Misumi reserves the right at its sole discretion to cancel, terminate or modify this offer.
  • MISUMI may change, add or delete application examples posted without prior notice.
  • MISUMI assumes no responsibilities for any damage incurred resulting from your use of the Service or any change, addition or deletion by MISUMI of the application examples for any reason whatsoever.

inCAD Library Features

  1. Get great new design ideas for these application examples.
  2. Over 300 design application ideas
    collected from dozens of industries!

  3. Find application examples quickly! Search by function, workpiece shape, etc.

  4. Download the CAD models for each application example.
  5. Log in to download free CAD models.
    Download CAD for the entire application example!

Good IDEA! button

Click the Good IDEA! Button when you like an application example!

*Can only be clicked once per application example.

  • Upper right corner on the page of application example details

  • Pop-up dialog for CAD data downloading

Page top

Keyword Search
No. Search
SNS: 

No.000208 Table Lifter

A link driven mechanism

Relevant category

Flanged Linear Bushings

Product name Flanged Linear Bushings - Double Type
Part number LHFRWM16G
Features Easy to assemble with bolt-on flanges. The Opposite Counterbored Hole Type is also available.
* Orange colored cells in the table below indicate the part numbers used in this example.

Selection criteria

Easy to assemble with bolt-on flanges.

Back to page top

Available sizes

■Flanged Linear Bushings - Double Type

Type Outer Cylinder Ball Retainer Operating Ambient Temperature Accessory
Material Hardness Surface Treatment Material Material
Round Flange
Square Flange
Compact Flange
52100 Bearing Steel Equivalent 58HRC- - 52100 Bearing Steel Equivalent Plastic (Duracon M90 equivalent) -20-80℃ Seal: Material
Nitrile Rubber
(-20-120℃)
Stainless Steel (SUS) -20-100℃
Electroless Nickel Plating 440C Stainless Steel
Equivalent
Plastic (Duracon M90 equivalent) -20-80℃
Stainless Steel (SUS) -20-100℃
440C Stainless Steel
Equivalent
56HRC- - Plastic (Duracon M90 equivalent) -20-80℃
Stainless Steel (SUS) -20-100℃

■Sizes and Dimensions

I.D.
(mm)
Length
(mm)
3 19
4 23
5 28
6 35
8 45
10 55
12 57
13 61
16 70
20 80
25 112
30 123
35 135
40 151
50 192

Back to page top

Selection steps

■Linear bushing selection steps

Determine conditions of use.
(Loads, Motion pattern, Life hours).

Temporarily select the specifications of linear bushings.
(Shaft dia. and length are temporarily selected according to the conditions of use.).

Basic safety check.
  • ●Basic Static Load Rating.
  • ●Basic Dynamic Load Rating.
  • ●Allowable Static Moment.
  • ●Operating Life.

Considerations Based on Required Performance.
●Life Variations Due to Temperature Changes.

Back to page top

Accuracy Info

■Accuracy Info. of Flanged Linear Bushings

(mm)

I.D. I.D. Tolerance Height Tolerance from Base Surface
3  0
-0.010
±0.3
4
5
6
8
10
12
13
16
20  0
-0.012
25
30
35  0
-0.015
40
50

Back to page top

Speeds / Loads (Load Info.).

■Speeds / Loads (Load Info.) of Flanged Linear Bushings

I.D.
(mm)
Basic Load Rating
Basic Dynamic Load Rating (N) Basic Static Load Rating (N)
3 138 210
4 176 254
5 263 412
6 324 529
8 431 784
10 588 1100
12 657 1200
13 813 1570
16 1230 2350
20 1400 2740
25 1560 3140
30 2490 5490
35 2650 6270
40 3430 8040
50 6080 15900

Back to page top

Technical calculations

■Life of Flanged Linear Bushings

When the linear system is in motion with applied load, the rolling surfaces and races are subject to repeated stress, This stress can cause scale-like flaking due to material fatigue. The total run distance until the flaking appears in the "Life" of the linear system.

Rated life can be calculated with the basic dynamic load rating and the actual load applied on the linear bushings, as shown below.

  • L: Rated Life (km).
  • fH: Hardness Factor (See Fig.1).
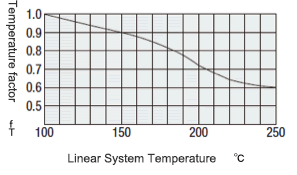
  • fT: Temperature Factor (See Fig.2).
  • fC: Contact Factor (See Table-3).
  • fW: Load Factor (See Table-4).
  • C: Basic Dynamic Load Rating (N).
  • P: Applied Load (N).

●Hardness factor (fH)

For linear applications, the linear shaft must have sufficient hardness. If it does not, the load rating decreases and the life will be reduced.

Fig. 1. Hardness Factor.

●Temperature factor (fT)

When the temperature of the linear system exceeds 100 degrees C, the hardness will decrease and as a result, the allowable load and life will reduced.

Fig. 2. Temperature Factor.

●Contact factor (fC)

In general, it is common to use two or more bushings on one shaft. In these cases, the load on each bushing will vary depending on the machining precision and will not have equally distributed loads. As a result, the allowable load per bushing will vary depending on the number of bushings used on the shafts. Please compensate the rated life with contact factors on Table-1.

Table-3. Contact Factor.

Number of Bearings Installed on One Shaft Contact factor fC
1 1
2 0.81
3 0.72
4 0.66
5 0.61

●Load Factor (fW)

To calculate the load applied to the bushings, in addition to the object weight, the inertia force attributed to the motion velocity, moment loads and the variations of each over time must be obtained. However, for reciprocating motion applications, it is difficult to obtain accurate calculations due to the effects of the vibrations and shocks. Therefor, use Table 2 to simplify the life calculations.

Conditions of Use fw
No shocks
vibrations,low speed: 15 m/min. or less
1.0~1.5
No significant shocks
vibrations,medium speed: 60 m/min. or less
1.5~2.0
With shocks
vibrations, high speed: 60 m/min. or more
2.0~3.5

Life in hours can be obtained by calculating the travel distance per hour. When the stroke length and the number of strokes are constant, it can be calculated using the formula below.

  • Lh: Life (Hr.).
  • L: Rated Life (km).
  • Ls: Stroke length (m).
  • n1: Number of cycles per minute (cpm).

Back to page top

Rod End Bearings

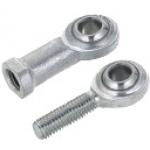
Product name Rod End Bearings - Standard
Part number PHSC8
* Orange colored cells in the table below indicate the part numbers used in this example.

Selection criteria

To make the up/down motion smooth by using it as a part of link mechanism.

Back to page top

Available sizes

■Rod End Bearings - Standard

Type Material
Holder Spherical Inner Ring Bushing (Liner)
Steel 1035 Carbon Steel(Trivalent Chromate) 52100 Bearing Steel(58HRC-) Special Copper Alloy
Oil-Free Bearing I.D. 3/4 (Trivalent Chromate) 52100 Bearing Steel(58HRC-) Self-lubricating Synthetic Resin
Other Than Above 52100 Bearing Steel(58HRC-) Polytetrafluoroethylene Resin
Stainless Steel Oil Free 303 Stainless Steel 440C Stainless Steel(58HRC-) Polytetrafluoroethylene Resin

■Sizes and Dimensions

Bearing I.D. Ball Center - Holder Edge
3 12
4 14
5 16
6 18
8 22
10 26
12 30
14 34
16 38
18 42
20 46
22 50

Back to page top

Accuracy Info

■Accuracy of Rod End Bearings

Bearing I.D. I.D. Tolerance
(H7)
3 +0.009
0
4 +0.012
 0
5
6
8 +0.015
 0
10
12 +0.018
 0
14
16
18
20 +0.021
 0
22

■Allowable Incline

Shaft Step Shape Shaft Condition Allowable Incline Angle α
Large Stepped part of the shaft contacts the outer circumference of the holder. Small (α1)
Medium Stepped part of the shaft contacts the side or the inner circumference of the holder. Medium (α2)
Not Provided Shaft contacts the inner circumference of the holder. Large (α3)
Shaft Bore Dia. (mm) Ball Dia. (mm) α1(°) α2(°) α3(°)
3 - 9.525 - - 8 - 10 - 42 -
4 - 10.319 - - 9 - 11 - 35 -
5 11.112 11.112 11.91 8 8 13 13 30 30 12
6 12.7 12.7 14.29 8 8 13 13 30 30 10
8 15.875 15.875 17.46 8 8 14 14 25 25 12
10 19.05 19.05 20.64 8 8 14 14 25 25 12
12 22.225 22.225 23.81 8 8 13 13 25 25 12
14 25.4 25.4 26.99 10 10 16 16 24 24 14
16 28.575 28.575 28.58 9 9 15 15 24 24 15
18 31.75 31.75 31.75 9 9 15 15 24 24 15
20 34.925 - - 9 - 15 - 24 -
22 38.1 - - 10 - 15 - 23 -

(1) Steel, (2) Oil-free, (3) Stainless Steel Oil-free.

Back to page top

Speeds / Loads (Load Info.)

■Static Load Capacity of Rod End Bearings

Bearing I.D. Static Load Capacity Radial Ca (kN)
Steel Oil-Free Stainless Steel Oil Free
3 - 1.57 -
4 - 2.25 -
5 5.59 3.92 0.98
6 6.86 5 1.44
8 9.8 7.45 2.69
10 13.2 9.41 4.16
12 16.7 11 5.88
14 20.6 15.2 6.61
16 25 20.2 8.33
18 29.4 25.2 11.52
20 34.3 27.8 -
22 41.2 35.9 -

Back to page top

Small Ball Bearings

Product name Small Ball Bearings Double Shielded
Part number B608ZZ
* Orange colored cells in the table below indicate the part numbers used in this example.

Selection criteria

Suitable in limited spaces.

Back to page top

Available sizes

■Small Ball Bearings Double Shielded

Material
52100 Bearing Steel

■Sizes and Dimensions

I.D. O.D. Thickness
2 5 2.3
6 3.0
7 3.5
2.5 6 2.6
7 3.5
3 6 2.5
7 3
8 4
9 5
10 4
13 5
4 7 2.5
9 4
11
12
13 5
16
5 8 2.5
11 5
13 4
14 5
16
19 6
6 10 3
13 5
15
17 6
19
22 7
8 12 3.5
16 5
19 6
22 7
24 8
28 9

Back to page top

Speeds / Loads (Load Info.)

■Speed and Load of Small Ball Bearings (Double Shielded)

I.D. Basic Load Rating Allowable Rotational Speed
O.D. Cr (Dynamic) N Cor (Static) N rpm
2 5 169 50 85000
6 330 98 75000
7 385 127 60000
2.5 6 208 74 71000
7 385 127 63000
3 6 208 74 71000
7 390 130 63000
8 560 179 60000
9 570 187 56000
10 630 218 50000
13 1300 485 40000
4 7 222 88 60000
9 640 224 53000
11 715 276 48000
12 957 350
13 1300 485 40000
16 1340 523 36000
5 8 218 131 53000
11 715 281 45000
13 1080 430 43000
14 1330 505 40000
16 1730 670 36000
19 2336 835 32000
6 10 495 218 45000
13 1080 440 40000
15 1350 530
17 2190 835 38000
19 2340 885 32000
22 3333 1423 30000
8 12 543 274 40000
16 1610 710 36000
19 1990 865
22 3350 1400 34000
24 4000 1590 28000
28 4563 1983

Back to page top

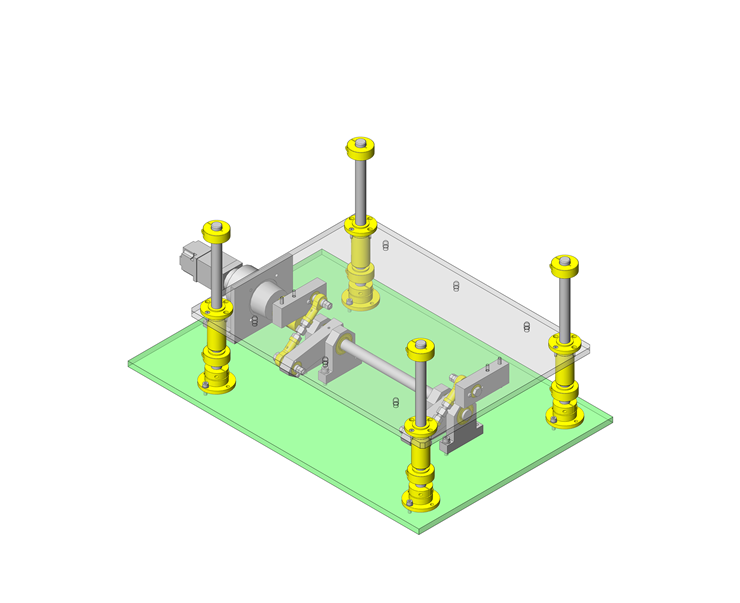
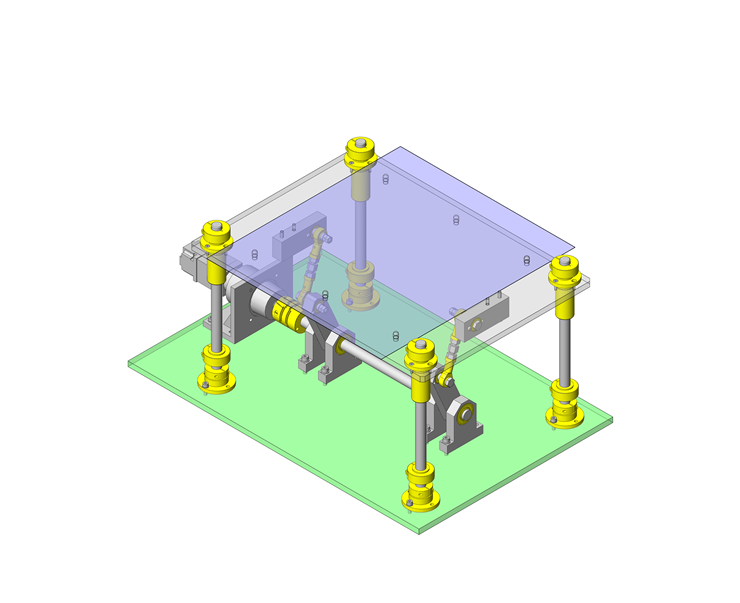
IDEA NOTE Link type lifter

The use of a link mechanism enables the lifter to slow down and stop mechanically at the end of an upstroke without controlling the motor.
A long upstroke is achieved in a limited space under the workpieces.

  • TERMS AND CONDITIONS FOR USE OF CAD DATA
    Your access to the CAD data that MISUMI Corporation (hereinafter referred to as the Company) posts on this site (including 3D CAD data, intermediate 3D CAD data and 2D CAD data; hereinafter referred to as the Data) are of products manufactured and/or sold by the Company (hereinafter referred to as the Products) assumes that you have read and accepted these terms and conditions which govern your use of the Data. If you do not agree to these terms and conditions, you must stop using this website and the Data. You must not use the Data for any unlawful purpose or in any manner inconsistent with these terms and conditions.
    1. CAD Data
    The Data is prepared for assisting the Company's users in the CAD design process by providing dimensions and other Product information. In order to provide the best speed and stability working within this site, the Product drawings were simplified to reduce the size of the Data. For instance, some of the Products are shown without the oil groove shape, screws or spring shape. Also, please be aware that the tolerance, surface roughness and/or chamfer of the Data may vary from the actual Products.
    2. Disclaimer on Data
    While the Company has carefully prepared the Data, accuracy of the Data is not guaranteed and is subject to the variances as described above. The Company may also modify, add or delete the Data at any time without prior notice. The Company assumes no liability for any direct, indirect, consequential or special damages that you may claim resulted from your use of the Data or any changes to or deletions of the Data regardless of the reason. The Company provides no warranty as to the quality, accuracy, functionality, safety or reliability of the combination of Products and parts. Example applications and combinations of the Products are provided for illustrative purposes only.
    3. Copyright
    Copyrights to the content and the Data belong to the Company or the manufacturers of the Products. The said copyright is protected by the Copyright Act and international treaties. The use (including duplication, modification, uploading, posting, transmission, distribution, licensing, sales and publishing) of the Data except for the purpose to use the Data described above without prior approval of the Company is not allowed. The Data cannot be used for any purposes (including sales promotion) except for designing your machine. If you violate this provision or the laws or regulations, the Company may prohibit you from the use of the Data, the Company’s site and/or take legal action. So long as you comply with these terms and conditions, the Company grants to you a non-exclusive, non-transferable, revocable license to access and use the Data for the sole purpose of assisting you in designing machines that incorporate products.
    In case that the CAD data is found to have been to be used for any purpose other than mentioned above or against the related laws, MISUMI may take legal actions, including the one for blocking the involved user from using CAD data and from accessing to the MISUMI site.
    4. Disclaimer of Warranty
    ANY AND ALL CONTENT APPEARING ON THIS WEB SITE IS PROVIDED FOR INFORMATIONAL PURPOSES ONLY. THIS WEB SITE, ITS CONTENT AND ITS LINKS ARE PROVIDED ON AN "AS IS" AND "AS AVAILABLE" BASIS AND ARE USED ONLY AT YOUR SOLE RISK, TO THE FULLEST EXTENT PERMISSIBLE BY LAW. THE COMPANY DISCLAIMS ALL WARRANTIES, EXPRESS OR IMPLIED, OF ANY KIND, REGARDING THIS WEB SITE (INCLUDING ITS CONTENT, HARDWARE, SOFTWARE AND LINKS), INCLUDING AS TO FITNESS FOR A PARTICULAR PURPOSE, MERCHANTABILITY, TITLE, NON INFRINGEMENT, RESULTS, ACCURACY, COMPLETENESS, ACCESSIBILITY, COMPATIBILITY, SECURITY AND FREEDOM FROM COMPUTER VIRUS. THE COMPANY WILL NOT BE LIABLE FOR ANY DAMAGES OR LOSSES, INCLUDING DIRECT, INDIRECT, CONSEQUENTIAL, SPECIAL, INCIDENTAL OR PUNITIVE DAMAGES AND/OR LOST PROFITS, IN CONNECTION WITH USE OF THE INTERNET, THIS WEB SITE, ITS CONTENT OR ITS LINKS
    Further, the Company will not be liable to you for any failure or delay by the Company to provide access to the Data or any of its obligations under these terms and conditions where such failure or delay is the direct or indirect result of any circumstances beyond the Company's reasonable control (and the Company's obligations will be suspended for the duration of such circumstances).
    5. Policy of Third Parties
    You may be required to separately agree to third party's policies if you use third party software to create or browse the Data or use a third party’s CAD data. In this case, the Company does not assume any responsibility for defects of such CAD data or the software of the third party or violation of their rights. Understand them before use.

    CAD Download (Unit Assembly)

    CAD Download: File Format
    生成

    Thank you for downloading the data.

    Click the Good IDEA! button when you find interesting design tips.


    This data is utilized in order to list more useful application examples in the future.

    CAD Data Limitations

    1. Assembly data shows the assembly drawings in the concept design phase. The sole purpose of the data is to explain the structure and functionality of the assembly and is not considered nor to be used as a final design.
      You will need to edit the Data so that it meets your specific design conditions.
    2. Unit assembly Data consists of some sub-assemblies.
      It is configured so that each sub-assembly unit can be used as it is or edited.
    3. * The part in the frame is a sub-assembly unit.

    4. The Data for fabricated parts is based on easy-to-edit dimensions and shapes in sketches and histories.
    5. The Data including the third-part components are made by the Company.

    Page top

  • * Unit assembly Data consists of some sub-assemblies.
       It is configured so that each sub-assembly unit can be used as it is or edited.

Application Overview

Purpose

  • Purpose
    • To lift workpieces and feed them to the next process.
  • Operation
    • The workpieces are fed from the previous process by a robot arm.
      The lifter lifts up and stop at an appropriate height level of the next feeding machine.

Points for use

  • Class 100

    The cleanliness of a clean room is indicated by "how many particles of what size exist in a certain volume. Class 100 means that the number of 0.5 μm-particles existing in 1 ft³ is less than 100.

    Transfer of glass substrates in a clean room that is controlled in accordance with Class 100

    The cleanliness of a clean room is indicated by "how many particles of what size exist in a certain volume. Class 100 means that the number of 0.5 μm-particles existing in 1 ft³ is less than 100.

    requirements.

Target workpiece

  • Shape: Glass substrate
  • Size: t0.5xW350xD360mm

Design Specifications

Operating Conditions or Design Requirements

  • Lifter stroke: 118mm
  • External dimensions: W655xD350xH289mm

Required Performance

  • Load: Workpiece+base=35N

Selection Criteria for Main Components

  • Select a servo motor that can lift the load 35N at a speed of 5mm/s.

Design Evaluation

Verification of main components

  • Select a motor that satisfies the load inertia and load torque.
  • Calculation of the load inertia applied to the motor shaft.
    • Conditions (values): Reducer Inertia JMG=0.041kg・cm2, brake inertia JMB=0.006kg・cm2, coupling inertia JC=0.728kg・cm2, other output shafts inertia JO=5.000kg・cm2, sprocket inertia JZ = 7.658kg・cm2, movable unit inertia JF2 = 0.290kg・cm2, reduction ratio=1/nm=25/484.
    • The load inertia applied to the shaft, JL, is expressed by JL=JMG+JMB+JF2+(JC+JO+JZ)×(1/nm)2 (JL=0.041+0.006+0.290+(0.728+5+7.658)×(25/484)2 =0.373kg・cm2).
    • The inertia ratio, m, is expressed by m=JL/JM (m =0.373/0.078=4.8<17 times (motor specification recommendation value)).
    • Servo motor moment of inertia, JM, is 0.078kg・cm2 (according to the catalog).
  • Torque calculation in lifting and acceleration
    • Conditions (values): Drive efficiency η=0.700, motor rotation speed No=369.748r/min, acceleration time Tsa=0.693s, load torque applied to the motor shaft TL=0.064N・m
    • Torque TMa in lifting and acceleration is expressed by TMa=((((JL/η)+JM)×No)/(9.55×104×Tsa))+TL (TMa=((((0.373/0.7)+0.078)×369.748)/(9.55×104×0.693))+0.064=0.067N・m)
    • The torque reaches its peak in lifting and acceleration. Since the rated torque is Ttyp=0.32N・m, the peak load ratio Rp is expressed by Rp=(Tma/Ttyp)×100 (Rp =(0.067/0.32)×100 =20.94%)
    • When the effective load torque is derived from the torques in each operation pattern, the rated torque becomes 0.064N・m<0.32N・m

Other Design Consideration

  • Motor is mounted below the workpiece unit to avoid dust contamination generated by the motor.

Explore Similar Application Examples

Page - / -

Part List

No. Part Name Sample Picture MISUMI Part Number
For Price and Days to ship click on Part No.
Quantity
1 Couplings MCSLC40-16-RDC17 1
2 Ball Bearing B6003ZZ 4
3 Parallel Keys KES5-20 2
4 Linear Bushings LHFRWM16G 4
5 Retaining Rings STWN17 4
6 Rod End Bearings PHSC8 2
7 Rod End Bearings PHSCL8 2
8 Deep Groove Ball Bearings B608ZZ 8
9 Shaft Supports STHWIR16 4
10 Shaft Collars SSCS16-15 8
11 Metal Washers WSJF25-16-2 8
  • The part list above only contains MISUMI parts.
    Part list download (CSV) includes MISUMI and third party components used in this example.
  • TERMS AND CONDITIONS FOR USE OF CAD DATA
    Your access to the CAD data that MISUMI Corporation (hereinafter referred to as the Company) posts on this site (including 3D CAD data, intermediate 3D CAD data and 2D CAD data; hereinafter referred to as the Data) are of products manufactured and/or sold by the Company (hereinafter referred to as the Products) assumes that you have read and accepted these terms and conditions which govern your use of the Data. If you do not agree to these terms and conditions, you must stop using this website and the Data. You must not use the Data for any unlawful purpose or in any manner inconsistent with these terms and conditions.
    1. CAD Data
    The Data is prepared for assisting the Company's users in the CAD design process by providing dimensions and other Product information. In order to provide the best speed and stability working within this site, the Product drawings were simplified to reduce the size of the Data. For instance, some of the Products are shown without the oil groove shape, screws or spring shape. Also, please be aware that the tolerance, surface roughness and/or chamfer of the Data may vary from the actual Products.
    2. Disclaimer on Data
    While the Company has carefully prepared the Data, accuracy of the Data is not guaranteed and is subject to the variances as described above. The Company may also modify, add or delete the Data at any time without prior notice. The Company assumes no liability for any direct, indirect, consequential or special damages that you may claim resulted from your use of the Data or any changes to or deletions of the Data regardless of the reason. The Company provides no warranty as to the quality, accuracy, functionality, safety or reliability of the combination of Products and parts. Example applications and combinations of the Products are provided for illustrative purposes only.
    3. Copyright
    Copyrights to the content and the Data belong to the Company or the manufacturers of the Products. The said copyright is protected by the Copyright Act and international treaties. The use (including duplication, modification, uploading, posting, transmission, distribution, licensing, sales and publishing) of the Data except for the purpose to use the Data described above without prior approval of the Company is not allowed. The Data cannot be used for any purposes (including sales promotion) except for designing your machine. If you violate this provision or the laws or regulations, the Company may prohibit you from the use of the Data, the Company’s site and/or take legal action. So long as you comply with these terms and conditions, the Company grants to you a non-exclusive, non-transferable, revocable license to access and use the Data for the sole purpose of assisting you in designing machines that incorporate products.
    In case that the CAD data is found to have been to be used for any purpose other than mentioned above or against the related laws, MISUMI may take legal actions, including the one for blocking the involved user from using CAD data and from accessing to the MISUMI site.
    4. Disclaimer of Warranty
    ANY AND ALL CONTENT APPEARING ON THIS WEB SITE IS PROVIDED FOR INFORMATIONAL PURPOSES ONLY. THIS WEB SITE, ITS CONTENT AND ITS LINKS ARE PROVIDED ON AN "AS IS" AND "AS AVAILABLE" BASIS AND ARE USED ONLY AT YOUR SOLE RISK, TO THE FULLEST EXTENT PERMISSIBLE BY LAW. THE COMPANY DISCLAIMS ALL WARRANTIES, EXPRESS OR IMPLIED, OF ANY KIND, REGARDING THIS WEB SITE (INCLUDING ITS CONTENT, HARDWARE, SOFTWARE AND LINKS), INCLUDING AS TO FITNESS FOR A PARTICULAR PURPOSE, MERCHANTABILITY, TITLE, NON INFRINGEMENT, RESULTS, ACCURACY, COMPLETENESS, ACCESSIBILITY, COMPATIBILITY, SECURITY AND FREEDOM FROM COMPUTER VIRUS. THE COMPANY WILL NOT BE LIABLE FOR ANY DAMAGES OR LOSSES, INCLUDING DIRECT, INDIRECT, CONSEQUENTIAL, SPECIAL, INCIDENTAL OR PUNITIVE DAMAGES AND/OR LOST PROFITS, IN CONNECTION WITH USE OF THE INTERNET, THIS WEB SITE, ITS CONTENT OR ITS LINKS
    Further, the Company will not be liable to you for any failure or delay by the Company to provide access to the Data or any of its obligations under these terms and conditions where such failure or delay is the direct or indirect result of any circumstances beyond the Company's reasonable control (and the Company's obligations will be suspended for the duration of such circumstances).
    5. Policy of Third Parties
    You may be required to separately agree to third party's policies if you use third party software to create or browse the Data or use a third party’s CAD data. In this case, the Company does not assume any responsibility for defects of such CAD data or the software of the third party or violation of their rights. Understand them before use.

    CAD Download (Unit Assembly)

    CAD Download: File Format
    生成

    Thank you for downloading the data.

    Click the Good IDEA! button when you find interesting design tips.


    This data is utilized in order to list more useful application examples in the future.

    CAD Data Limitations

    1. Assembly data shows the assembly drawings in the concept design phase. The sole purpose of the data is to explain the structure and functionality of the assembly and is not considered nor to be used as a final design.
      You will need to edit the Data so that it meets your specific design conditions.
    2. Unit assembly Data consists of some sub-assemblies.
      It is configured so that each sub-assembly unit can be used as it is or edited.
    3. * The part in the frame is a sub-assembly unit.

    4. The Data for fabricated parts is based on easy-to-edit dimensions and shapes in sketches and histories.
    5. The Data including the third-part components are made by the Company.

    Page top

Page top