(!)Due to Microsoft's end of support for Internet Explorer 11 on 15/06/2022, this site does not support the recommended environment.

ideanote
inCAD Library

Please read before use

What is inCAD Library?

  • Helpful application examples for mechanical engineers.

The Concept of inCAD Library

  • Online application library with a range of ideas for all manufacturing industries.
  • Save design time and learn new design applications when you are concepting new machines.

Disclaimer

  • MISUMI may not offer all parts in each application design. Available parts can only be purchased separately not as a unit shown in each application design.
  • MISUMI does not guarantee quality, accuracy, functionality, safety or reliability for the combination of the parts in each application example. Accept these points prior to use.
  • 2014 Copyright MISUMI
  • The data cannot be used for any purposes (including sales promotion) except for designing your machine.
  • All associated CAD is free. Misumi reserves the right at its sole discretion to cancel, terminate or modify this offer.
  • MISUMI may change, add or delete application examples posted without prior notice.
  • MISUMI assumes no responsibilities for any damage incurred resulting from your use of the Service or any change, addition or deletion by MISUMI of the application examples for any reason whatsoever.

inCAD Library Features

  1. Get great new design ideas for these application examples.
  2. Over 300 design application ideas
    collected from dozens of industries!

  3. Find application examples quickly! Search by function, workpiece shape, etc.

  4. Download the CAD models for each application example.
  5. Log in to download free CAD models.
    Download CAD for the entire application example!

Good IDEA! button

Click the Good IDEA! Button when you like an application example!

*Can only be clicked once per application example.

  • Upper right corner on the page of application example details

  • Pop-up dialog for CAD data downloading

Page top

Keyword Search
No. Search
SNS: 

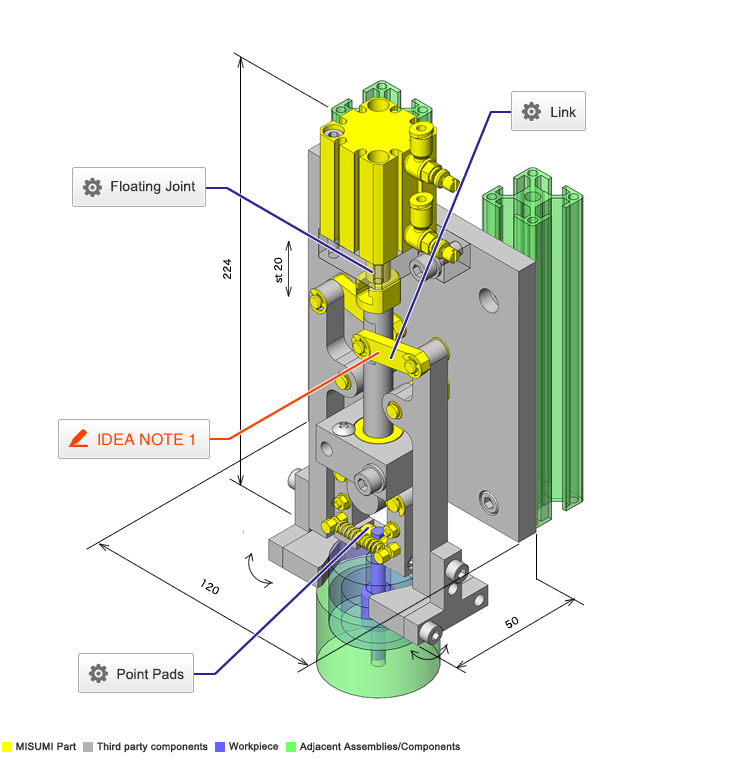
No.000219 Gripper for Multiple Worpieces

Simultaneously grips two workpieces with a single cylinder.

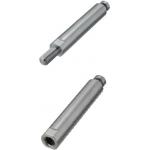
Floating Joint

Product name Tip Connection Joints - Tapped
Part number TCMJF10-10-M5-F6-B4
* Orange colored cells in the table below indicate the part numbers used in this example.

Selection criteria

Appropriate joint for connecting a cylinder and a T-slot joint

Back to page top

Available sizes

■Tip Connection Joints - Tapped

Material Surface Treatment Hardness
1045 Carbon Steel Hard Chrome Plating
Plating Thickness 3 μm or more
750HV-
O1 Tool Steel - 53-58HRC
304 Stainless Steel - -

■Sizes and Dimensions

Shaft Dia. Shaft Length Thread Dia.
3 4 5 6 8 10 12 14 16 20
8 10-100 - - - - - -
10 10-100 - - - - - -
12 15-150 - - - - - -
16 15-150 - - - - - -
20 20-200 - - - - - -
25 25-200 - - - - -

Back to page top

Accuracy Info

■Accuracy of the Floating Joints T-slots, Tip Connection Joints

Shaft Dia. Shaft Dia. Tolerance
(g6)
8 -0.005
-0.014
10 -0.006
-0.017
12
16
20 -0.007
-0.020
25

Back to page top

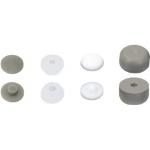
Point Pads

Product name Point Pads - Tapped
Part number PDUPK10
* Orange colored cells in the table below indicate the part numbers used in this example.

Selection criteria

Suitable pad for chucking a workpiece

Back to page top

Available sizes

■Point Pads - Tapped

Material Type
Spherical Hole Type Flat Type Tapped
PEEK -
PTFE Resin - - -
Ultra High-molecular-weight Polyethylene

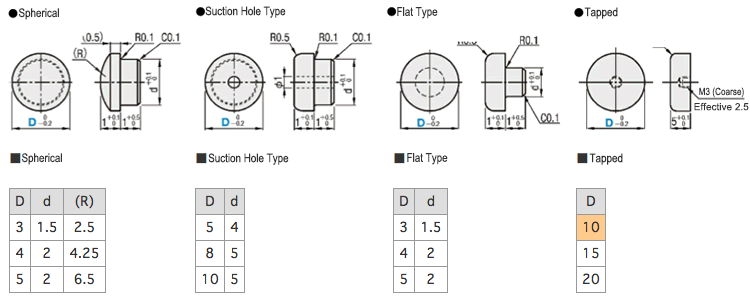
■Point pad dimensions

Back to page top

Link

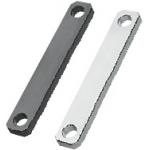
Product name Links - Standard
Part number LNFS5-L30-W10-T5
* Orange colored cells in the table below indicate the part numbers used in this example.

Selection criteria

Selected to turn linear motion into a swinging motion

Back to page top

Available sizes

■Links - Standard

Material Surface Treatment
1045 Carbon Steel Black Oxide
Electroless Nickel Plating
304 Stainless Steel -

■Sizes and Dimensions

Hole Dia. Hole Pitch
(1 mm increments)
Width
(1 mm increments)
Thickness (Selectable)
2 3 5 6 9 10 12 16 19 22
2 10-75 7-12 - - - - - - - -
3 10-150 10-20 - - - - - - - -
4 - - - - - - -
5 - - - - - - -
6 - - - - - - -
8 - - - - - -
10 20-200 15-30 - - - - - -
12 20-30 - - - -
13 - - - -
14 20-40 - - - - - -
15 - - - - - -
16 - - - - - -
18 - - - - - -
20 30-300 25-50 - - - - -
25 30-60 - - - -

Back to page top

Accuracy Info

■Accuracy of the links - standard (width configurable)

Hole Dia. Hole Dia. Tolerance
(H7)
2 +0.009
 0
3
4 +0.012
  0
5
6
8 +0.015
 0
10
12 +0.018
  0
13
14
15
16
18
20 +0.021
  0
25

Back to page top

IDEA NOTE Link Mechanism

The stroke of the cylinder movement is converted by a link perpendicular to the thrust direction for clamping.

  • TERMS AND CONDITIONS FOR USE OF CAD DATA
    Your access to the CAD data that MISUMI Corporation (hereinafter referred to as the Company) posts on this site (including 3D CAD data, intermediate 3D CAD data and 2D CAD data; hereinafter referred to as the Data) are of products manufactured and/or sold by the Company (hereinafter referred to as the Products) assumes that you have read and accepted these terms and conditions which govern your use of the Data. If you do not agree to these terms and conditions, you must stop using this website and the Data. You must not use the Data for any unlawful purpose or in any manner inconsistent with these terms and conditions.
    1. CAD Data
    The Data is prepared for assisting the Company's users in the CAD design process by providing dimensions and other Product information. In order to provide the best speed and stability working within this site, the Product drawings were simplified to reduce the size of the Data. For instance, some of the Products are shown without the oil groove shape, screws or spring shape. Also, please be aware that the tolerance, surface roughness and/or chamfer of the Data may vary from the actual Products.
    2. Disclaimer on Data
    While the Company has carefully prepared the Data, accuracy of the Data is not guaranteed and is subject to the variances as described above. The Company may also modify, add or delete the Data at any time without prior notice. The Company assumes no liability for any direct, indirect, consequential or special damages that you may claim resulted from your use of the Data or any changes to or deletions of the Data regardless of the reason. The Company provides no warranty as to the quality, accuracy, functionality, safety or reliability of the combination of Products and parts. Example applications and combinations of the Products are provided for illustrative purposes only.
    3. Copyright
    Copyrights to the content and the Data belong to the Company or the manufacturers of the Products. The said copyright is protected by the Copyright Act and international treaties. The use (including duplication, modification, uploading, posting, transmission, distribution, licensing, sales and publishing) of the Data except for the purpose to use the Data described above without prior approval of the Company is not allowed. The Data cannot be used for any purposes (including sales promotion) except for designing your machine. If you violate this provision or the laws or regulations, the Company may prohibit you from the use of the Data, the Company’s site and/or take legal action. So long as you comply with these terms and conditions, the Company grants to you a non-exclusive, non-transferable, revocable license to access and use the Data for the sole purpose of assisting you in designing machines that incorporate products.
    In case that the CAD data is found to have been to be used for any purpose other than mentioned above or against the related laws, MISUMI may take legal actions, including the one for blocking the involved user from using CAD data and from accessing to the MISUMI site.
    4. Disclaimer of Warranty
    ANY AND ALL CONTENT APPEARING ON THIS WEB SITE IS PROVIDED FOR INFORMATIONAL PURPOSES ONLY. THIS WEB SITE, ITS CONTENT AND ITS LINKS ARE PROVIDED ON AN "AS IS" AND "AS AVAILABLE" BASIS AND ARE USED ONLY AT YOUR SOLE RISK, TO THE FULLEST EXTENT PERMISSIBLE BY LAW. THE COMPANY DISCLAIMS ALL WARRANTIES, EXPRESS OR IMPLIED, OF ANY KIND, REGARDING THIS WEB SITE (INCLUDING ITS CONTENT, HARDWARE, SOFTWARE AND LINKS), INCLUDING AS TO FITNESS FOR A PARTICULAR PURPOSE, MERCHANTABILITY, TITLE, NON INFRINGEMENT, RESULTS, ACCURACY, COMPLETENESS, ACCESSIBILITY, COMPATIBILITY, SECURITY AND FREEDOM FROM COMPUTER VIRUS. THE COMPANY WILL NOT BE LIABLE FOR ANY DAMAGES OR LOSSES, INCLUDING DIRECT, INDIRECT, CONSEQUENTIAL, SPECIAL, INCIDENTAL OR PUNITIVE DAMAGES AND/OR LOST PROFITS, IN CONNECTION WITH USE OF THE INTERNET, THIS WEB SITE, ITS CONTENT OR ITS LINKS
    Further, the Company will not be liable to you for any failure or delay by the Company to provide access to the Data or any of its obligations under these terms and conditions where such failure or delay is the direct or indirect result of any circumstances beyond the Company's reasonable control (and the Company's obligations will be suspended for the duration of such circumstances).
    5. Policy of Third Parties
    You may be required to separately agree to third party's policies if you use third party software to create or browse the Data or use a third party’s CAD data. In this case, the Company does not assume any responsibility for defects of such CAD data or the software of the third party or violation of their rights. Understand them before use.

    CAD Download (Unit Assembly)

    CAD Download: File Format
    生成

    Thank you for downloading the data.

    Click the Good IDEA! button when you find interesting design tips.


    This data is utilized in order to list more useful application examples in the future.

    CAD Data Limitations

    1. Assembly data shows the assembly drawings in the concept design phase. The sole purpose of the data is to explain the structure and functionality of the assembly and is not considered nor to be used as a final design.
      You will need to edit the Data so that it meets your specific design conditions.
    2. Unit assembly Data consists of some sub-assemblies.
      It is configured so that each sub-assembly unit can be used as it is or edited.
    3. * The part in the frame is a sub-assembly unit.

    4. The Data for fabricated parts is based on easy-to-edit dimensions and shapes in sketches and histories.
    5. The Data including the third-part components are made by the Company.

    Page top

  • * Unit assembly Data consists of some sub-assemblies.
       It is configured so that each sub-assembly unit can be used as it is or edited.

Application Overview

Purpose

  • Purpose
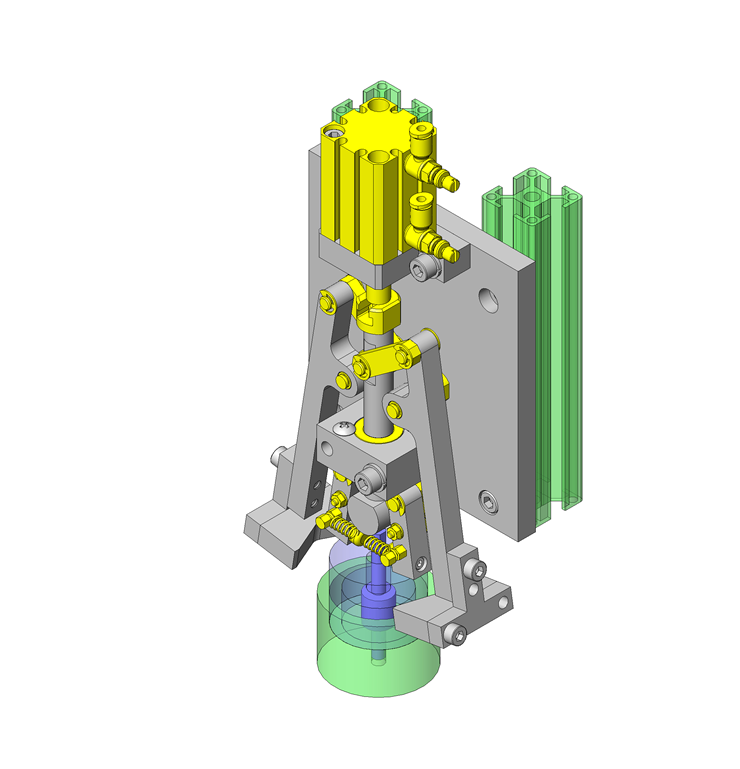
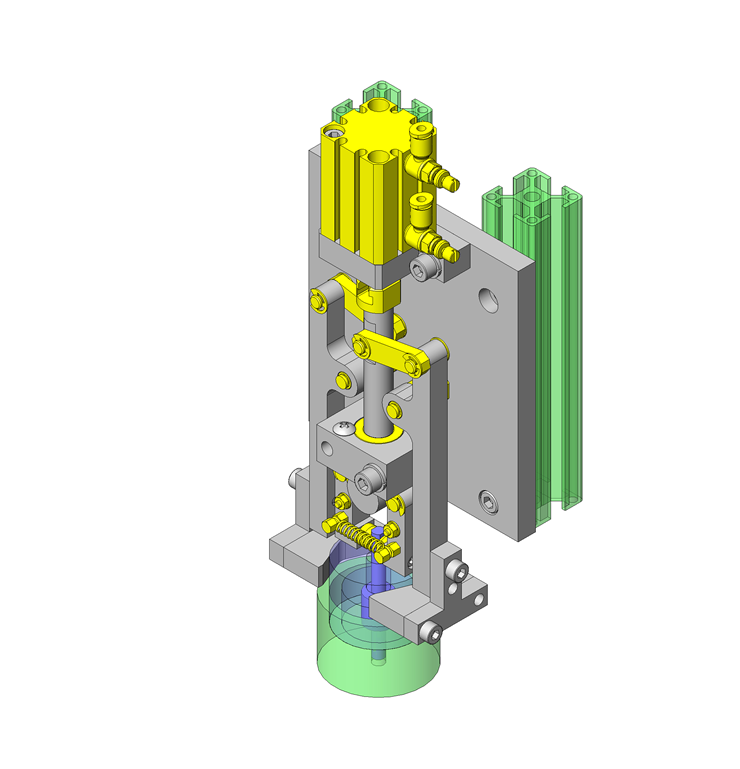
    • To position and temporarily grip workpieces α and β at the same time.
  • Operation
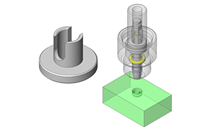
    • When the cylinder makes a pushing movement, the outer chuck connected to the cylinder via a link opens, and the inner chuck connected with a fulcrum opens by a roller at the end of the shaft. When the Cylinder makes a pulling movement, the roller is detached from inner chuck and the workpiece ß is held by spring force and the outer chuck closes to grip workpiece α.

Target workpiece

  • Workpiece α
    • Shape: rotor
    • Size: φ40 x H32mm
    • Weight: 0.30kg
  • Workpiece β
    • Shape: shaft
    • Size: φ6 x H62mm
    • Weight: 0.04kg

Design Specifications

Operating Conditions or Design Requirements

  • Cylinder stroke: 20mm
  • Outer dimensions: D120 x W50 x H224mm

Required Performance

  • Required accuracy: 0.1mm
  • Load on outer chuck: 111.5N
  • Load on inner chuck: 9.41N

Selection Criteria for Main Components

  • A cylinder is selected using a safety factor of 3.
  • As the inner chuck holds a workpiece with a spring force and not cylinder thrust, a spring that can grip workpiece ß is selected.

Design Evaluation

Verification of main components

  • The cylinder thrust and spring force are verified based on the required workpiece chucking force.
  • Confirmation of workpiece gripping force
    • Conditional value: mass of workpiece α M1 = 0.4kg, mass of workpiece β M2 = 0.04kg, gravitational acceleration g = 9.8m/s², cylinder thrust (when pulling, at operating air pressure of 0.4 MPa) F = 118N,
      Installation angle of chuck A link θ = 10°, distance from arm fulcrum to power point of chuck A L1 = 30mm, distance from arm fulcrum to acting point of chuck A L2 = 90mm,
      distance from arm fulcrum to spring of chuck B R1 = 22mm, distance from arm fulcrum to chucking part of chuck B R2 = 29mm, initial tension of tension spring T = 5.1N, spring constant of tension spring k = 1.86N/mm, deflection amount of tension spring during chuck D = 3mm
      Number of arms of chuck A = number of arms of chuck B N = 2 pieces
    • To chuck workpiece α, the pulling force of the cylinder is used.
      The force at the acting point of the link of the chuck A = chucking force of chuck A: Q1 = (F/N)/tanθ x (L1/L2) = (118/2)/tan10 x (30/90) = 334.6 x (30/90) = 111.5N
    • As the weight of workpiece α = W1 = M1 x g = 0.4 x 9.8 = 3.92N, considering the friction coefficient and number of arms, the workpiece gripping force is (Q1 x N)/W1 = (111.5 x 2)/3.92 = 56.9 times. Therefore, the workpiece can be gripped.
    • To chuck workpiece β, the force of tension spring is used.
      Force by tension spring: S = T + k x D = 5.1 + 1.86 x 3 = 10.68N
    • The force at acting point of chuck B link = chucking force of chuck B: Q2 = S x (R1/R2)/N = 10.68 x (22/29)/2 = 4.05N
    • As the weight of workpiece β = W2 = M2 x g = 0.04 x 9.8 = 0.39N, considering the friction coefficient and number of arms, the workpiece gripping force is (Q2 x μ x N)/W2 = (4.05 x 2)/0.39 = 20.7 times. Therefore, the workpiece can be gripped.

Other Design Consideration

  • By using a link mechanism, a chucking force greater than the cylinder thrust is produced.
  • By using a cylinder, the machining cost is reduced.

Explore Similar Application Examples

Page - / -

Part List

No. Part Name Sample Picture MISUMI Part Number
For Price and Days to ship click on Part No.
Quantity
1 Air Cylinders MSCCN20-20 1
2 Oil Free Bushings JZF12-15 1
3 Floating Joints TCMJF10-10-M5-F6-B4 1
4 Floating Joints FJMH5-0.8 1
5 Precision Pivot Pins CDGH6-20 1
6 Precision Pivot Pins CDGH6-15 2
7 Rotary Shaft FXAA6A-15-F10-SET 2
8 Rotary Shaft FXAA6-15-F10-SET 2
9 Oil Free Bushings JZB6-10 2
10 Cantilever Pin SCLBK4-15 2
11 Deep Groove Ball Bearings SB624ZZ 2
12 Collars CLBPS4-7-1 2
13 Spring Anchors DSPO5-10 2
14 Point Pad S PDUPK10 2
15 Tension Springs AWT5-30 1
16 Links LNFS5-L30-W10-T5 2
17 Sensors for Air Cylinders MD13L3 2
18 Flow Rate Control Valves SPSNL4-M5 2
19 Bearing Spacers CLBUB4-7-1 2
  • The part list above only contains MISUMI parts.
    Part list download (CSV) includes MISUMI and third party components used in this example.
  • TERMS AND CONDITIONS FOR USE OF CAD DATA
    Your access to the CAD data that MISUMI Corporation (hereinafter referred to as the Company) posts on this site (including 3D CAD data, intermediate 3D CAD data and 2D CAD data; hereinafter referred to as the Data) are of products manufactured and/or sold by the Company (hereinafter referred to as the Products) assumes that you have read and accepted these terms and conditions which govern your use of the Data. If you do not agree to these terms and conditions, you must stop using this website and the Data. You must not use the Data for any unlawful purpose or in any manner inconsistent with these terms and conditions.
    1. CAD Data
    The Data is prepared for assisting the Company's users in the CAD design process by providing dimensions and other Product information. In order to provide the best speed and stability working within this site, the Product drawings were simplified to reduce the size of the Data. For instance, some of the Products are shown without the oil groove shape, screws or spring shape. Also, please be aware that the tolerance, surface roughness and/or chamfer of the Data may vary from the actual Products.
    2. Disclaimer on Data
    While the Company has carefully prepared the Data, accuracy of the Data is not guaranteed and is subject to the variances as described above. The Company may also modify, add or delete the Data at any time without prior notice. The Company assumes no liability for any direct, indirect, consequential or special damages that you may claim resulted from your use of the Data or any changes to or deletions of the Data regardless of the reason. The Company provides no warranty as to the quality, accuracy, functionality, safety or reliability of the combination of Products and parts. Example applications and combinations of the Products are provided for illustrative purposes only.
    3. Copyright
    Copyrights to the content and the Data belong to the Company or the manufacturers of the Products. The said copyright is protected by the Copyright Act and international treaties. The use (including duplication, modification, uploading, posting, transmission, distribution, licensing, sales and publishing) of the Data except for the purpose to use the Data described above without prior approval of the Company is not allowed. The Data cannot be used for any purposes (including sales promotion) except for designing your machine. If you violate this provision or the laws or regulations, the Company may prohibit you from the use of the Data, the Company’s site and/or take legal action. So long as you comply with these terms and conditions, the Company grants to you a non-exclusive, non-transferable, revocable license to access and use the Data for the sole purpose of assisting you in designing machines that incorporate products.
    In case that the CAD data is found to have been to be used for any purpose other than mentioned above or against the related laws, MISUMI may take legal actions, including the one for blocking the involved user from using CAD data and from accessing to the MISUMI site.
    4. Disclaimer of Warranty
    ANY AND ALL CONTENT APPEARING ON THIS WEB SITE IS PROVIDED FOR INFORMATIONAL PURPOSES ONLY. THIS WEB SITE, ITS CONTENT AND ITS LINKS ARE PROVIDED ON AN "AS IS" AND "AS AVAILABLE" BASIS AND ARE USED ONLY AT YOUR SOLE RISK, TO THE FULLEST EXTENT PERMISSIBLE BY LAW. THE COMPANY DISCLAIMS ALL WARRANTIES, EXPRESS OR IMPLIED, OF ANY KIND, REGARDING THIS WEB SITE (INCLUDING ITS CONTENT, HARDWARE, SOFTWARE AND LINKS), INCLUDING AS TO FITNESS FOR A PARTICULAR PURPOSE, MERCHANTABILITY, TITLE, NON INFRINGEMENT, RESULTS, ACCURACY, COMPLETENESS, ACCESSIBILITY, COMPATIBILITY, SECURITY AND FREEDOM FROM COMPUTER VIRUS. THE COMPANY WILL NOT BE LIABLE FOR ANY DAMAGES OR LOSSES, INCLUDING DIRECT, INDIRECT, CONSEQUENTIAL, SPECIAL, INCIDENTAL OR PUNITIVE DAMAGES AND/OR LOST PROFITS, IN CONNECTION WITH USE OF THE INTERNET, THIS WEB SITE, ITS CONTENT OR ITS LINKS
    Further, the Company will not be liable to you for any failure or delay by the Company to provide access to the Data or any of its obligations under these terms and conditions where such failure or delay is the direct or indirect result of any circumstances beyond the Company's reasonable control (and the Company's obligations will be suspended for the duration of such circumstances).
    5. Policy of Third Parties
    You may be required to separately agree to third party's policies if you use third party software to create or browse the Data or use a third party’s CAD data. In this case, the Company does not assume any responsibility for defects of such CAD data or the software of the third party or violation of their rights. Understand them before use.

    CAD Download (Unit Assembly)

    CAD Download: File Format
    生成

    Thank you for downloading the data.

    Click the Good IDEA! button when you find interesting design tips.


    This data is utilized in order to list more useful application examples in the future.

    CAD Data Limitations

    1. Assembly data shows the assembly drawings in the concept design phase. The sole purpose of the data is to explain the structure and functionality of the assembly and is not considered nor to be used as a final design.
      You will need to edit the Data so that it meets your specific design conditions.
    2. Unit assembly Data consists of some sub-assemblies.
      It is configured so that each sub-assembly unit can be used as it is or edited.
    3. * The part in the frame is a sub-assembly unit.

    4. The Data for fabricated parts is based on easy-to-edit dimensions and shapes in sketches and histories.
    5. The Data including the third-part components are made by the Company.

    Page top

Page top