(!)Due to Microsoft's end of support for Internet Explorer 11 on 15/06/2022, this site does not support the recommended environment.

ideanote
inCAD Library

Please read before use

What is inCAD Library?

  • Helpful application examples for mechanical engineers.

The Concept of inCAD Library

  • Online application library with a range of ideas for all manufacturing industries.
  • Save design time and learn new design applications when you are concepting new machines.

Disclaimer

  • MISUMI may not offer all parts in each application design. Available parts can only be purchased separately not as a unit shown in each application design.
  • MISUMI does not guarantee quality, accuracy, functionality, safety or reliability for the combination of the parts in each application example. Accept these points prior to use.
  • 2014 Copyright MISUMI
  • The data cannot be used for any purposes (including sales promotion) except for designing your machine.
  • All associated CAD is free. Misumi reserves the right at its sole discretion to cancel, terminate or modify this offer.
  • MISUMI may change, add or delete application examples posted without prior notice.
  • MISUMI assumes no responsibilities for any damage incurred resulting from your use of the Service or any change, addition or deletion by MISUMI of the application examples for any reason whatsoever.

inCAD Library Features

  1. Get great new design ideas for these application examples.
  2. Over 300 design application ideas
    collected from dozens of industries!

  3. Find application examples quickly! Search by function, workpiece shape, etc.

  4. Download the CAD models for each application example.
  5. Log in to download free CAD models.
    Download CAD for the entire application example!

Good IDEA! button

Click the Good IDEA! Button when you like an application example!

*Can only be clicked once per application example.

  • Upper right corner on the page of application example details

  • Pop-up dialog for CAD data downloading

Page top

Keyword Search
No. Search
SNS: 

No.000129 Compact Workpiece Transfer

Extrusion Mechanism utilizing a linear guide

Relevant category

Linear Guides for Heavy Load

Product name Linear Guides for Heavy Load, With Resin Retainer, Interchangeable, Light Preload
Part number SXWZ28-400
Features With No Mutual Ball Contacts, Resin Retainer provides Low-Noise and Smooth Movements.
* Orange colored cells in the table below indicate the part numbers used in this example.

Selection criteria

Rail Strength

Back to page top

Available sizes

■Linear Guides for Heavy Load, With Resin Retainer, Interchangeable, Light Preload

Type Number of Blocks Material Hardness
Standard 1・2 Carbon Steel 58HRC〜
Wide Block Through Hole
Wide Block Tapped Hole

■Sizes and Dimensions

Block
Type
Overall Height Rail Length (Configure in 1 mm increments) Block Dimension Rail Width
1 blocks 2 blocks Width Length
1 blocks 2 blocks
Standard 24 100〜1480 160~1480 34 56.8 56.8 x 2 pcs. 15
28 160〜1960 220〜1960 42 65.2 65.2 x 2 pcs. 20
33 160〜1960 220〜1960 48 81.6 81.6 x 2pcs. 23
42 200〜1960 280〜1960 60 96.4 96.4 x 2pcs. 28
Wide
Block
24 100〜1480 160〜1480 52 56.8 56.8 x 2 pcs. 15
28 160〜1960 220〜1960 59 65.2 65.2 x 2 pcs. 20
33 160〜1960 220〜1960 73 81.6 81.6 x 2 pcs. 23
42 200〜1960 280〜1960 90 96.4 96.4 x 2 pcs. 28

Back to page top

Selection Steps

Linear guide selection steps

Determine Application Conditions
(Moving mass, feed rate, motion pattern, life)

Temporarily select linear bushing specifications
(Block type, overall height, rail length are temporarily selected according to the conditions of use.)

Basic safety check
  • Allowable Load
  • Operating Life
  • Preload

Back to page top

Accuracy Info

■Preload and Accuracy Standard (Heavy Load Linear Guide With Plastic Retainers, Interchangeable, Light Preload)

(μm)

Radial Clearance -4~0(H24・28)
-5~0(H33・42)
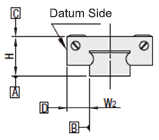
H Dimension Tolerance ±20
Pair variation of H 15
Tolerance of dims. W2 ±30
Pair variation of W2 25

(μm)

Rail Length (mm)
-80 81-125 126-200 201-250 251-315 316-400 401-500 501-630 631-800 801-1000 1001-1250 1251-1600 1601-2000
Running Parallelism 6 6.5 7 8 9 11 12 14 16 18 20 23 26

Back to page top

Performance info.

■Rated Load of Linear Guide (Heavy Load Linear Guide With Plastic Retainers, Interchangeable, Light Preload)

Overall Height Basic Load Rating Allowable Static Moment
C (Dynamic) kN C0 (Static) kN MA
N・m
MB
N・m
Mc
N・m
24 7.9 15.6 74 62 78
28 11.1 21.8 124 104 149
33 17.9 33.5 242 203 266
42 27.3 50.5 415 305 480

Back to page top

Technical Calculations

Operating Life Calculation for Linear Guides

Operating Life
When the linear system is in motion with applied load, the rolling surfaces and races are subject to repeated stress. This stress can cause scale-like flaking due to material fatigue. The total run distance until the flaking appears is the "Life" of the linear system.
Rated Life
Rated life is the total travel distance that 90% of linear guides of the same type can reach, under the same conditions, with no occurrence of flaking damage. Rated life can be calculated with the basic dynamic load rating and the actual load applied on the linear guides, as shown below.
Load must be calculated before actually using linear guides. To obtain loads during linear reciprocating motion, it is necessary to consider vibrations and impacts during motion as well as the distribution load applied to the linear guides.The operating environment temperature also effects the life of these parts. When taking these conditions into consideration, the calculation will be:
  • L: Rated Life (Km)
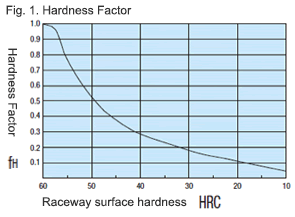
  • fH: Hardness Factor (See Fig.1)
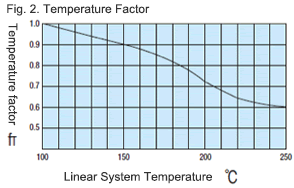
  • fT: Temperature Factor (See Fig.2)
  • fC: Contact Factor (See Table-1)
  • fW: Load Factor (See Table-2)
  • C: Basic Dynamic Load Rating (N)
  • P: Applied Load (N)
Hardness factor (fH)

For linear applications, the rail and ball bearings must have sufficient hardness. If they do not, the load rating decreases and the life will be reduced.

Temperature factor (fT)

When the temperature of the linear system exceeds 100 degrees C, the hardness will decrease and as a result, the allowable load and life will be reduced.
* Please use linear guides within the resistant temperature range on the product pages.

Contact factor (fC)

Table-1. Contact Factor

Number of blocks per rail Contact factor fC

1 1.00
2 0.81
3 0.72
4 0.66
5 0.61

In general, it is common to use two or more blocks on one rail. In these cases, the load on each block will vary depending on the machining precision and will not have equally distributed loads. As a result, the allowable load per block will vary depending on the number of blocks used on the rail.

Load Factor (fW)

Table-2. Load Factor

Condition of Use fw
No shocks / vibrations, low speed: 15 m/min. or less 1.0-1.5
No significant shocks / vibrations, medium speed: 60 m/min. or less 1.5-20
With shocks / vibrations, high speed: 60 m/min. or more 2.0-3.5

To calculate the load applied to the linear guides, in addition to the object weight, the inertia force attributed to the motion velocity, moment loads and the variations of each over time must be obtained. However, for reciprocating motion applications, it is difficult to obtain accurate calculations due to effects of the vibrations and shocks. therefor, use Table 2 to simplify the life calculations.

Applied Load P Calculation Method
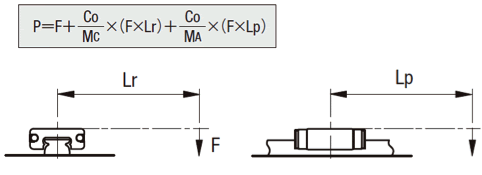
When load is applied to the a block, convert moment load into applied load using the following formula.
  • P: Applied Load (N)
  • F: Downward load (N)
  • C0: Static load rating (N)
  • MA: Allowable Static Moment - Pitching Direction (N·m)
  • MC: Allowable Static Moment - Rolling Direction (N·m)
  • Lp: Load point distance (m) in pitching direction
  • Lr: Load point distance (m) in rolling direction

Back to page top

Floating Joint

Product name Floating Joint - Bracket Mounting Type
Part number FLCL10-1.25
Features Floating Joint can be installed vertically
* Orange colored cells in the table below indicate the part numbers used in this example.

Selection criteria

Bracket mounting type required for this application

Back to page top

Available sizes

■Floating Joint - Bracket Mounting Type

Part Name Material Surface Treatment
Main Body Steel Ball Retainer Plate Nitrile Rubber -
Rod Tip Socket 1018 Carbon Steel Trivalent Chromate
Cap 52100 Bearing Steel
Steel Ball Retainer
Ball Holder
Case Cast Iron Class No. 30
Thread 1018 Carbon Steel
Mounting Part (M8〜M12) Low Carbon Steel
(M14〜M26) Cast Iron Class No. 30 Enamel Paint
(Blue)

■Sizes and Dimensions

Thread Dia. - Pitch Overall Length Main Body Outer Dia. Overall Width Core
Height
Allowable Misalignment
M8−1.0 49.5 φ30 31 16 0.5
M10−1.25 61.5 φ36 43 19 0.75
M12−1.5
M14−1.5 110 φ51 51 26 1
M16−1.5
M18−1.5 120
M22−1.5 145 φ62 62 32 1.5
M26−1.5 173 φ69 69 37

Back to page top

IDEA NOTE The linear block is fixed and rail is in motion.

In order to move a block, a rail needs to be installed in the block's movement range, but the rail cannot be installed due to the restriction imposed by the workpiece on the transfer table. (The height of the device is limited to 380 mm or less, making it impossible to avoid interference using the vertical space.) To counter this restriction,the block is fixed and the rail moves.

  • TERMS AND CONDITIONS FOR USE OF CAD DATA
    Your access to the CAD data that MISUMI Corporation (hereinafter referred to as the Company) posts on this site (including 3D CAD data, intermediate 3D CAD data and 2D CAD data; hereinafter referred to as the Data) are of products manufactured and/or sold by the Company (hereinafter referred to as the Products) assumes that you have read and accepted these terms and conditions which govern your use of the Data. If you do not agree to these terms and conditions, you must stop using this website and the Data. You must not use the Data for any unlawful purpose or in any manner inconsistent with these terms and conditions.
    1. CAD Data
    The Data is prepared for assisting the Company's users in the CAD design process by providing dimensions and other Product information. In order to provide the best speed and stability working within this site, the Product drawings were simplified to reduce the size of the Data. For instance, some of the Products are shown without the oil groove shape, screws or spring shape. Also, please be aware that the tolerance, surface roughness and/or chamfer of the Data may vary from the actual Products.
    2. Disclaimer on Data
    While the Company has carefully prepared the Data, accuracy of the Data is not guaranteed and is subject to the variances as described above. The Company may also modify, add or delete the Data at any time without prior notice. The Company assumes no liability for any direct, indirect, consequential or special damages that you may claim resulted from your use of the Data or any changes to or deletions of the Data regardless of the reason. The Company provides no warranty as to the quality, accuracy, functionality, safety or reliability of the combination of Products and parts. Example applications and combinations of the Products are provided for illustrative purposes only.
    3. Copyright
    Copyrights to the content and the Data belong to the Company or the manufacturers of the Products. The said copyright is protected by the Copyright Act and international treaties. The use (including duplication, modification, uploading, posting, transmission, distribution, licensing, sales and publishing) of the Data except for the purpose to use the Data described above without prior approval of the Company is not allowed. The Data cannot be used for any purposes (including sales promotion) except for designing your machine. If you violate this provision or the laws or regulations, the Company may prohibit you from the use of the Data, the Company’s site and/or take legal action. So long as you comply with these terms and conditions, the Company grants to you a non-exclusive, non-transferable, revocable license to access and use the Data for the sole purpose of assisting you in designing machines that incorporate products.
    In case that the CAD data is found to have been to be used for any purpose other than mentioned above or against the related laws, MISUMI may take legal actions, including the one for blocking the involved user from using CAD data and from accessing to the MISUMI site.
    4. Disclaimer of Warranty
    ANY AND ALL CONTENT APPEARING ON THIS WEB SITE IS PROVIDED FOR INFORMATIONAL PURPOSES ONLY. THIS WEB SITE, ITS CONTENT AND ITS LINKS ARE PROVIDED ON AN "AS IS" AND "AS AVAILABLE" BASIS AND ARE USED ONLY AT YOUR SOLE RISK, TO THE FULLEST EXTENT PERMISSIBLE BY LAW. THE COMPANY DISCLAIMS ALL WARRANTIES, EXPRESS OR IMPLIED, OF ANY KIND, REGARDING THIS WEB SITE (INCLUDING ITS CONTENT, HARDWARE, SOFTWARE AND LINKS), INCLUDING AS TO FITNESS FOR A PARTICULAR PURPOSE, MERCHANTABILITY, TITLE, NON INFRINGEMENT, RESULTS, ACCURACY, COMPLETENESS, ACCESSIBILITY, COMPATIBILITY, SECURITY AND FREEDOM FROM COMPUTER VIRUS. THE COMPANY WILL NOT BE LIABLE FOR ANY DAMAGES OR LOSSES, INCLUDING DIRECT, INDIRECT, CONSEQUENTIAL, SPECIAL, INCIDENTAL OR PUNITIVE DAMAGES AND/OR LOST PROFITS, IN CONNECTION WITH USE OF THE INTERNET, THIS WEB SITE, ITS CONTENT OR ITS LINKS
    Further, the Company will not be liable to you for any failure or delay by the Company to provide access to the Data or any of its obligations under these terms and conditions where such failure or delay is the direct or indirect result of any circumstances beyond the Company's reasonable control (and the Company's obligations will be suspended for the duration of such circumstances).
    5. Policy of Third Parties
    You may be required to separately agree to third party's policies if you use third party software to create or browse the Data or use a third party’s CAD data. In this case, the Company does not assume any responsibility for defects of such CAD data or the software of the third party or violation of their rights. Understand them before use.

    CAD Download (Unit Assembly)

    CAD Download: File Format
    生成

    Thank you for downloading the data.

    Click the Good IDEA! button when you find interesting design tips.


    This data is utilized in order to list more useful application examples in the future.

    CAD Data Limitations

    1. Assembly data shows the assembly drawings in the concept design phase. The sole purpose of the data is to explain the structure and functionality of the assembly and is not considered nor to be used as a final design.
      You will need to edit the Data so that it meets your specific design conditions.
    2. Unit assembly Data consists of some sub-assemblies.
      It is configured so that each sub-assembly unit can be used as it is or edited.
    3. * The part in the frame is a sub-assembly unit.

    4. The Data for fabricated parts is based on easy-to-edit dimensions and shapes in sketches and histories.
    5. The Data including the third-part components are made by the Company.

    Page top

  • * Unit assembly Data consists of some sub-assemblies.
       It is configured so that each sub-assembly unit can be used as it is or edited.

Application Overview

Purpose

  • A design where the linear guide is fixed and the rail moves to help avoid interference. A pusher attached to the end of the rail pushes the workpiece into the transfer box.

Points for use

  • Useful in designs where air cannot be used to power the transfer mechanism.

Target workpiece

  • Resin magazine (resin pallet)
  • Outer dimensions: W67 x H70 x D80 mm
  • Workpiece weight: 170 g x 3 pieces = 510 g

Design Specifications

Operating Conditions or Design Requirements

  • Outer dimensions: W663 x H373 x D164 mm
  • Single axis robot stroke: 300 mm [movable stroke: 229 mm]

Required Performance

  • Workpiece transfer positioning accuracy: ±0.1 mm
  • Required workpiece transfer load capacity: 2.4 kg
  • Workpiece transfer speed: 350 mm/s

Selection Criteria for Main Components

  • Single axis robot
    • A single axis robot that satisfies "maximum load capacity ≥ movable part mass + workpiece weight".
    • A robot that satisfies the transfer speed specification and is reasonably priced.
    • A robot that satisfies the transfer stroke.
  • Linear Guides
    • Linear guides that satisfy the allowable moment.

Design Evaluation

Verification of main components

  • Whether the linear guides withstand the loading moment and whether the robot is suitable for the transfer specifications (load capacity, speed, stroke) are verified.
  • Linear guide allowable moment
    • Linear guide allowable moment: MB = 104 N·m (yawing)
    • Single axis robot maximum push force: f = 150 N
      Distance from rotation center to acting point: I = 0.136 m
      Safety factor: e = 5 times
      Loading moment: M = 150 N x 0.136 = 20.4
      Required allowable moment: MB > M x e = 20.4 x 5 = 102 N·m
      Therefore, linear guides with allowable moment of 104 N·m are selected.
  • Transfer mass: 2.25 kg
    • Linear guide rail: 0.92 kg, slide plate: 0.58 kg, pan: 0.32 kg, claw holder: 0.37 kg, claw: 0.06 kg
  • Workpiece mass: 0.17 kg x 3 pieces = 0.51 kg
    • Friction coefficient: 0.3 (tentative value)
    • Required operation power: workpiece mass x friction coefficient = 0.51 kg x 0.3 = 0.153 kg 
  • Required transferable mass
    • 2.25 kg + 0.153 kg = 2.403 kg < 25 kg (single axis robot maximum load capacity)
  • Required speed
    • 1 cycle: 3 s
      Required speed = (transfer distance x 2) ÷ 3 = 458 mm ÷ 3 s = 153 mm/s
      As acceleration/deceleration time is not considered in this equation,
      Acceleration: 0.1 G = 980 mm/s² (tentative value)
      Setting speed: 350 mm/s < 500 mm/s (single axis robot maximum speed)
      Acceleration time = speed ÷ acceleration = 350 mm/s ÷ 980 mm/s² = 0.33 s
      Moving distance during acceleration/deceleration = acceleration x acceleration time ÷ 2 = 980 mm/s² x 0.33 s ÷ 2 = 53.4 mm
      Moving distance at setting speed = distance per cycle - moving distance per cycle during acceleration/deceleration = 229 mm x 2 - 53.4 mm x 4 = 244.4 mm
      Moving time at setting speed = moving distance at setting speed ÷ setting speed = 244.4 mm ÷ 350 mm/s = 0.77 s
    • 1 cycle = 0.77 s + 0.33 s x 4 = 2.09 s
    • Marginal time: 3 s - 2.09 s = 0.91 s

Other Design Consideration

  • Since linear guide is mounted directly above the workpiece transfer table, a drip pan is installed to catch excess grease.

Explore Similar Application Examples

Page - / -

Part List

No. Part Name Sample Picture MISUMI Part Number
For Price and Days to ship click on Part No.
Quantity
1 Single-Axis Robot RSD2 RSD212-C1-D-3-300-HP 1
2 Linear Guides SXWZ28-400 1
3 Floating Connector FLCL10-1.25 1
4 Dowel Pins MSH4-10 4
5 Socket Head Cap Screws-with Washer CBST5-10 4
6 Socket Head Cap Screws-with Washer CBST5-16 4
7 Socket Head Cap Screws-with Washer CBST6-20 10
  • The part list above only contains MISUMI parts.
    Part list download (CSV) includes MISUMI and third party components used in this example.
  • TERMS AND CONDITIONS FOR USE OF CAD DATA
    Your access to the CAD data that MISUMI Corporation (hereinafter referred to as the Company) posts on this site (including 3D CAD data, intermediate 3D CAD data and 2D CAD data; hereinafter referred to as the Data) are of products manufactured and/or sold by the Company (hereinafter referred to as the Products) assumes that you have read and accepted these terms and conditions which govern your use of the Data. If you do not agree to these terms and conditions, you must stop using this website and the Data. You must not use the Data for any unlawful purpose or in any manner inconsistent with these terms and conditions.
    1. CAD Data
    The Data is prepared for assisting the Company's users in the CAD design process by providing dimensions and other Product information. In order to provide the best speed and stability working within this site, the Product drawings were simplified to reduce the size of the Data. For instance, some of the Products are shown without the oil groove shape, screws or spring shape. Also, please be aware that the tolerance, surface roughness and/or chamfer of the Data may vary from the actual Products.
    2. Disclaimer on Data
    While the Company has carefully prepared the Data, accuracy of the Data is not guaranteed and is subject to the variances as described above. The Company may also modify, add or delete the Data at any time without prior notice. The Company assumes no liability for any direct, indirect, consequential or special damages that you may claim resulted from your use of the Data or any changes to or deletions of the Data regardless of the reason. The Company provides no warranty as to the quality, accuracy, functionality, safety or reliability of the combination of Products and parts. Example applications and combinations of the Products are provided for illustrative purposes only.
    3. Copyright
    Copyrights to the content and the Data belong to the Company or the manufacturers of the Products. The said copyright is protected by the Copyright Act and international treaties. The use (including duplication, modification, uploading, posting, transmission, distribution, licensing, sales and publishing) of the Data except for the purpose to use the Data described above without prior approval of the Company is not allowed. The Data cannot be used for any purposes (including sales promotion) except for designing your machine. If you violate this provision or the laws or regulations, the Company may prohibit you from the use of the Data, the Company’s site and/or take legal action. So long as you comply with these terms and conditions, the Company grants to you a non-exclusive, non-transferable, revocable license to access and use the Data for the sole purpose of assisting you in designing machines that incorporate products.
    In case that the CAD data is found to have been to be used for any purpose other than mentioned above or against the related laws, MISUMI may take legal actions, including the one for blocking the involved user from using CAD data and from accessing to the MISUMI site.
    4. Disclaimer of Warranty
    ANY AND ALL CONTENT APPEARING ON THIS WEB SITE IS PROVIDED FOR INFORMATIONAL PURPOSES ONLY. THIS WEB SITE, ITS CONTENT AND ITS LINKS ARE PROVIDED ON AN "AS IS" AND "AS AVAILABLE" BASIS AND ARE USED ONLY AT YOUR SOLE RISK, TO THE FULLEST EXTENT PERMISSIBLE BY LAW. THE COMPANY DISCLAIMS ALL WARRANTIES, EXPRESS OR IMPLIED, OF ANY KIND, REGARDING THIS WEB SITE (INCLUDING ITS CONTENT, HARDWARE, SOFTWARE AND LINKS), INCLUDING AS TO FITNESS FOR A PARTICULAR PURPOSE, MERCHANTABILITY, TITLE, NON INFRINGEMENT, RESULTS, ACCURACY, COMPLETENESS, ACCESSIBILITY, COMPATIBILITY, SECURITY AND FREEDOM FROM COMPUTER VIRUS. THE COMPANY WILL NOT BE LIABLE FOR ANY DAMAGES OR LOSSES, INCLUDING DIRECT, INDIRECT, CONSEQUENTIAL, SPECIAL, INCIDENTAL OR PUNITIVE DAMAGES AND/OR LOST PROFITS, IN CONNECTION WITH USE OF THE INTERNET, THIS WEB SITE, ITS CONTENT OR ITS LINKS
    Further, the Company will not be liable to you for any failure or delay by the Company to provide access to the Data or any of its obligations under these terms and conditions where such failure or delay is the direct or indirect result of any circumstances beyond the Company's reasonable control (and the Company's obligations will be suspended for the duration of such circumstances).
    5. Policy of Third Parties
    You may be required to separately agree to third party's policies if you use third party software to create or browse the Data or use a third party’s CAD data. In this case, the Company does not assume any responsibility for defects of such CAD data or the software of the third party or violation of their rights. Understand them before use.

    CAD Download (Unit Assembly)

    CAD Download: File Format
    生成

    Thank you for downloading the data.

    Click the Good IDEA! button when you find interesting design tips.


    This data is utilized in order to list more useful application examples in the future.

    CAD Data Limitations

    1. Assembly data shows the assembly drawings in the concept design phase. The sole purpose of the data is to explain the structure and functionality of the assembly and is not considered nor to be used as a final design.
      You will need to edit the Data so that it meets your specific design conditions.
    2. Unit assembly Data consists of some sub-assemblies.
      It is configured so that each sub-assembly unit can be used as it is or edited.
    3. * The part in the frame is a sub-assembly unit.

    4. The Data for fabricated parts is based on easy-to-edit dimensions and shapes in sketches and histories.
    5. The Data including the third-part components are made by the Company.

    Page top

Page top