(!)Due to Microsoft's end of support for Internet Explorer 11 on 15/06/2022, this site does not support the recommended environment.

ideanote
inCAD Library

Please read before use

What is inCAD Library?

  • Helpful application examples for mechanical engineers.

The Concept of inCAD Library

  • Online application library with a range of ideas for all manufacturing industries.
  • Save design time and learn new design applications when you are concepting new machines.

Disclaimer

  • MISUMI may not offer all parts in each application design. Available parts can only be purchased separately not as a unit shown in each application design.
  • MISUMI does not guarantee quality, accuracy, functionality, safety or reliability for the combination of the parts in each application example. Accept these points prior to use.
  • 2014 Copyright MISUMI
  • The data cannot be used for any purposes (including sales promotion) except for designing your machine.
  • All associated CAD is free. Misumi reserves the right at its sole discretion to cancel, terminate or modify this offer.
  • MISUMI may change, add or delete application examples posted without prior notice.
  • MISUMI assumes no responsibilities for any damage incurred resulting from your use of the Service or any change, addition or deletion by MISUMI of the application examples for any reason whatsoever.

inCAD Library Features

  1. Get great new design ideas for these application examples.
  2. Over 300 design application ideas
    collected from dozens of industries!

  3. Find application examples quickly! Search by function, workpiece shape, etc.

  4. Download the CAD models for each application example.
  5. Log in to download free CAD models.
    Download CAD for the entire application example!

Good IDEA! button

Click the Good IDEA! Button when you like an application example!

*Can only be clicked once per application example.

  • Upper right corner on the page of application example details

  • Pop-up dialog for CAD data downloading

Page top

Keyword Search
No. Search
SNS: 

No.000032 Pick and Place Mechanism with Ball Spline

Compact design utilizing ball spline

Relevant category

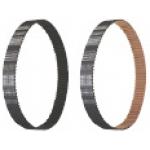
Timing Belt

Product name Timing Belts - MXL / XL / L / H
Part number TUN165L050
Features General purpose timing belts for transmission. Although some tooth fabrics for MXL and XL rubber belts are changed to comply with the bear-back specifications, it does not affect the performance.
* Orange colored cells in the table below indicate the part numbers used in this example.

Selection criteria

Transmit torque from driving to driven pulley.

Back to page top

Risk info.

A pulley layout enabling replacements

Back to page top

Available sizes

■Timing Belts - MXL / XL / L / H

Material MXL XL L H
Tooth surface cover Tooth rubber Core wire
Nylon canvas Chloroprene
Rubber
Glass fiber cord
S/Z Alternately Twisted Continuous
Polyurethane Polyurethane MXL: Kevlar
XL・L: Steel cord

■Reference dimensions

Belt type Pitch Belt width Belt length reference
MXL 2.032 4.8, 6.4, 9.5, 12.7 100-1100
XL 5.08 6.4, 7.9, 9.5, 12.7 200-2100
L 9.525 12.7, 19.1, 25.4, 38.1 300-1800
H 12.7 19.1, 25.4, 38.1, 50.8 600-4300

Back to page top

Selection steps

■Timing belt selection procedure

* Timing belt selection is made together with timing pulley

Automated selection tool is available to use.

http://fawos.misumi.jp/FA_WEB/pulley_us/

Determining of usage conditions
Designed power・Rotational speed・Interim shaft distance・motion pattern, etc.

Belt (pulley) interim selection
Belt type·Belt width

Verifying specification compatibility
  • Verifying calculated shaft distance, etc.
  • Verifying tension and load

Performance info.

■Load info. of timing belt

Belt type Small pulley rotational speed(rpm) Designed power(kW)
MXL、XL、L、H、T5、T10 10-20000 0.01-800

Back to page top

Technical calculations

■Technical calculations

Back to page top

Timing Pulley

Product name Timing Pulleys L Type
Part number ATPA19L050-A-N30
Features New! METRIC/ INCH Bores Available!
* Orange colored cells in the table below indicate the part numbers used in this example.

Selection criteria

Transfer rotary motion. Aluminum type selected for weight reduction purposes.

Back to page top

Risk info.

Accuracy degradation due to wear over time.

Back to page top

Available sizes

■Timing Pulleys L Type

Material Surface treatment Tooth type/Belt width
MXL XL L H
Pulley Flange 4.8 6.4 9.5 12.7 6.4 7.9 9.5 12.7 12.7 19.1 25.4 38.1 19.1 25.4 38.1 50.8
MXL、XL:
2017 Aluminum Alloy

L、H:
7075 Aluminum Alloy
5052 Aluminum Alloy Clear anodize
Black anodize
Hard anodize
Electroless
nickel plating
1045 Carbon Steel Low Carbon Steel
Black
oxide
Electroless
nickel plating
304 Stainless Steel 304 Stainless Steel -

■Pulley number of teeth and shaft bore DIA.

Belt type Shape Number of teeth Pitch circle DIA. Shaft bore DIA.
MXL K, A, B 14-72 φ9.6-46.57 φ3-35
XL A, B 10-72 φ16.17-116.43 φ4-80
L A, B, D 10-72 φ30.32-218.30 φ6-100
H A, B, D 14-72 φ58.60-291.06 φ12-100

K: With collar
A: No hub
B: With hub
D: With hub Relieved

Back to page top

Selection steps

■Timing pulley selection steps

* Timing pulley selection is made at the same time as the timing belt.

Automated selection tool is available to use.

http://fawos.misumi.jp/FA_WEB/pulley_us/

Determining of usage conditions
Design power・Rotational speed・Rotation ratio・Interim shaft distance, Motion pattern, etc.

Temporary selection of pulley (Belt)
Tooth profile・Belt width

Verifying specification compatibility
  • Verifying calculated shaft distance, etc.
  • Verifying tension·Load

Back to page top

Accuracy Info

■Timing pulley accuracy

Shaft bore tolerance: H7

Back to page top

Technical calculations

■Technical calculations

Back to page top

Bearings with Housing

Product name Bearings with Housings - Standard Length, Double Bearings, Retained
Part number BGRBB6007ZZ-50
* Orange colored cells in the table below indicate the part numbers used in this example.

Selection criteria

Compact double bearing type with high bearing performance

Back to page top

Available sizes

■Bearings with Housings - Standard Length, Double Bearings, Retained

Flange Shape Material Surface treatment
Bearing Housing Retaining ring Housing
Round type
Square type
Compact type
Steel 1045 Carbon Steel Spring steel Black oxide
304 Stainless Steel Electroless nickel plating
2017 Aluminum Alloy 304 Stainless Steel Clear anodizing
Stainless
304 Stainless Steel

■Sizes

Shaft bore DIA. Bearing
part number
Seal Overall length Pilot
O.D.
φ30 6806 Double shielded

Non-contact
rubber seal

Contacting
rubber seal
35 50 φ50
6906 35 50 φ54
6006 40 60 φ62
6206 50 60 φ70
φ35 6007 50 60 φ70
6207 60 80 φ84
φ40 6008 60 70 φ78
6208 60 80 φ92

Back to page top

Accuracy Info

■Accuracy of bearing housing

Pilot O.D. tolerance: g7
Seating face - Pilot perpendicularity: 0.01

Back to page top

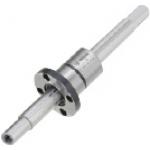
Ball Spline

Product name Ball Splines -Both Ends Stepped Tapped
Part number BSLM13-350-F6-E25-P10-Q10-M6-N6-SC0
* Orange colored cells in the table below indicate the part numbers used in this example.

Selection criteria

Suitable for a transmission element when linear and rotary motion are needed at the same time.

Back to page top

Available sizes

■Ball Splines -Both Ends Stepped Tapped

Spline
Shaft
Material 52100 Bearing Steel 440C Stainless Steel
Hardness 58HRC~ 55HRC~
Nut Material 4115 Alloy Steel 440C Stainless Steel
Hardness 58HRC~ 55HRC~
Shape Round flange
Compact flange -
Straight

■Dimensions

Spline shaft Nut
Name No. Shaft DIA. Overall length Pilot DIA.
10 φ10.4 60-600 φ21
13 φ13.4 60-600 φ24
16 φ16.6 70-600 φ31

For 440C Stainless Steel spline shaft max. overall length is 390mm.

Back to page top

Selection steps

■Ball spline selection steps

Determine application conditions
(Load, Torque, Feed distance, Life)

Temporarily select ball spline specifications
(Temporarily select spline shaft DIA., spline shaft length, overall length based on app. conditions)

Verify basic safety
  • Allowable load
  • Life

Back to page top

Accuracy Info

■Accuracy of ball spline shaft

(μm)

Name
No.
Spline
Shaft DIA.
Nut O.D. runout Spline shaft center runout(Max.)
(Max.) Length -200 201-315 316-400 401-500 501-
10 φ10.4 33 59 83 103 82 102
13 φ13.4 39 56 71 83 62 75
16 φ16.6

Back to page top

Performance info.

■Ball spline load rating

Name
No.
Basic torque rating Basic load rating
Dynamic (Nm) Static (Nm) Dynamic (kN) Static (kN)
10 11 21 2.4 4.3
13 20 37 3.3 5.9
16 51 93 6.2 11.1

Back to page top

Technical calculations

Ball spline running life is calculated with the formula below.

●In case of radial loads

In case of radial loads

●In case of torque loads

In case of torque loads
  • L: Life (km)
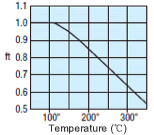
  • ft: Temp. factor
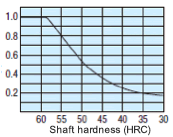
  • fh: Hardness factor
  • fp: Load rating ratio
  • fw: Load factor
  • L0: Rated life (50km)
  • C: Basic dynamic load rating (N)
  • F: Applicable radial load (N)
  • Ct: Basic dynamic torque rating (N・m)
  • T: Applicable torque (N・m)

Ball spline life time is calculated with the formula below.

寿命時間
  • Lh: Run hours (hr)
  • L: Life (km)
  • St: Stroke length
  • n: Number of cycles per minute (cpm)

■Temp. factor (ft)

Temp. factor (ft)

■Hardness factor (fh)

Hardness factor (fh)

■Load rating ratio (fp)

Name No. Spline shaft DIA. Distributed load Direct download
10 φ10.4 1 0.71
13 φ13.4 1 0.71
16 φ16.6 1 0.68

■Load factor (fw)

Application conditions Load factor (fw)
No vibration or shocks
(Low speed 1~2 15m/min or less)
1-2
Some vibrations and shocks
(Med. speed 2~3 60m/min)
2-3
Severe vibrations and shocks
(High speed 3 and over 60m/min or over)
3-

Back to page top

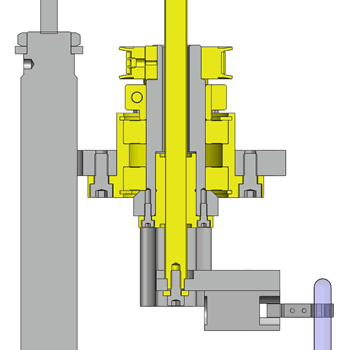
IDEA NOTE Transmit rotational power to the ball spline nut

This app. example uses a ball splines with flanged type nut.
Flanged nut is mounted on a hollow shaft, and rotation is transmitted via a pulley.

  • TERMS AND CONDITIONS FOR USE OF CAD DATA
    Your access to the CAD data that MISUMI Corporation (hereinafter referred to as the Company) posts on this site (including 3D CAD data, intermediate 3D CAD data and 2D CAD data; hereinafter referred to as the Data) are of products manufactured and/or sold by the Company (hereinafter referred to as the Products) assumes that you have read and accepted these terms and conditions which govern your use of the Data. If you do not agree to these terms and conditions, you must stop using this website and the Data. You must not use the Data for any unlawful purpose or in any manner inconsistent with these terms and conditions.
    1. CAD Data
    The Data is prepared for assisting the Company's users in the CAD design process by providing dimensions and other Product information. In order to provide the best speed and stability working within this site, the Product drawings were simplified to reduce the size of the Data. For instance, some of the Products are shown without the oil groove shape, screws or spring shape. Also, please be aware that the tolerance, surface roughness and/or chamfer of the Data may vary from the actual Products.
    2. Disclaimer on Data
    While the Company has carefully prepared the Data, accuracy of the Data is not guaranteed and is subject to the variances as described above. The Company may also modify, add or delete the Data at any time without prior notice. The Company assumes no liability for any direct, indirect, consequential or special damages that you may claim resulted from your use of the Data or any changes to or deletions of the Data regardless of the reason. The Company provides no warranty as to the quality, accuracy, functionality, safety or reliability of the combination of Products and parts. Example applications and combinations of the Products are provided for illustrative purposes only.
    3. Copyright
    Copyrights to the content and the Data belong to the Company or the manufacturers of the Products. The said copyright is protected by the Copyright Act and international treaties. The use (including duplication, modification, uploading, posting, transmission, distribution, licensing, sales and publishing) of the Data except for the purpose to use the Data described above without prior approval of the Company is not allowed. The Data cannot be used for any purposes (including sales promotion) except for designing your machine. If you violate this provision or the laws or regulations, the Company may prohibit you from the use of the Data, the Company’s site and/or take legal action. So long as you comply with these terms and conditions, the Company grants to you a non-exclusive, non-transferable, revocable license to access and use the Data for the sole purpose of assisting you in designing machines that incorporate products.
    In case that the CAD data is found to have been to be used for any purpose other than mentioned above or against the related laws, MISUMI may take legal actions, including the one for blocking the involved user from using CAD data and from accessing to the MISUMI site.
    4. Disclaimer of Warranty
    ANY AND ALL CONTENT APPEARING ON THIS WEB SITE IS PROVIDED FOR INFORMATIONAL PURPOSES ONLY. THIS WEB SITE, ITS CONTENT AND ITS LINKS ARE PROVIDED ON AN "AS IS" AND "AS AVAILABLE" BASIS AND ARE USED ONLY AT YOUR SOLE RISK, TO THE FULLEST EXTENT PERMISSIBLE BY LAW. THE COMPANY DISCLAIMS ALL WARRANTIES, EXPRESS OR IMPLIED, OF ANY KIND, REGARDING THIS WEB SITE (INCLUDING ITS CONTENT, HARDWARE, SOFTWARE AND LINKS), INCLUDING AS TO FITNESS FOR A PARTICULAR PURPOSE, MERCHANTABILITY, TITLE, NON INFRINGEMENT, RESULTS, ACCURACY, COMPLETENESS, ACCESSIBILITY, COMPATIBILITY, SECURITY AND FREEDOM FROM COMPUTER VIRUS. THE COMPANY WILL NOT BE LIABLE FOR ANY DAMAGES OR LOSSES, INCLUDING DIRECT, INDIRECT, CONSEQUENTIAL, SPECIAL, INCIDENTAL OR PUNITIVE DAMAGES AND/OR LOST PROFITS, IN CONNECTION WITH USE OF THE INTERNET, THIS WEB SITE, ITS CONTENT OR ITS LINKS
    Further, the Company will not be liable to you for any failure or delay by the Company to provide access to the Data or any of its obligations under these terms and conditions where such failure or delay is the direct or indirect result of any circumstances beyond the Company's reasonable control (and the Company's obligations will be suspended for the duration of such circumstances).
    5. Policy of Third Parties
    You may be required to separately agree to third party's policies if you use third party software to create or browse the Data or use a third party’s CAD data. In this case, the Company does not assume any responsibility for defects of such CAD data or the software of the third party or violation of their rights. Understand them before use.

    CAD Download (Unit Assembly)

    CAD Download: File Format
    生成

    Thank you for downloading the data.

    Click the Good IDEA! button when you find interesting design tips.


    This data is utilized in order to list more useful application examples in the future.

    CAD Data Limitations

    1. Assembly data shows the assembly drawings in the concept design phase. The sole purpose of the data is to explain the structure and functionality of the assembly and is not considered nor to be used as a final design.
      You will need to edit the Data so that it meets your specific design conditions.
    2. Unit assembly Data consists of some sub-assemblies.
      It is configured so that each sub-assembly unit can be used as it is or edited.
    3. * The part in the frame is a sub-assembly unit.

    4. The Data for fabricated parts is based on easy-to-edit dimensions and shapes in sketches and histories.
    5. The Data including the third-part components are made by the Company.

    Page top

  • * Unit assembly Data consists of some sub-assemblies.
       It is configured so that each sub-assembly unit can be used as it is or edited.

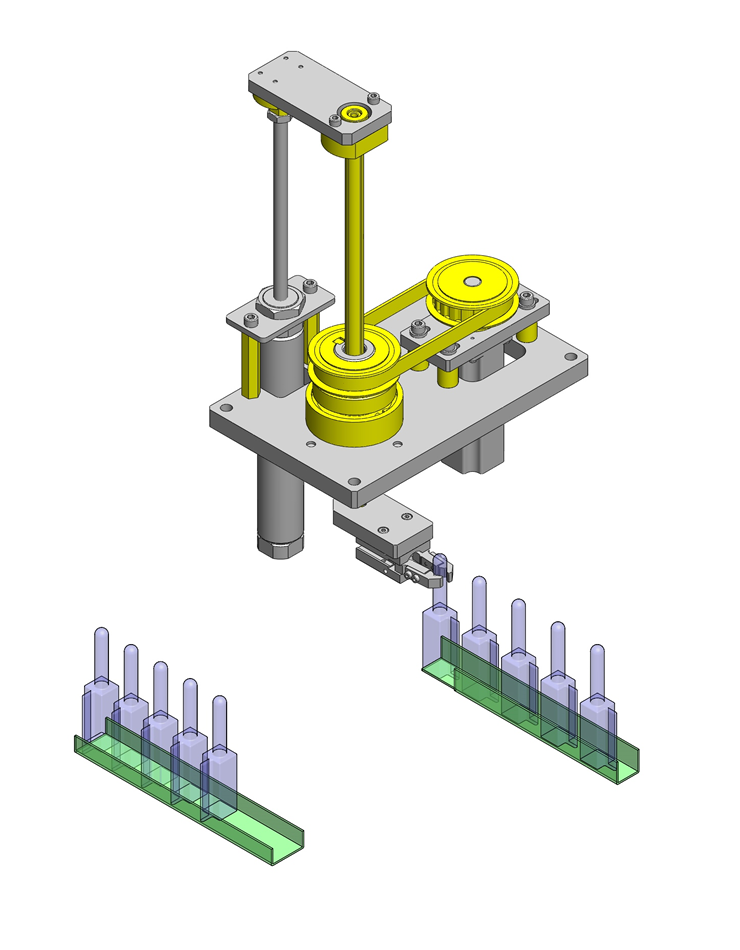
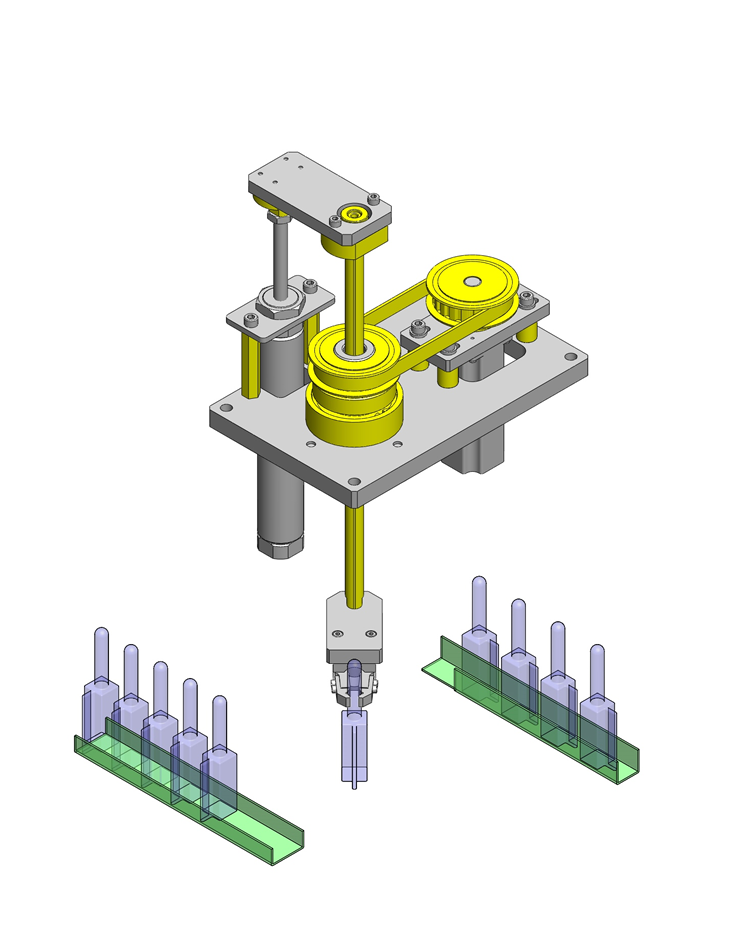
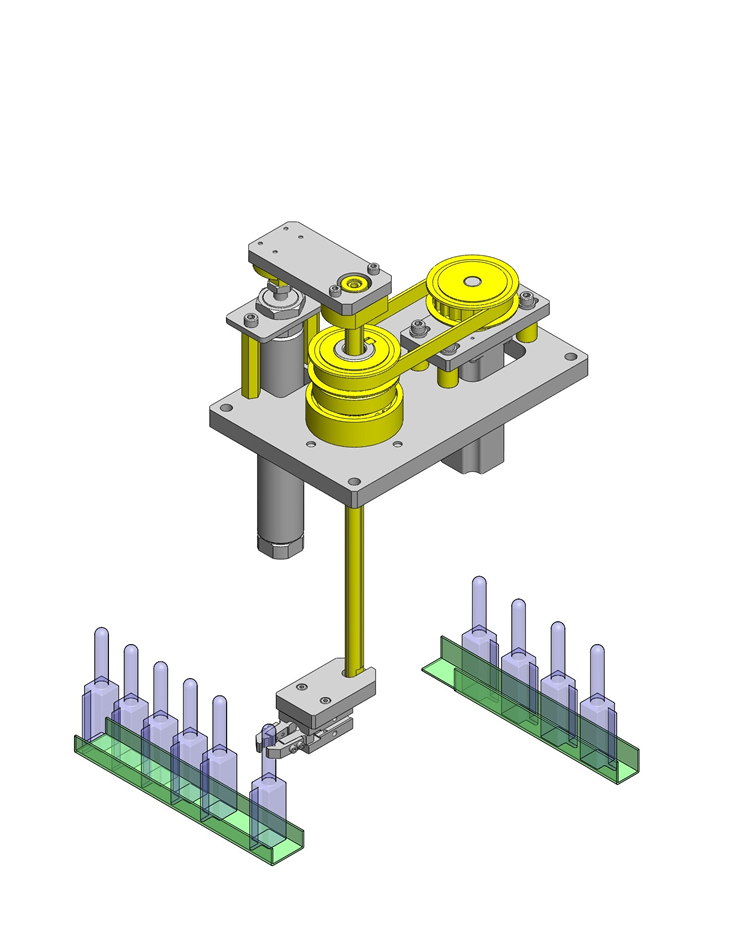
Application Overview

Purpose

  • Pick, rotate and lower workpiece to next work station.

Target workpiece

  • Plastic pin with square base
    • Pin DIA.: φ15, Length: 100mm
    • Protrusion on one location

Design Specifications

Operating Conditions or Design Requirements

  • W150XD240XH377mm
  • Up/down stroke: 150mm
  • Rotation angle: 90deg.

Required Performance

  • Rotational position accuracy: ±1°

Selection Criteria for Main Components

  • A ball spline is used for accurate linear motion as well as for its ability to rotate its orientation.

Design Evaluation

Verification of main components

  • Select a motor that satisfies the torque at required speed.
  • Motor selection
    • Calculation of load torque
      App. condition: Timing belt drive
    • Conditional value:
      D = 57.61 x 10³m - pulley pitch diameter
      F = 5N - belt tension force
      W = 0kg - workpiece mass
      μ = 0.1 - coefficient of friction, sliding surface
      g = 9.8m/s² - gravitational acceleration
    • From: Load torque T = D/2 × (F + μWg) Nm
      T = 1 / 2 × 57.61 × 10³ × (5 + 0.1 × 0 × 9.8) = 144 × 10³Nm
      therefore, we select a motor with larger torque then T =0.14Nm
    • Torque of the selected motor MAMA012P1A (with continuous operation range up to 5000r/min) is 0.19Nm, and satisfy requirements.
      Motor rated torque > Actually applied torque.

Other Design Consideration

  • For smooth rotation ball spine is supported by ball bearing on two ends and rotation is transmitted thru pulley.
  • If needed install position sensors.

Explore Similar Application Examples

Page - / -

Part List

No. Part Name Sample Picture MISUMI Part Number
For Price and Days to ship click on Part No.
Quantity
1 Floating Joints FJUC10 1
2 Collars FNCLB-V6-D15-L18.2 4
3 Hex Posts LSFB12-57 2
4 Timing Pulleys ATPA19L050-B-P13 1
5 Timing Belts TUN165L050 1
6 Timing Pulleys ATPA19L050-A-N30 1
7 Shaft Collars SCSLAW35-43 1
8 Parallel Keys KESSM8-20 1
9 Bearing W/Housing BGRBB6007ZZ-50 1
10 Ball Spline BSLM13-350-F6-E25-P10-Q10-M6-N6-SC0 1
11 Bearing Spacer CLBU10-17-5.0 1
12 Bearing W/Housing BGTAB6200ZZ 1
13 Shaft Collars SCSBS10-16 1
14 Metal Washers FWSSM-D15-V6.5-T3.1 1
  • The part list above only contains MISUMI parts.
    Part list download (CSV) includes MISUMI and third party components used in this example.
  • TERMS AND CONDITIONS FOR USE OF CAD DATA
    Your access to the CAD data that MISUMI Corporation (hereinafter referred to as the Company) posts on this site (including 3D CAD data, intermediate 3D CAD data and 2D CAD data; hereinafter referred to as the Data) are of products manufactured and/or sold by the Company (hereinafter referred to as the Products) assumes that you have read and accepted these terms and conditions which govern your use of the Data. If you do not agree to these terms and conditions, you must stop using this website and the Data. You must not use the Data for any unlawful purpose or in any manner inconsistent with these terms and conditions.
    1. CAD Data
    The Data is prepared for assisting the Company's users in the CAD design process by providing dimensions and other Product information. In order to provide the best speed and stability working within this site, the Product drawings were simplified to reduce the size of the Data. For instance, some of the Products are shown without the oil groove shape, screws or spring shape. Also, please be aware that the tolerance, surface roughness and/or chamfer of the Data may vary from the actual Products.
    2. Disclaimer on Data
    While the Company has carefully prepared the Data, accuracy of the Data is not guaranteed and is subject to the variances as described above. The Company may also modify, add or delete the Data at any time without prior notice. The Company assumes no liability for any direct, indirect, consequential or special damages that you may claim resulted from your use of the Data or any changes to or deletions of the Data regardless of the reason. The Company provides no warranty as to the quality, accuracy, functionality, safety or reliability of the combination of Products and parts. Example applications and combinations of the Products are provided for illustrative purposes only.
    3. Copyright
    Copyrights to the content and the Data belong to the Company or the manufacturers of the Products. The said copyright is protected by the Copyright Act and international treaties. The use (including duplication, modification, uploading, posting, transmission, distribution, licensing, sales and publishing) of the Data except for the purpose to use the Data described above without prior approval of the Company is not allowed. The Data cannot be used for any purposes (including sales promotion) except for designing your machine. If you violate this provision or the laws or regulations, the Company may prohibit you from the use of the Data, the Company’s site and/or take legal action. So long as you comply with these terms and conditions, the Company grants to you a non-exclusive, non-transferable, revocable license to access and use the Data for the sole purpose of assisting you in designing machines that incorporate products.
    In case that the CAD data is found to have been to be used for any purpose other than mentioned above or against the related laws, MISUMI may take legal actions, including the one for blocking the involved user from using CAD data and from accessing to the MISUMI site.
    4. Disclaimer of Warranty
    ANY AND ALL CONTENT APPEARING ON THIS WEB SITE IS PROVIDED FOR INFORMATIONAL PURPOSES ONLY. THIS WEB SITE, ITS CONTENT AND ITS LINKS ARE PROVIDED ON AN "AS IS" AND "AS AVAILABLE" BASIS AND ARE USED ONLY AT YOUR SOLE RISK, TO THE FULLEST EXTENT PERMISSIBLE BY LAW. THE COMPANY DISCLAIMS ALL WARRANTIES, EXPRESS OR IMPLIED, OF ANY KIND, REGARDING THIS WEB SITE (INCLUDING ITS CONTENT, HARDWARE, SOFTWARE AND LINKS), INCLUDING AS TO FITNESS FOR A PARTICULAR PURPOSE, MERCHANTABILITY, TITLE, NON INFRINGEMENT, RESULTS, ACCURACY, COMPLETENESS, ACCESSIBILITY, COMPATIBILITY, SECURITY AND FREEDOM FROM COMPUTER VIRUS. THE COMPANY WILL NOT BE LIABLE FOR ANY DAMAGES OR LOSSES, INCLUDING DIRECT, INDIRECT, CONSEQUENTIAL, SPECIAL, INCIDENTAL OR PUNITIVE DAMAGES AND/OR LOST PROFITS, IN CONNECTION WITH USE OF THE INTERNET, THIS WEB SITE, ITS CONTENT OR ITS LINKS
    Further, the Company will not be liable to you for any failure or delay by the Company to provide access to the Data or any of its obligations under these terms and conditions where such failure or delay is the direct or indirect result of any circumstances beyond the Company's reasonable control (and the Company's obligations will be suspended for the duration of such circumstances).
    5. Policy of Third Parties
    You may be required to separately agree to third party's policies if you use third party software to create or browse the Data or use a third party’s CAD data. In this case, the Company does not assume any responsibility for defects of such CAD data or the software of the third party or violation of their rights. Understand them before use.

    CAD Download (Unit Assembly)

    CAD Download: File Format
    生成

    Thank you for downloading the data.

    Click the Good IDEA! button when you find interesting design tips.


    This data is utilized in order to list more useful application examples in the future.

    CAD Data Limitations

    1. Assembly data shows the assembly drawings in the concept design phase. The sole purpose of the data is to explain the structure and functionality of the assembly and is not considered nor to be used as a final design.
      You will need to edit the Data so that it meets your specific design conditions.
    2. Unit assembly Data consists of some sub-assemblies.
      It is configured so that each sub-assembly unit can be used as it is or edited.
    3. * The part in the frame is a sub-assembly unit.

    4. The Data for fabricated parts is based on easy-to-edit dimensions and shapes in sketches and histories.
    5. The Data including the third-part components are made by the Company.

    Page top

Page top