(!)Due to Microsoft's end of support for Internet Explorer 11 on 15/06/2022, this site does not support the recommended environment.

ideanote
inCAD Library

Please read before use

What is inCAD Library?

  • Helpful application examples for mechanical engineers.

The Concept of inCAD Library

  • Online application library with a range of ideas for all manufacturing industries.
  • Save design time and learn new design applications when you are concepting new machines.

Disclaimer

  • MISUMI may not offer all parts in each application design. Available parts can only be purchased separately not as a unit shown in each application design.
  • MISUMI does not guarantee quality, accuracy, functionality, safety or reliability for the combination of the parts in each application example. Accept these points prior to use.
  • 2014 Copyright MISUMI
  • The data cannot be used for any purposes (including sales promotion) except for designing your machine.
  • All associated CAD is free. Misumi reserves the right at its sole discretion to cancel, terminate or modify this offer.
  • MISUMI may change, add or delete application examples posted without prior notice.
  • MISUMI assumes no responsibilities for any damage incurred resulting from your use of the Service or any change, addition or deletion by MISUMI of the application examples for any reason whatsoever.

inCAD Library Features

  1. Get great new design ideas for these application examples.
  2. Over 300 design application ideas
    collected from dozens of industries!

  3. Find application examples quickly! Search by function, workpiece shape, etc.

  4. Download the CAD models for each application example.
  5. Log in to download free CAD models.
    Download CAD for the entire application example!

Good IDEA! button

Click the Good IDEA! Button when you like an application example!

*Can only be clicked once per application example.

  • Upper right corner on the page of application example details

  • Pop-up dialog for CAD data downloading

Page top

Keyword Search
No. Search
SNS: 

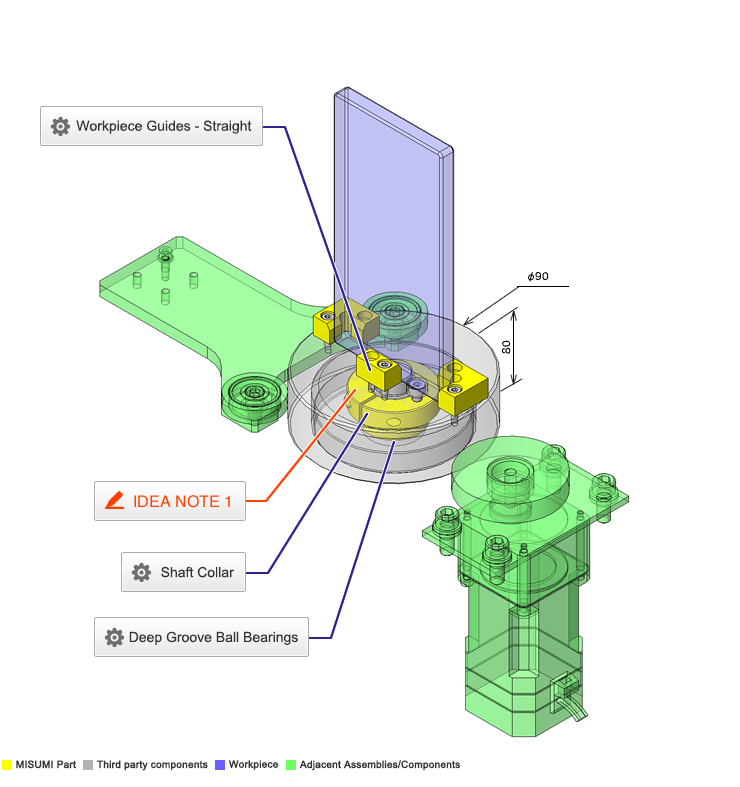
No.000194 Rotary Inspection Station

Rotary unit for visual inspection of workpiece.

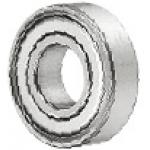
Deep Groove Ball Bearings

Product name Deep Groove Ball Bearings - Economy, Double Shielded
Part number C6903ZZ
Features Major overseas manufacturers' bearings equivalent to the domestic products in product quality. Please place order for these products if a large lot of bearings are required.
* Orange colored cells in the table below indicate the part numbers used in this example.

Selection criteria

Use it for the rotary shaft bearing which is the main part of the equipment.

Back to page top

Available sizes

■Deep Groove Ball Bearings - Economy, Double Shielded

Material: 52100 Bearing Steel

(Name No.) Shaft Bore Dia. O.D. Thickness
C6900ZZ φ10 φ22 6
C6000ZZ φ26 8
C6200ZZ φ30 9
C6300ZZ φ35 11
C6901ZZ φ12 φ24 6
C6001ZZ φ28 8
C6201ZZ φ32 10
C6301ZZ φ37 12
C6902ZZ φ15 φ28 7
C6002ZZ φ32 9
C6202ZZ φ35 11
C6302ZZ φ42 13
C6903ZZ φ17 φ30 7
C6003ZZ φ35 10
C6203ZZ φ40 12
C6303ZZ φ47 14
C6904ZZ φ20 φ37 9
C6004ZZ φ42 12
C6204ZZ φ47 14
C6304ZZ φ52 15
C6905ZZ φ25 φ42 9
C6005ZZ φ47 12
C6205ZZ φ52 15
C6305ZZ φ62 17
C6906ZZ φ30 φ47 9
C6006ZZ φ55 13
C6206ZZ φ62 16
C6306ZZ φ72 19

* Please see the product pages for recommended dimensions of the mating shaft.

Back to page top

Performance info.

■Load info of the Deep Groove Ball Bearings - Economy Type, Double Shielded

(Name No.) Shaft Bore Dia. O.D. Basic Load Rating Allowable Rotational Speed
rpm
(Reference)
Cr (Dynamic) N Cor (Static) N
C6900ZZ φ10 φ22 2.7 1.27 30000
C6000ZZ φ26 4.55 1.97 29000
C6200ZZ φ30 5.1 2.39 25000
C6300ZZ φ35 8.2 3.5 23000
C6901ZZ φ12 φ24 2.89 1.46 27000
C6001ZZ φ28 5.1 2.39 26000
C6201ZZ φ32 6.8 3.05 22000
C6301ZZ φ37 9.7 4.2 20000
C6902ZZ φ15 φ28 3.65 2 24000
C6002ZZ φ32 5.6 2.83 22000
C6202ZZ φ35 7.75 3.6 19000
C6302ZZ φ42 11.4 5.45 17000
C6903ZZ φ17 φ30 4.65 2.58 22000
C6003ZZ φ35 6.8 3.35 20000
C6203ZZ φ40 9.6 4.6 18000
C6303ZZ φ47 13.5 6.55 16000
C6904ZZ φ20 φ37 6.4 3.7 19000
C6004ZZ φ42 9.4 5.05 18000
C6204ZZ φ47 12.8 6.6 16000
C6304ZZ φ52 15.9 7.9 14000
C6905ZZ φ25 φ42 7.05 4.55 16000
C6005ZZ φ47 10.1 5.85 15000
C6205ZZ φ52 14 7.85 13900
C6305ZZ φ62 21.2 10.9 12000
C6906ZZ φ30 φ47 7.25 5 14000
C6006ZZ φ55 13.2 8.3 13000
C6206ZZ φ62 19.5 11.3 11000
C6306ZZ φ72 26.7 15 10000

Back to page top

Shaft Collar

Product name Shaft Collars - 2 Tapped Holes
Part number PSCSW20-10
* Orange colored cells in the table below indicate the part numbers used in this example.

Selection criteria

Easy-to-assemble parts with a pre-inserted tap

Back to page top

Available sizes

■Shaft Collars - 2 Tapped Holes

Material Surface Treatment Accessory
1045 Carbon Steel Black Oxide Hex Socket Head Cap Screw 1 pcs.
Electroless Nickel Plating Hex Socket Head Cap Screw 1 pcs.
(SUS)
304 Stainless Steel

Back to page top

■Sizes and Dimensions

Shaft Bore Dia. Overall width
(Thickness)
O.D. Fastening Screw Dia.
(Coarse)
Mounting screw DIA.
(Coarse)
φ6 8 φ20 M3 M3
10 M4
φ8 8 φ25 M3
10 M4 M4
12 φ30 M5 M5
φ10 8 M3 M5
10 M4
12 M5
φ12 8 M3 M5
10 M4
12 M5
15 φ35 M6 M6
φ13 10 φ30 M4 M4
12 φ34 M5 M5
φ15 10 M4 M4
12 φ35 M5 M5
15 φ40 M6 M6
φ16 10 φ35 M5 M4
12 M5
15 φ40 M6 M6
φ18・φ20 10 M5 M4
12 M5
15 φ45 M6 M6
φ25 12 M5 M5
15 φ50 M6 M6
φ30 15 φ55 M6

Accuracy Info

■Accuracy of the Shaft Collars - Slit 2-tapped Type

Shaft Bore Dia. Tolerance: +0.05/+0.01

O.D. Tolerance: ±0.1

Overall Width Tolerance: ±0.1

Perpendicularity of the Mounting Surface and the Shaft Bore:  0.02 or less

Back to page top

Workpiece Guides - Straight

Product name Guides- Straight
Part number WGHNC-17-10-10
* Orange colored cells in the table below indicate the part numbers used in this example.

Selection criteria

Economical workpiece securing material.

Back to page top

Available sizes

■Guides- Straight

Material Surface Treatment
1045 Carbon Steel Black Oxide
Electroless Nickel Plating
304 Stainless Steel -
Polyacetal
MC Nylon

■Sizes and Dimensions

Width Thickness Height
(1 mm Increments)
Applicable Mounting
Bolt Dia.
17 20 30
10 6~10 M3
12

Back to page top

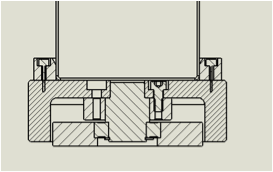
IDEA NOTE How to create a simple mechanism for visual inspection?

Utilize bearings and tapped shaft collar to create a simple turntable type rotary mechanism.

  • TERMS AND CONDITIONS FOR USE OF CAD DATA
    Your access to the CAD data that MISUMI Corporation (hereinafter referred to as the Company) posts on this site (including 3D CAD data, intermediate 3D CAD data and 2D CAD data; hereinafter referred to as the Data) are of products manufactured and/or sold by the Company (hereinafter referred to as the Products) assumes that you have read and accepted these terms and conditions which govern your use of the Data. If you do not agree to these terms and conditions, you must stop using this website and the Data. You must not use the Data for any unlawful purpose or in any manner inconsistent with these terms and conditions.
    1. CAD Data
    The Data is prepared for assisting the Company's users in the CAD design process by providing dimensions and other Product information. In order to provide the best speed and stability working within this site, the Product drawings were simplified to reduce the size of the Data. For instance, some of the Products are shown without the oil groove shape, screws or spring shape. Also, please be aware that the tolerance, surface roughness and/or chamfer of the Data may vary from the actual Products.
    2. Disclaimer on Data
    While the Company has carefully prepared the Data, accuracy of the Data is not guaranteed and is subject to the variances as described above. The Company may also modify, add or delete the Data at any time without prior notice. The Company assumes no liability for any direct, indirect, consequential or special damages that you may claim resulted from your use of the Data or any changes to or deletions of the Data regardless of the reason. The Company provides no warranty as to the quality, accuracy, functionality, safety or reliability of the combination of Products and parts. Example applications and combinations of the Products are provided for illustrative purposes only.
    3. Copyright
    Copyrights to the content and the Data belong to the Company or the manufacturers of the Products. The said copyright is protected by the Copyright Act and international treaties. The use (including duplication, modification, uploading, posting, transmission, distribution, licensing, sales and publishing) of the Data except for the purpose to use the Data described above without prior approval of the Company is not allowed. The Data cannot be used for any purposes (including sales promotion) except for designing your machine. If you violate this provision or the laws or regulations, the Company may prohibit you from the use of the Data, the Company’s site and/or take legal action. So long as you comply with these terms and conditions, the Company grants to you a non-exclusive, non-transferable, revocable license to access and use the Data for the sole purpose of assisting you in designing machines that incorporate products.
    In case that the CAD data is found to have been to be used for any purpose other than mentioned above or against the related laws, MISUMI may take legal actions, including the one for blocking the involved user from using CAD data and from accessing to the MISUMI site.
    4. Disclaimer of Warranty
    ANY AND ALL CONTENT APPEARING ON THIS WEB SITE IS PROVIDED FOR INFORMATIONAL PURPOSES ONLY. THIS WEB SITE, ITS CONTENT AND ITS LINKS ARE PROVIDED ON AN "AS IS" AND "AS AVAILABLE" BASIS AND ARE USED ONLY AT YOUR SOLE RISK, TO THE FULLEST EXTENT PERMISSIBLE BY LAW. THE COMPANY DISCLAIMS ALL WARRANTIES, EXPRESS OR IMPLIED, OF ANY KIND, REGARDING THIS WEB SITE (INCLUDING ITS CONTENT, HARDWARE, SOFTWARE AND LINKS), INCLUDING AS TO FITNESS FOR A PARTICULAR PURPOSE, MERCHANTABILITY, TITLE, NON INFRINGEMENT, RESULTS, ACCURACY, COMPLETENESS, ACCESSIBILITY, COMPATIBILITY, SECURITY AND FREEDOM FROM COMPUTER VIRUS. THE COMPANY WILL NOT BE LIABLE FOR ANY DAMAGES OR LOSSES, INCLUDING DIRECT, INDIRECT, CONSEQUENTIAL, SPECIAL, INCIDENTAL OR PUNITIVE DAMAGES AND/OR LOST PROFITS, IN CONNECTION WITH USE OF THE INTERNET, THIS WEB SITE, ITS CONTENT OR ITS LINKS
    Further, the Company will not be liable to you for any failure or delay by the Company to provide access to the Data or any of its obligations under these terms and conditions where such failure or delay is the direct or indirect result of any circumstances beyond the Company's reasonable control (and the Company's obligations will be suspended for the duration of such circumstances).
    5. Policy of Third Parties
    You may be required to separately agree to third party's policies if you use third party software to create or browse the Data or use a third party’s CAD data. In this case, the Company does not assume any responsibility for defects of such CAD data or the software of the third party or violation of their rights. Understand them before use.

    CAD Download (Unit Assembly)

    CAD Download: File Format
    生成

    Thank you for downloading the data.

    Click the Good IDEA! button when you find interesting design tips.


    This data is utilized in order to list more useful application examples in the future.

    CAD Data Limitations

    1. Assembly data shows the assembly drawings in the concept design phase. The sole purpose of the data is to explain the structure and functionality of the assembly and is not considered nor to be used as a final design.
      You will need to edit the Data so that it meets your specific design conditions.
    2. Unit assembly Data consists of some sub-assemblies.
      It is configured so that each sub-assembly unit can be used as it is or edited.
    3. * The part in the frame is a sub-assembly unit.

    4. The Data for fabricated parts is based on easy-to-edit dimensions and shapes in sketches and histories.
    5. The Data including the third-part components are made by the Company.

    Page top

  • * Unit assembly Data consists of some sub-assemblies.
       It is configured so that each sub-assembly unit can be used as it is or edited.

Application Overview

Purpose

  • Assist visual inspection of workpiece carried over by conveyor. Rotary mechanism is driven by a motor stationed at the inspection point.

Target workpiece

  • Shape: plastic plate
  • Size: W 65 x D 8 x H 130 mm
  • Weight: 150 g

Design Specifications

Operating Conditions or Design Requirements

  • Rotational speed at inspection: 12 rpm
  • External size: φ 90 x H 80 mm

Required Performance

  • Position repeatability: ± 0.3 mm

Selection criteria for Main Components

  • Rotational speed of the workpiece: 12 rpm, O.D. of rotary pallet: φ 90 mm Select bearings with a size having a margin fitting this dimension.

Design Evaluation

Verification of main components

  • Verify bearing durability for the load condition.
  • Check the life of bearing
    • Conditional values: bearings:
      Basic dynamic load rating of C6903ZZ: Cr = 4.65 kN = 4650 N,
    • Workpiece weight: M1 = 150 g = 0.15 kg,
    • Component weight borne by the bearing of the rotary pallet: M2 = 400 g = 0.4 kg,
    • Gravitational acceleration = 9.8 m/s².
    • Let radial dynamic equivalent load be Pr, radial load Fr, thrust load Fa, radial factor X = 1, and thrust factor Y = 2.3 , then,
    • Only the thrust load will be applied to the bearing by the workpiece and component. Assuming that radial load Fr = 0 N, We obtain the following: Fa = (M1 + M2) × g = (0.15 + 0.4) × 9.8 = 5.4 N,
    • Pr=X×Fr+Y×Fa=1×0+2.3×5.4=12.4[N].
    • Rated life (10⁶ rotations): L = (Cr/Pr)³ = (4650/12.4)³ = 52.7×10⁶ (10⁶ rotations) = 52.7 (10¹² rotations) Thus, there exists sufficient margin.

Other Design Consideration

  • Be careful during the inspection process as the workpiece may fall off the grip. Therefore, implement additional workpiece securing mechanisms as necessary.

Explore Similar Application Examples

Page - / -

Part List

No. Part Name Sample Picture MISUMI Part Number
For Price and Days to ship click on Part No.
Quantity
1 Deep Groove Ball Bearings C6903ZZ 1
2 Shaft Collars PSCSW20-10 1
3 Retaining Rings STWS17 1
4 Workpiece Guide WGLNC-20-10-10 2
5 Workpiece Guide WGHNC-17-10-10 1
  • The part list above only contains MISUMI parts.
    Part list download (CSV) includes MISUMI and third party components used in this example.
  • TERMS AND CONDITIONS FOR USE OF CAD DATA
    Your access to the CAD data that MISUMI Corporation (hereinafter referred to as the Company) posts on this site (including 3D CAD data, intermediate 3D CAD data and 2D CAD data; hereinafter referred to as the Data) are of products manufactured and/or sold by the Company (hereinafter referred to as the Products) assumes that you have read and accepted these terms and conditions which govern your use of the Data. If you do not agree to these terms and conditions, you must stop using this website and the Data. You must not use the Data for any unlawful purpose or in any manner inconsistent with these terms and conditions.
    1. CAD Data
    The Data is prepared for assisting the Company's users in the CAD design process by providing dimensions and other Product information. In order to provide the best speed and stability working within this site, the Product drawings were simplified to reduce the size of the Data. For instance, some of the Products are shown without the oil groove shape, screws or spring shape. Also, please be aware that the tolerance, surface roughness and/or chamfer of the Data may vary from the actual Products.
    2. Disclaimer on Data
    While the Company has carefully prepared the Data, accuracy of the Data is not guaranteed and is subject to the variances as described above. The Company may also modify, add or delete the Data at any time without prior notice. The Company assumes no liability for any direct, indirect, consequential or special damages that you may claim resulted from your use of the Data or any changes to or deletions of the Data regardless of the reason. The Company provides no warranty as to the quality, accuracy, functionality, safety or reliability of the combination of Products and parts. Example applications and combinations of the Products are provided for illustrative purposes only.
    3. Copyright
    Copyrights to the content and the Data belong to the Company or the manufacturers of the Products. The said copyright is protected by the Copyright Act and international treaties. The use (including duplication, modification, uploading, posting, transmission, distribution, licensing, sales and publishing) of the Data except for the purpose to use the Data described above without prior approval of the Company is not allowed. The Data cannot be used for any purposes (including sales promotion) except for designing your machine. If you violate this provision or the laws or regulations, the Company may prohibit you from the use of the Data, the Company’s site and/or take legal action. So long as you comply with these terms and conditions, the Company grants to you a non-exclusive, non-transferable, revocable license to access and use the Data for the sole purpose of assisting you in designing machines that incorporate products.
    In case that the CAD data is found to have been to be used for any purpose other than mentioned above or against the related laws, MISUMI may take legal actions, including the one for blocking the involved user from using CAD data and from accessing to the MISUMI site.
    4. Disclaimer of Warranty
    ANY AND ALL CONTENT APPEARING ON THIS WEB SITE IS PROVIDED FOR INFORMATIONAL PURPOSES ONLY. THIS WEB SITE, ITS CONTENT AND ITS LINKS ARE PROVIDED ON AN "AS IS" AND "AS AVAILABLE" BASIS AND ARE USED ONLY AT YOUR SOLE RISK, TO THE FULLEST EXTENT PERMISSIBLE BY LAW. THE COMPANY DISCLAIMS ALL WARRANTIES, EXPRESS OR IMPLIED, OF ANY KIND, REGARDING THIS WEB SITE (INCLUDING ITS CONTENT, HARDWARE, SOFTWARE AND LINKS), INCLUDING AS TO FITNESS FOR A PARTICULAR PURPOSE, MERCHANTABILITY, TITLE, NON INFRINGEMENT, RESULTS, ACCURACY, COMPLETENESS, ACCESSIBILITY, COMPATIBILITY, SECURITY AND FREEDOM FROM COMPUTER VIRUS. THE COMPANY WILL NOT BE LIABLE FOR ANY DAMAGES OR LOSSES, INCLUDING DIRECT, INDIRECT, CONSEQUENTIAL, SPECIAL, INCIDENTAL OR PUNITIVE DAMAGES AND/OR LOST PROFITS, IN CONNECTION WITH USE OF THE INTERNET, THIS WEB SITE, ITS CONTENT OR ITS LINKS
    Further, the Company will not be liable to you for any failure or delay by the Company to provide access to the Data or any of its obligations under these terms and conditions where such failure or delay is the direct or indirect result of any circumstances beyond the Company's reasonable control (and the Company's obligations will be suspended for the duration of such circumstances).
    5. Policy of Third Parties
    You may be required to separately agree to third party's policies if you use third party software to create or browse the Data or use a third party’s CAD data. In this case, the Company does not assume any responsibility for defects of such CAD data or the software of the third party or violation of their rights. Understand them before use.

    CAD Download (Unit Assembly)

    CAD Download: File Format
    生成

    Thank you for downloading the data.

    Click the Good IDEA! button when you find interesting design tips.


    This data is utilized in order to list more useful application examples in the future.

    CAD Data Limitations

    1. Assembly data shows the assembly drawings in the concept design phase. The sole purpose of the data is to explain the structure and functionality of the assembly and is not considered nor to be used as a final design.
      You will need to edit the Data so that it meets your specific design conditions.
    2. Unit assembly Data consists of some sub-assemblies.
      It is configured so that each sub-assembly unit can be used as it is or edited.
    3. * The part in the frame is a sub-assembly unit.

    4. The Data for fabricated parts is based on easy-to-edit dimensions and shapes in sketches and histories.
    5. The Data including the third-part components are made by the Company.

    Page top

Page top