(!)Due to Microsoft's end of support for Internet Explorer 11 on 15/06/2022, this site does not support the recommended environment.

ideanote
inCAD Library

Please read before use

What is inCAD Library?

  • Helpful application examples for mechanical engineers.

The Concept of inCAD Library

  • Online application library with a range of ideas for all manufacturing industries.
  • Save design time and learn new design applications when you are concepting new machines.

Disclaimer

  • MISUMI may not offer all parts in each application design. Available parts can only be purchased separately not as a unit shown in each application design.
  • MISUMI does not guarantee quality, accuracy, functionality, safety or reliability for the combination of the parts in each application example. Accept these points prior to use.
  • 2014 Copyright MISUMI
  • The data cannot be used for any purposes (including sales promotion) except for designing your machine.
  • All associated CAD is free. Misumi reserves the right at its sole discretion to cancel, terminate or modify this offer.
  • MISUMI may change, add or delete application examples posted without prior notice.
  • MISUMI assumes no responsibilities for any damage incurred resulting from your use of the Service or any change, addition or deletion by MISUMI of the application examples for any reason whatsoever.

inCAD Library Features

  1. Get great new design ideas for these application examples.
  2. Over 300 design application ideas
    collected from dozens of industries!

  3. Find application examples quickly! Search by function, workpiece shape, etc.

  4. Download the CAD models for each application example.
  5. Log in to download free CAD models.
    Download CAD for the entire application example!

Good IDEA! button

Click the Good IDEA! Button when you like an application example!

*Can only be clicked once per application example.

  • Upper right corner on the page of application example details

  • Pop-up dialog for CAD data downloading

Page top

Keyword Search
No. Search
SNS: 

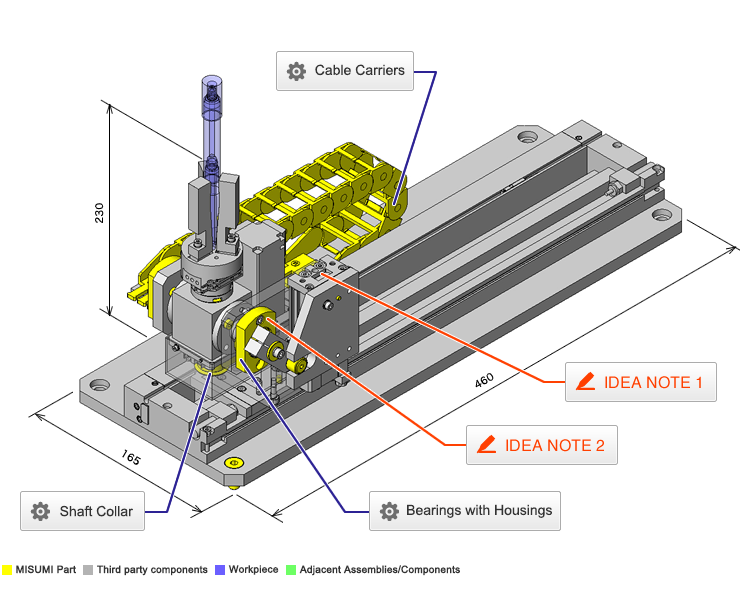
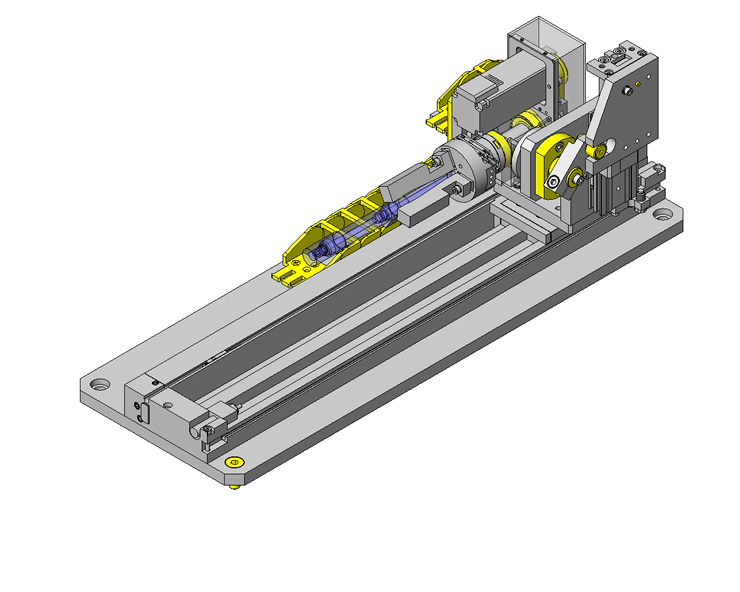
No.000177 Reverse Gripper

Gripper that can reverse and rotate.

Relevant category

Cable Carriers

Product name Cable Carriers -Slit-
Part number SE08F-30-028-14
* Orange colored cells in the table below indicate the part numbers used in this example.

Selection criteria

Organizes cables and protects them against wear and tear on moving objects.

Back to page top

Available sizes

■Cable Carriers - Slit (Type 08F)

Type Material
Outer Radius Mount Special Plastic
(Operating Temperature: -30 - 100℃)
Equivalent to Flammability Standard UL94-V2
Inner Radius Mount

■Sizes and Overall Dimensions

Bending Radius Number of Links Mounting height (Required Space Height) (Arc + Allowance) Link Pitch
28 1〜37 76 91 130 20
38 1〜38 96 111 160
48 1〜40 116 131 190

■Sizes and Link Cross Section Dimensions

Inner height Overall Height Inner width Overall Width Number of Comb Teeth
14.6 19.3 16 24.2 2
20 28.2 2
30 38.2 3
40 48.2 4
50 58.2 5

Back to page top

Bearings with Housings

Product name Bearings with Housings - Direct Mount, Standard with Pilot, Retained
Part number SBGCR6901ZZ
* Orange colored cells in the table below indicate the part numbers used in this example.

Selection criteria

Bearing and housing sold as a set.

Back to page top

Available sizes

■Bearings with Housings, Pilot, Retained

Flange Shape Material Surface Treatment Material of the Included
Retaining Ring
Bearing Holder Holder
Round

Square

Compact
Steel 1045 Carbon Steel Black Oxide Spring Steel
Electroless Nickel Plating 304 Stainless Steel
2017 Aluminum Alloy Clear Anodize
Stainless Steel
304 Stainless Steel

■Sizes and Dimensions

Seal Bearing Shaft Bore
Dia.
Bearing
O.D.
Bearing
Width
Flange
External Dimensions
Compact Flange
Wrench Flats
Overall
Thickness
Flange
Thickness
Pilot Part
Length
Pilot Dia.
Non-contact Rubber Seal

Contact Rubber Seal
623 φ3 φ10 4 33 16 9 7 2 φ14
624 φ4 φ13 5 35 18 10 8 φ17
605 φ5 φ14 5 36 20 10 8 φ18
625 φ16 5 38 22 10 8 φ20
606 φ6 φ17 6 39 23 11 9 φ21
626 φ19 6 41 25 11 9 φ24
698 φ8 φ19 6 41 25 11 9 φ24
608 φ22 7 45 29 12 10 φ27
628 φ24 8 47 32 13 11 φ30
6800 φ10 φ19 5 41 25 10 8 φ24
6900 φ22 6 45 29 11 9 φ27
6000 φ26 8 50 34 13 11 φ32
6200 φ30 9 54 38 14 12 φ36
6801 φ12 φ21 5 44 29 10 8 φ26
6901 φ24 6 48 31 11 9 φ30
6001 φ28 8 52 36 13 11 φ34
6201 32φ 10 56 40 15 13 φ38
6802 φ15 φ24 5 47 32 10 8 φ30
6902 φ28 7 57 37 12 10 φ35
6002 φ32 9 60 40 14 12 φ38
6202 φ35 11 64 44 17 15 φ42
6903 φ17 φ30 7 60 38 12 10 φ36
6003 φ35 10 66 44 16 14 φ42
6203 φ40 12 72 50 18 16 φ48
6804 φ20 φ32 7 60 40 12 10 φ38
6904 φ37 9 69 47 15 13 φ45
6004 φ42 12 77 54 18 16 φ50
6204 φ47 14 81 58 20 18 φ54
6805 φ25 φ37 7 69 47 13 11 φ45
6905 φ42 9 77 54 15 13 φ50
6005 φ47 12 88 58 18 16 φ54
6205 φ52 15 94 64 22 20 φ60
6806 φ30 φ42 7 77 54 13 11 φ50
6906 φ47 9 88 58 15 13 φ54
6006 φ55 13 96 66 20 18 φ62
6206 φ62 16 104 74 23 21 φ70
6007 φ35 14 21 19
6207 φ72 17 126 88 26 23 3 φ84
6008 φ40 φ68 15 114 82 23 21 2 φ78
6208 φ80 18 134 96 27 24 3 φ92
Double shielded 6010 φ50 16 25 22
6210 φ90 20 147 110 31 28 φ106

Back to page top

Accuracy Info

■Accuracy Information of the Bearings with Housings, Pilot, Retained

Pilot Dia. Tolerance: g7

Concentricity of the Pilot and the Bearing Housing:  0.02 or less

Perpendicularity of the Flange Mounting Surface and the Bearing Housing:  0.01 or less

Back to page top

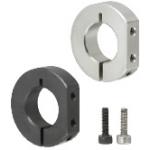
Shaft Collar

Product name Shaft Collars - D Shaped - Compact Slit Type
Part number PSDNJ15-8
Features Utilization of Mounting Hole on Cut Side facilitates Sensor Bracket Mounting
* Orange colored cells in the table below indicate the part numbers used in this example.

Selection criteria

Mounting holes on side allow for easy installation of sensor brackets.

Back to page top

Available sizes

■Shaft Collar Clamp D Cut, Cut Surface Mount Hole, Compact

Material Surface Treatment Accessory
1045 Carbon Steel Black Oxide Hex Socket Head Cap Screw 1 pcs.
Electroless Nickel Plating Hex Socket Head Cap Screw 1 pcs.
(SUS)
304 Stainless Steel

■Sizes and Dimensions

Shaft Bore Dia. Overall Width
(Thickness)
O.D. Fastening Screw Dia.
(Coarse)
Mounting Screw Dia.
(Coarse)
φ10 8 φ30 M3 M3
φ12
φ15
φ16
φ20 φ35
φ25 10 φ42 M4 M4
φ30 12 φ50 M5

* Please see the product pages for dimension details.

Back to page top

Accuracy Info

Shaft Bore Dia. Tolerance: +0.05/+0.01

O.D. Tolerance: ±0.1

Overall Width Tolerance: ±0.1

Back to page top

IDEA NOTE Reverse pneumatic gripper converts linear motion into rotary motion.

The reverse pneumatic gripper uses a cam follower and groove to convert the linear motion of the guided cylinder into rotational motion.

IDEA NOTE Stepper motor helps keep cost down.

A stepper motor and photo micro sensor at the origin enable the rotary motion of the three-claw pneumatic gripper.

IDEA NOTE 揺動自転構造

断面図参照

  • TERMS AND CONDITIONS FOR USE OF CAD DATA
    Your access to the CAD data that MISUMI Corporation (hereinafter referred to as the Company) posts on this site (including 3D CAD data, intermediate 3D CAD data and 2D CAD data; hereinafter referred to as the Data) are of products manufactured and/or sold by the Company (hereinafter referred to as the Products) assumes that you have read and accepted these terms and conditions which govern your use of the Data. If you do not agree to these terms and conditions, you must stop using this website and the Data. You must not use the Data for any unlawful purpose or in any manner inconsistent with these terms and conditions.
    1. CAD Data
    The Data is prepared for assisting the Company's users in the CAD design process by providing dimensions and other Product information. In order to provide the best speed and stability working within this site, the Product drawings were simplified to reduce the size of the Data. For instance, some of the Products are shown without the oil groove shape, screws or spring shape. Also, please be aware that the tolerance, surface roughness and/or chamfer of the Data may vary from the actual Products.
    2. Disclaimer on Data
    While the Company has carefully prepared the Data, accuracy of the Data is not guaranteed and is subject to the variances as described above. The Company may also modify, add or delete the Data at any time without prior notice. The Company assumes no liability for any direct, indirect, consequential or special damages that you may claim resulted from your use of the Data or any changes to or deletions of the Data regardless of the reason. The Company provides no warranty as to the quality, accuracy, functionality, safety or reliability of the combination of Products and parts. Example applications and combinations of the Products are provided for illustrative purposes only.
    3. Copyright
    Copyrights to the content and the Data belong to the Company or the manufacturers of the Products. The said copyright is protected by the Copyright Act and international treaties. The use (including duplication, modification, uploading, posting, transmission, distribution, licensing, sales and publishing) of the Data except for the purpose to use the Data described above without prior approval of the Company is not allowed. The Data cannot be used for any purposes (including sales promotion) except for designing your machine. If you violate this provision or the laws or regulations, the Company may prohibit you from the use of the Data, the Company’s site and/or take legal action. So long as you comply with these terms and conditions, the Company grants to you a non-exclusive, non-transferable, revocable license to access and use the Data for the sole purpose of assisting you in designing machines that incorporate products.
    In case that the CAD data is found to have been to be used for any purpose other than mentioned above or against the related laws, MISUMI may take legal actions, including the one for blocking the involved user from using CAD data and from accessing to the MISUMI site.
    4. Disclaimer of Warranty
    ANY AND ALL CONTENT APPEARING ON THIS WEB SITE IS PROVIDED FOR INFORMATIONAL PURPOSES ONLY. THIS WEB SITE, ITS CONTENT AND ITS LINKS ARE PROVIDED ON AN "AS IS" AND "AS AVAILABLE" BASIS AND ARE USED ONLY AT YOUR SOLE RISK, TO THE FULLEST EXTENT PERMISSIBLE BY LAW. THE COMPANY DISCLAIMS ALL WARRANTIES, EXPRESS OR IMPLIED, OF ANY KIND, REGARDING THIS WEB SITE (INCLUDING ITS CONTENT, HARDWARE, SOFTWARE AND LINKS), INCLUDING AS TO FITNESS FOR A PARTICULAR PURPOSE, MERCHANTABILITY, TITLE, NON INFRINGEMENT, RESULTS, ACCURACY, COMPLETENESS, ACCESSIBILITY, COMPATIBILITY, SECURITY AND FREEDOM FROM COMPUTER VIRUS. THE COMPANY WILL NOT BE LIABLE FOR ANY DAMAGES OR LOSSES, INCLUDING DIRECT, INDIRECT, CONSEQUENTIAL, SPECIAL, INCIDENTAL OR PUNITIVE DAMAGES AND/OR LOST PROFITS, IN CONNECTION WITH USE OF THE INTERNET, THIS WEB SITE, ITS CONTENT OR ITS LINKS
    Further, the Company will not be liable to you for any failure or delay by the Company to provide access to the Data or any of its obligations under these terms and conditions where such failure or delay is the direct or indirect result of any circumstances beyond the Company's reasonable control (and the Company's obligations will be suspended for the duration of such circumstances).
    5. Policy of Third Parties
    You may be required to separately agree to third party's policies if you use third party software to create or browse the Data or use a third party’s CAD data. In this case, the Company does not assume any responsibility for defects of such CAD data or the software of the third party or violation of their rights. Understand them before use.

    CAD Download (Unit Assembly)

    CAD Download: File Format
    生成

    Thank you for downloading the data.

    Click the Good IDEA! button when you find interesting design tips.


    This data is utilized in order to list more useful application examples in the future.

    CAD Data Limitations

    1. Assembly data shows the assembly drawings in the concept design phase. The sole purpose of the data is to explain the structure and functionality of the assembly and is not considered nor to be used as a final design.
      You will need to edit the Data so that it meets your specific design conditions.
    2. Unit assembly Data consists of some sub-assemblies.
      It is configured so that each sub-assembly unit can be used as it is or edited.
    3. * The part in the frame is a sub-assembly unit.

    4. The Data for fabricated parts is based on easy-to-edit dimensions and shapes in sketches and histories.
    5. The Data including the third-part components are made by the Company.

    Page top

  • * Unit assembly Data consists of some sub-assemblies.
       It is configured so that each sub-assembly unit can be used as it is or edited.

Application Overview

Purpose

  • Purpose
    • Gripper reverses and rotates the workpiece as it is laser engraved.
  • Operation
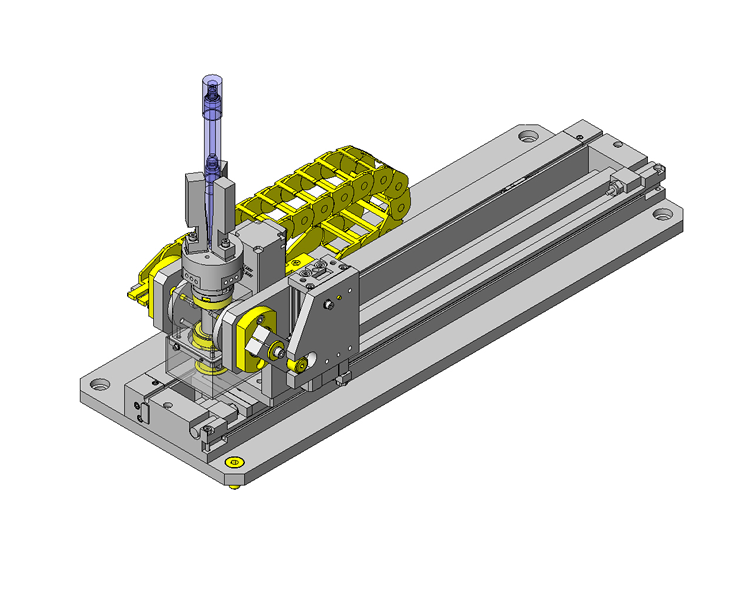
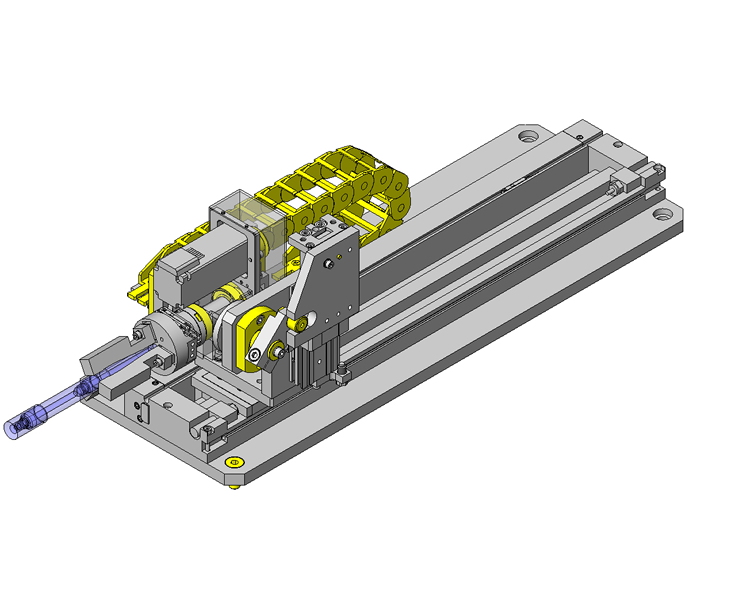
    • Workpieces are transported to the receiving/discharging position by a robot. Once the workpiece is in place, the three-claw pneumatic gripper reverses the part 90° and moves forward into printing position. As the piece is being laser marked, a stepper motor and timing belt rotates the workpiece. When printing is completed, the gripper reverses back 90° into receiving/discharging position and the piece is removed by a robot.

Target workpiece

  • Shape: Bar-shape
  • Workpiece size: φ 12 x L 145 mm
  • Weight: 37 g

Design Specifications

Operating Conditions or Design Requirements

  • Stroke of the three-claw pneumatic gripper: 6 mm
  • Reversing angle: 90°
  • Rotation angle: 90°
  • External size: W 460 x D 165 x H 230 mm

Required Performance

  • Position repeatability accuracy of the three-claw pneumatic gripper: ± 0.1 mm

Design Evaluation

Verification of main components

  • Verify the gripping force of the pneumatic gripper for appropriate workpiece gripping force.
  • Check the gripping force of the three-claw pneumatic gripper
    • Conditional values: Center of gravity of workpiece L1 = 85mm, workpiece gripping point L2 = 59.5 mm, workpiece weight m = 37 g, supply pressure p = 0.5MPa, gravitational acceleration g = 9.8m/s², friction coefficient μ=0.2 (metal vs. metal)
    • Gripping force F1 of the three-claw pneumatic gripper at supply pressure p, and workpiece gripping point L2 is obtained form the graph as F1 = 4.5 N.
      Gripping force on the workpiece F1' = F1 x μ Thus, F1' = 4.5 x 0.2 = 0.9 N
    • Required gripping force F2 is obtained from the balance of the moment as follows.
      Mg×L1=F2×L2
      F2 = Mg x (L1/L2) Thus, F2 = 37 x 10⁻³ x 9.8 x (85/59.5) = 0.518 N
      F1'>F2 Thus, sufficient gripping force is achieved.

Other Design Consideration

  • Install a mechanical stopper to limit the rotation of the three-claw pneumatic gripper below 270°. This stopper serves as a countermeasure against cable entanglement and disconnection.
  • For safety purposes, a cover is installed over the timing belt.

Explore Similar Application Examples

Page - / -

Part List

No. Part Name Sample Picture MISUMI Part Number
For Price and Days to ship click on Part No.
Quantity
1 Ball Bearing SB6902ZZ 2
2 High Torque Timing Pulleys HTPK32S2M060-A-P4 2
3 Locating Pins SJPDSC4-4 2
4 Locating Pins SXST-D3-L13-E1 2
5 Cable Carrier SE08F-30-028-14 1
6 Metal Washers WSSS15-4-2 2
7 Bearing W/ Housing SBGCR6901ZZ 2
8 Low Head Cap Screws CBSST4-10 4
9 Timing Belts HTBN256S2M-60 1
10 Parallel Keys KEDS4-12 1
11 Collars CLBP12-16-5 1
12 Shaft Collars PSDNJ15-8 1
13 Collars CLBP15-19-5.5 1
14 Cam Followers CFUA5-13 1
15 Countersunk Screws SFBJ3-8 8
16 Low Head Cap Screws CBSST8-16 4
17 Dowel Pins MSC3-10 2
  • The part list above only contains MISUMI parts.
    Part list download (CSV) includes MISUMI and third party components used in this example.
  • TERMS AND CONDITIONS FOR USE OF CAD DATA
    Your access to the CAD data that MISUMI Corporation (hereinafter referred to as the Company) posts on this site (including 3D CAD data, intermediate 3D CAD data and 2D CAD data; hereinafter referred to as the Data) are of products manufactured and/or sold by the Company (hereinafter referred to as the Products) assumes that you have read and accepted these terms and conditions which govern your use of the Data. If you do not agree to these terms and conditions, you must stop using this website and the Data. You must not use the Data for any unlawful purpose or in any manner inconsistent with these terms and conditions.
    1. CAD Data
    The Data is prepared for assisting the Company's users in the CAD design process by providing dimensions and other Product information. In order to provide the best speed and stability working within this site, the Product drawings were simplified to reduce the size of the Data. For instance, some of the Products are shown without the oil groove shape, screws or spring shape. Also, please be aware that the tolerance, surface roughness and/or chamfer of the Data may vary from the actual Products.
    2. Disclaimer on Data
    While the Company has carefully prepared the Data, accuracy of the Data is not guaranteed and is subject to the variances as described above. The Company may also modify, add or delete the Data at any time without prior notice. The Company assumes no liability for any direct, indirect, consequential or special damages that you may claim resulted from your use of the Data or any changes to or deletions of the Data regardless of the reason. The Company provides no warranty as to the quality, accuracy, functionality, safety or reliability of the combination of Products and parts. Example applications and combinations of the Products are provided for illustrative purposes only.
    3. Copyright
    Copyrights to the content and the Data belong to the Company or the manufacturers of the Products. The said copyright is protected by the Copyright Act and international treaties. The use (including duplication, modification, uploading, posting, transmission, distribution, licensing, sales and publishing) of the Data except for the purpose to use the Data described above without prior approval of the Company is not allowed. The Data cannot be used for any purposes (including sales promotion) except for designing your machine. If you violate this provision or the laws or regulations, the Company may prohibit you from the use of the Data, the Company’s site and/or take legal action. So long as you comply with these terms and conditions, the Company grants to you a non-exclusive, non-transferable, revocable license to access and use the Data for the sole purpose of assisting you in designing machines that incorporate products.
    In case that the CAD data is found to have been to be used for any purpose other than mentioned above or against the related laws, MISUMI may take legal actions, including the one for blocking the involved user from using CAD data and from accessing to the MISUMI site.
    4. Disclaimer of Warranty
    ANY AND ALL CONTENT APPEARING ON THIS WEB SITE IS PROVIDED FOR INFORMATIONAL PURPOSES ONLY. THIS WEB SITE, ITS CONTENT AND ITS LINKS ARE PROVIDED ON AN "AS IS" AND "AS AVAILABLE" BASIS AND ARE USED ONLY AT YOUR SOLE RISK, TO THE FULLEST EXTENT PERMISSIBLE BY LAW. THE COMPANY DISCLAIMS ALL WARRANTIES, EXPRESS OR IMPLIED, OF ANY KIND, REGARDING THIS WEB SITE (INCLUDING ITS CONTENT, HARDWARE, SOFTWARE AND LINKS), INCLUDING AS TO FITNESS FOR A PARTICULAR PURPOSE, MERCHANTABILITY, TITLE, NON INFRINGEMENT, RESULTS, ACCURACY, COMPLETENESS, ACCESSIBILITY, COMPATIBILITY, SECURITY AND FREEDOM FROM COMPUTER VIRUS. THE COMPANY WILL NOT BE LIABLE FOR ANY DAMAGES OR LOSSES, INCLUDING DIRECT, INDIRECT, CONSEQUENTIAL, SPECIAL, INCIDENTAL OR PUNITIVE DAMAGES AND/OR LOST PROFITS, IN CONNECTION WITH USE OF THE INTERNET, THIS WEB SITE, ITS CONTENT OR ITS LINKS
    Further, the Company will not be liable to you for any failure or delay by the Company to provide access to the Data or any of its obligations under these terms and conditions where such failure or delay is the direct or indirect result of any circumstances beyond the Company's reasonable control (and the Company's obligations will be suspended for the duration of such circumstances).
    5. Policy of Third Parties
    You may be required to separately agree to third party's policies if you use third party software to create or browse the Data or use a third party’s CAD data. In this case, the Company does not assume any responsibility for defects of such CAD data or the software of the third party or violation of their rights. Understand them before use.

    CAD Download (Unit Assembly)

    CAD Download: File Format
    生成

    Thank you for downloading the data.

    Click the Good IDEA! button when you find interesting design tips.


    This data is utilized in order to list more useful application examples in the future.

    CAD Data Limitations

    1. Assembly data shows the assembly drawings in the concept design phase. The sole purpose of the data is to explain the structure and functionality of the assembly and is not considered nor to be used as a final design.
      You will need to edit the Data so that it meets your specific design conditions.
    2. Unit assembly Data consists of some sub-assemblies.
      It is configured so that each sub-assembly unit can be used as it is or edited.
    3. * The part in the frame is a sub-assembly unit.

    4. The Data for fabricated parts is based on easy-to-edit dimensions and shapes in sketches and histories.
    5. The Data including the third-part components are made by the Company.

    Page top

Page top