(!)Due to Microsoft's end of support for Internet Explorer 11 on 15/06/2022, this site does not support the recommended environment.

ideanote
inCAD Library

Please read before use

What is inCAD Library?

  • Helpful application examples for mechanical engineers.

The Concept of inCAD Library

  • Online application library with a range of ideas for all manufacturing industries.
  • Save design time and learn new design applications when you are concepting new machines.

Disclaimer

  • MISUMI may not offer all parts in each application design. Available parts can only be purchased separately not as a unit shown in each application design.
  • MISUMI does not guarantee quality, accuracy, functionality, safety or reliability for the combination of the parts in each application example. Accept these points prior to use.
  • 2014 Copyright MISUMI
  • The data cannot be used for any purposes (including sales promotion) except for designing your machine.
  • All associated CAD is free. Misumi reserves the right at its sole discretion to cancel, terminate or modify this offer.
  • MISUMI may change, add or delete application examples posted without prior notice.
  • MISUMI assumes no responsibilities for any damage incurred resulting from your use of the Service or any change, addition or deletion by MISUMI of the application examples for any reason whatsoever.

inCAD Library Features

  1. Get great new design ideas for these application examples.
  2. Over 300 design application ideas
    collected from dozens of industries!

  3. Find application examples quickly! Search by function, workpiece shape, etc.

  4. Download the CAD models for each application example.
  5. Log in to download free CAD models.
    Download CAD for the entire application example!

Good IDEA! button

Click the Good IDEA! Button when you like an application example!

*Can only be clicked once per application example.

  • Upper right corner on the page of application example details

  • Pop-up dialog for CAD data downloading

Page top

Keyword Search
No. Search
SNS: 

No.000186 Inspection Probe Adjustment Mechanism

Adjustment mechanism by using the right-handed screw and left-handed screw

Relevant category

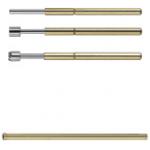
Contact Probes

Product name Contact Probes - NP88, NP88HD Series
Part number NP88-B
* Orange colored cells in the table below indicate the part numbers used in this example.

Selection criteria

Based on workpiece and testing requirements.

Back to page top

Available sizes

■Contact Probes (Minimum Mounting Pitch: 1.5 mm)

Part Name Material Surface Treatment
Plunger W1-9 Tool Steel Rhodium Plating on Nickel Undercoat
Barrel Brass Gold Plating on Nickel Undercoat
Spring SWP Gold plated
Ball 52100 Bearing Steel Gold Plating

■Tip Shape

Tip Shape Min. Mounting Pitch Full Stroke Initial Spring Pressure
A 1.5 2.5 10gf、30gf
B
C
D
E
G
H
J
N

Back to page top

Performance Info.

■Load Info of the Contact Probes (Minimum Mounting Pitch: 1.5 mm)

Spring Pressure Allowable Current Resistance Replacement Cycle (Reference)
Initial 2/3 Stroke
10gf 50gf 1.3A 80mΩ 250,000 times
30gf 100gf

Back to page top

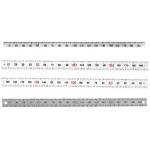
Scale Plates

Product name Scale Plates
Part number MEPCSH-LC90-HC
* Orange colored cells in the table below indicate the part numbers used in this example.

Selection criteria

Allow user to read adjustment value.

Back to page top

Available sizes

■Scale Plates (Horizontal, 304 Stainless Steel)

Width Scale Type Material Plate Thickness Length
8 Zero at Left 304 Stainless Steel 0.5 100・200
Zero at Right 100・200
Center Divided 300
12 Zero at Left 100・200
Zero at Right 100・200
Center Divided 300

* Adhesive tapes are not provided.
Use the O3.4 x 2 screw mounting holes (5 mm from the both ends)

Back to page top

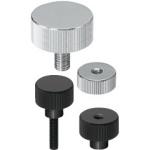
Thick Knurled Knobs

Product name Knurled Knobs - Thick, L Dimension Standard
Part number NKBA3-6-8
* Orange colored cells in the table below indicate the part numbers used in this example.

Selection criteria

Used as manual locking pin.

Back to page top

Available sizes

■Thick Knurled Knobs, Stepped and Threaded, L Fixed

Material Surface Treatment
1212 Carbon Steel Buff Polished + Chrome Plating
303 Stainless Steel Brushed Finish
1212 Carbon Steel Black Oxide

■Sizes and Dimensions

Thread Knob Stepped Shaft Part Mounting
Height
DIA.
(Coarse)
Length O.D. Thickness Diameter Length
6 10 16 20 25 30 40
M3 φ12 5 φ6 5 10
6 11
8 13
12 17
M4 φ16 7 φ8 6 13
9 15
11 17
17 23
M5 φ20 8 φ10 7.5 15.5
10 17.5
12 19.5
26 33.5
M6 φ24 10 φ12 10 20
13 23
15 25
25 35
M8 φ30 12 φ16 12 24
15 27
30 42
M10 φ36 16 φ20 15 31
20 35
40 55

Back to page top

IDEA NOTE Width adjustment by using the right-handed screw and left-handed screw

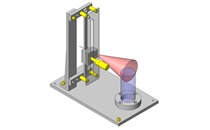
By using the right-handed screw and left-handed screw, probe brackets are moving uniformly from the center.

IDEA NOTE Remove Backlash

Configuration in which a spring is placed in the center part to eliminate backlash.

  • TERMS AND CONDITIONS FOR USE OF CAD DATA
    Your access to the CAD data that MISUMI Corporation (hereinafter referred to as the Company) posts on this site (including 3D CAD data, intermediate 3D CAD data and 2D CAD data; hereinafter referred to as the Data) are of products manufactured and/or sold by the Company (hereinafter referred to as the Products) assumes that you have read and accepted these terms and conditions which govern your use of the Data. If you do not agree to these terms and conditions, you must stop using this website and the Data. You must not use the Data for any unlawful purpose or in any manner inconsistent with these terms and conditions.
    1. CAD Data
    The Data is prepared for assisting the Company's users in the CAD design process by providing dimensions and other Product information. In order to provide the best speed and stability working within this site, the Product drawings were simplified to reduce the size of the Data. For instance, some of the Products are shown without the oil groove shape, screws or spring shape. Also, please be aware that the tolerance, surface roughness and/or chamfer of the Data may vary from the actual Products.
    2. Disclaimer on Data
    While the Company has carefully prepared the Data, accuracy of the Data is not guaranteed and is subject to the variances as described above. The Company may also modify, add or delete the Data at any time without prior notice. The Company assumes no liability for any direct, indirect, consequential or special damages that you may claim resulted from your use of the Data or any changes to or deletions of the Data regardless of the reason. The Company provides no warranty as to the quality, accuracy, functionality, safety or reliability of the combination of Products and parts. Example applications and combinations of the Products are provided for illustrative purposes only.
    3. Copyright
    Copyrights to the content and the Data belong to the Company or the manufacturers of the Products. The said copyright is protected by the Copyright Act and international treaties. The use (including duplication, modification, uploading, posting, transmission, distribution, licensing, sales and publishing) of the Data except for the purpose to use the Data described above without prior approval of the Company is not allowed. The Data cannot be used for any purposes (including sales promotion) except for designing your machine. If you violate this provision or the laws or regulations, the Company may prohibit you from the use of the Data, the Company’s site and/or take legal action. So long as you comply with these terms and conditions, the Company grants to you a non-exclusive, non-transferable, revocable license to access and use the Data for the sole purpose of assisting you in designing machines that incorporate products.
    In case that the CAD data is found to have been to be used for any purpose other than mentioned above or against the related laws, MISUMI may take legal actions, including the one for blocking the involved user from using CAD data and from accessing to the MISUMI site.
    4. Disclaimer of Warranty
    ANY AND ALL CONTENT APPEARING ON THIS WEB SITE IS PROVIDED FOR INFORMATIONAL PURPOSES ONLY. THIS WEB SITE, ITS CONTENT AND ITS LINKS ARE PROVIDED ON AN "AS IS" AND "AS AVAILABLE" BASIS AND ARE USED ONLY AT YOUR SOLE RISK, TO THE FULLEST EXTENT PERMISSIBLE BY LAW. THE COMPANY DISCLAIMS ALL WARRANTIES, EXPRESS OR IMPLIED, OF ANY KIND, REGARDING THIS WEB SITE (INCLUDING ITS CONTENT, HARDWARE, SOFTWARE AND LINKS), INCLUDING AS TO FITNESS FOR A PARTICULAR PURPOSE, MERCHANTABILITY, TITLE, NON INFRINGEMENT, RESULTS, ACCURACY, COMPLETENESS, ACCESSIBILITY, COMPATIBILITY, SECURITY AND FREEDOM FROM COMPUTER VIRUS. THE COMPANY WILL NOT BE LIABLE FOR ANY DAMAGES OR LOSSES, INCLUDING DIRECT, INDIRECT, CONSEQUENTIAL, SPECIAL, INCIDENTAL OR PUNITIVE DAMAGES AND/OR LOST PROFITS, IN CONNECTION WITH USE OF THE INTERNET, THIS WEB SITE, ITS CONTENT OR ITS LINKS
    Further, the Company will not be liable to you for any failure or delay by the Company to provide access to the Data or any of its obligations under these terms and conditions where such failure or delay is the direct or indirect result of any circumstances beyond the Company's reasonable control (and the Company's obligations will be suspended for the duration of such circumstances).
    5. Policy of Third Parties
    You may be required to separately agree to third party's policies if you use third party software to create or browse the Data or use a third party’s CAD data. In this case, the Company does not assume any responsibility for defects of such CAD data or the software of the third party or violation of their rights. Understand them before use.

    CAD Download (Unit Assembly)

    CAD Download: File Format
    生成

    Thank you for downloading the data.

    Click the Good IDEA! button when you find interesting design tips.


    This data is utilized in order to list more useful application examples in the future.

    CAD Data Limitations

    1. Assembly data shows the assembly drawings in the concept design phase. The sole purpose of the data is to explain the structure and functionality of the assembly and is not considered nor to be used as a final design.
      You will need to edit the Data so that it meets your specific design conditions.
    2. Unit assembly Data consists of some sub-assemblies.
      It is configured so that each sub-assembly unit can be used as it is or edited.
    3. * The part in the frame is a sub-assembly unit.

    4. The Data for fabricated parts is based on easy-to-edit dimensions and shapes in sketches and histories.
    5. The Data including the third-part components are made by the Company.

    Page top

  • * Unit assembly Data consists of some sub-assemblies.
       It is configured so that each sub-assembly unit can be used as it is or edited.

Application Overview

Purpose

  • Purpose
    • Test unit that can handle various size workpieces by adjusting the position of inspection probes.
  • Operation
    • Changes the distance between probes (probe mounting brackets) by operating right/left hand lead screws. Depending on which direction the lead screw knob is turned, the probe mounting brackets are closing in or moving out from each other.

Points for use

  • Capable to adjust the probe distance from 2 mm to 22 mm.

Target workpiece

  • Shape: Circuit board
  • Size: W 240 x D 140 mm

Design Specifications

Operating Conditions or Design Requirements

  • External dimensions: W 100 x D 180 x H 74 mm
  • Probe adjustment distance: 2 mm - 22 mm

Required Performance

  • Accuracy: ± 0.1 mm
  • Probe stroke: 2.5 mm
  • Probe load: 50 gf (2/3 stroke)

Selection Criteria for Main Components

  • Linear guide
    • Select a linear guides that can handle the load at the probe contact (initial selection is size 10)
  • Compression spring
    • To remove any backlash

      Backlash is a clearance in a mechanism caused by gaps between the parts.

      when positioning inspection pins and during testing.

Design Evaluation

Verification of main components

  • Select motor based on load moment.
  • Motor selection
    • Conditional values:
    • Motor shaft allowable moment of inertia: 1.25 × 10⁻⁵ kg・ (catalogue value)
    • Reduction ratio: 12.5
    • Load total moment of inertia: 5.8 × 10⁻⁵ kg・ 
      1.25 x 10⁻⁵ x 12.5 > 5.8 x 10⁻⁴ Thus, no problem.
    • t = 1.0 s, N =120 rpm (reduction ratio: 12.5), and J = 5.8 kg・c 
      Load torque T=J x N/9.55 x 10-4 x t , T= 7.3×10⁻³
    • Allowable torque: 0.98 N・m
      7.3×10⁻³ < 0.98
      ⇒Thus, meeting the condition.

Other Design Consideration

  • Reducing operation force by adopting a fine screw thread.
  • Adopting a scale with 0 at the center to read the distance value.

Explore Similar Application Examples

Page - / -

Part List

No. Part Name Sample Picture MISUMI Part Number
For Price and Days to ship click on Part No.
Quantity
1 Contact Probes NP88-B 2
2 Contact Probes NR88 2
3 Scale Plates MEPCSH-LC90-HC 1
4 Linear Guides SSE2BSZ10-95 1
5 Deep Groove Ball Bearings SFL675ZZ 3
6 Knurled Knobs NKBA3-6-8 1
7 Compression Springs WY10-40 1
8 Washers for Compression Springs SPGCS12-9-6 2
10 Flat Head Cap Screws SFB3-6 4
11 Hex Socket Set Screws MSSTS3-5 2
12 Dowel Pins MSCSS3-8 2
  • The part list above only contains MISUMI parts.
    Part list download (CSV) includes MISUMI and third party components used in this example.
  • TERMS AND CONDITIONS FOR USE OF CAD DATA
    Your access to the CAD data that MISUMI Corporation (hereinafter referred to as the Company) posts on this site (including 3D CAD data, intermediate 3D CAD data and 2D CAD data; hereinafter referred to as the Data) are of products manufactured and/or sold by the Company (hereinafter referred to as the Products) assumes that you have read and accepted these terms and conditions which govern your use of the Data. If you do not agree to these terms and conditions, you must stop using this website and the Data. You must not use the Data for any unlawful purpose or in any manner inconsistent with these terms and conditions.
    1. CAD Data
    The Data is prepared for assisting the Company's users in the CAD design process by providing dimensions and other Product information. In order to provide the best speed and stability working within this site, the Product drawings were simplified to reduce the size of the Data. For instance, some of the Products are shown without the oil groove shape, screws or spring shape. Also, please be aware that the tolerance, surface roughness and/or chamfer of the Data may vary from the actual Products.
    2. Disclaimer on Data
    While the Company has carefully prepared the Data, accuracy of the Data is not guaranteed and is subject to the variances as described above. The Company may also modify, add or delete the Data at any time without prior notice. The Company assumes no liability for any direct, indirect, consequential or special damages that you may claim resulted from your use of the Data or any changes to or deletions of the Data regardless of the reason. The Company provides no warranty as to the quality, accuracy, functionality, safety or reliability of the combination of Products and parts. Example applications and combinations of the Products are provided for illustrative purposes only.
    3. Copyright
    Copyrights to the content and the Data belong to the Company or the manufacturers of the Products. The said copyright is protected by the Copyright Act and international treaties. The use (including duplication, modification, uploading, posting, transmission, distribution, licensing, sales and publishing) of the Data except for the purpose to use the Data described above without prior approval of the Company is not allowed. The Data cannot be used for any purposes (including sales promotion) except for designing your machine. If you violate this provision or the laws or regulations, the Company may prohibit you from the use of the Data, the Company’s site and/or take legal action. So long as you comply with these terms and conditions, the Company grants to you a non-exclusive, non-transferable, revocable license to access and use the Data for the sole purpose of assisting you in designing machines that incorporate products.
    In case that the CAD data is found to have been to be used for any purpose other than mentioned above or against the related laws, MISUMI may take legal actions, including the one for blocking the involved user from using CAD data and from accessing to the MISUMI site.
    4. Disclaimer of Warranty
    ANY AND ALL CONTENT APPEARING ON THIS WEB SITE IS PROVIDED FOR INFORMATIONAL PURPOSES ONLY. THIS WEB SITE, ITS CONTENT AND ITS LINKS ARE PROVIDED ON AN "AS IS" AND "AS AVAILABLE" BASIS AND ARE USED ONLY AT YOUR SOLE RISK, TO THE FULLEST EXTENT PERMISSIBLE BY LAW. THE COMPANY DISCLAIMS ALL WARRANTIES, EXPRESS OR IMPLIED, OF ANY KIND, REGARDING THIS WEB SITE (INCLUDING ITS CONTENT, HARDWARE, SOFTWARE AND LINKS), INCLUDING AS TO FITNESS FOR A PARTICULAR PURPOSE, MERCHANTABILITY, TITLE, NON INFRINGEMENT, RESULTS, ACCURACY, COMPLETENESS, ACCESSIBILITY, COMPATIBILITY, SECURITY AND FREEDOM FROM COMPUTER VIRUS. THE COMPANY WILL NOT BE LIABLE FOR ANY DAMAGES OR LOSSES, INCLUDING DIRECT, INDIRECT, CONSEQUENTIAL, SPECIAL, INCIDENTAL OR PUNITIVE DAMAGES AND/OR LOST PROFITS, IN CONNECTION WITH USE OF THE INTERNET, THIS WEB SITE, ITS CONTENT OR ITS LINKS
    Further, the Company will not be liable to you for any failure or delay by the Company to provide access to the Data or any of its obligations under these terms and conditions where such failure or delay is the direct or indirect result of any circumstances beyond the Company's reasonable control (and the Company's obligations will be suspended for the duration of such circumstances).
    5. Policy of Third Parties
    You may be required to separately agree to third party's policies if you use third party software to create or browse the Data or use a third party’s CAD data. In this case, the Company does not assume any responsibility for defects of such CAD data or the software of the third party or violation of their rights. Understand them before use.

    CAD Download (Unit Assembly)

    CAD Download: File Format
    生成

    Thank you for downloading the data.

    Click the Good IDEA! button when you find interesting design tips.


    This data is utilized in order to list more useful application examples in the future.

    CAD Data Limitations

    1. Assembly data shows the assembly drawings in the concept design phase. The sole purpose of the data is to explain the structure and functionality of the assembly and is not considered nor to be used as a final design.
      You will need to edit the Data so that it meets your specific design conditions.
    2. Unit assembly Data consists of some sub-assemblies.
      It is configured so that each sub-assembly unit can be used as it is or edited.
    3. * The part in the frame is a sub-assembly unit.

    4. The Data for fabricated parts is based on easy-to-edit dimensions and shapes in sketches and histories.
    5. The Data including the third-part components are made by the Company.

    Page top

Page top